Advent Calendar
prusaprinters
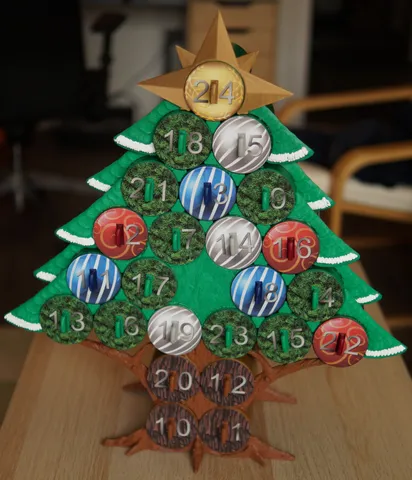
Hi,I build this advent calendar, made from PVC-pipe and 3D-printed parts, and thought someone may like it.Dimensions53x48x16cmInstructions:The main Body is constructed from PVC-pipes with an outer diameter of 63mm and an inner diameter of about 65.5mm.Saw the PVC into 24 tubes with a length of 155mm.Then glue the pipes into the shape of the top part (green) and the trunk part (brown).I used PVC glue, which also works great for PLA.I recommend to first glue smaller chunks of 2-3 tubes and then glue these together when the glue dried.The next step is to spray-paint the top part green, the bottom part brown, and to glue them together when the paint is dry.You can then print all the additional parts, see part list below.The tolerances for the inserts, lids and back caps are important, so make test prints before you print all of them.One issue, I encountered, were some deviations in the inner diameter of the PVC pipe. Therefore, I added stl files for lids 0.1mm lager/smaller Diameter (lid+01.stl/lid-01.stl) as well as step files for the lids on the front and caps on the back.All parts can be printed without supports, however the lids may come out nicer with supports enabled.If you decide to print the lids with support, make sure to add a support-blocker in the center so that only the outer rim is supported.When you have successfully printed all the parts, you can glue to the tubes.I recommend to start with the large and mid-size inserts, which are to be glued in the corresponding holes between the tubes.Proceed with the small insert, these are a bit finicky, so take your time.Then glue the back caps in place.Glue the backsides to the roots and branches, and then glue them to the tubes.Next is the star on top and the leafs.The “snow” on the leafs visible in the picture was created manually using a 3D-pen.The last step is to assemble the drawers.First print the decals and cut them out.Glue them to the Lids with glue stick.I also added decals without numbers, so you can make your own.Finally, insert the drawer into the lid and secure them together with 3 pieces of filament (ca. 10-15mm long) for reference, look at the picture.Part list:4m PVC pipePVC glue2x big_insert.stl4x medium_insert.stl38x small_insert.stl5x leaf.stl5x leaf_mirrored.stl2x branch.stl2x branch_mirrored.stl2x branch_back.stl2x branch_back_mirrored.stl2x root2.stl1x root1.stl1x root1_mirrored.stl1x root1_back_01.stl1x root1_back_02.stl1x root1_back_01_mirrored.stl1x root1_back_02_mirrored.stl1x star.stl24x back_cap.stl24x lid.stl24x drawer.stlSawing toolAdditionally, I created a simple jig to saw the tubes to a consistent length.Print the saw_tool_front.stl and the saw_tool_back.stl and remove the supports from saw_tool_front.stl (no additional support necessary).Then assemble them with some wooden strips according to the reference picture.The wood should be of rectangular cross-section (10x25mm) and about 173mm long.The wood should also be fixed in place with some small screws.
With this file you will be able to print Advent Calendar with your 3D printer. Click on the button and save the file on your computer to work, edit or customize your design. You can also find more 3D designs for printers on Advent Calendar.