Adjustable Wheel Chair for Dog (Branco Project)
thingiverse
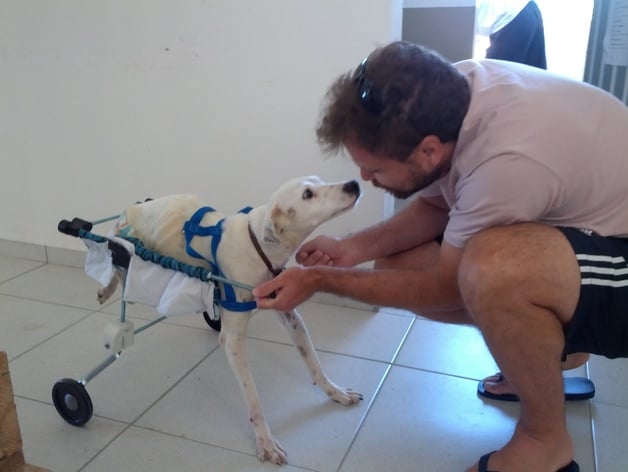
Here are the instructions for building a wheelchair for dogs. To adjust the size of this wheelchair, you can simply screw or unscrew the parts and trim the endless screws when you're done. For extra stability, try soldering those screws to the bolts. This wheelchair can be used with either bicycle training wheels or large printed wheels - check out some photos online. You might find it interesting to read a story about how one dog's owner used a 3D-printed wheelchair for their pet. The link is http://3dprint.com/18651/3d-printed-dog-wheelchair/ Now let's move on to the building instructions: If you're printing out the large wheel, be sure to use PLA and add a @pause instruction at the start of the top axis layer so that you can put in the ball bearing. This way, your printer will continue to build the wheel with the bearing already inside. Once the ball bearing is securely in place, go ahead and attach the additional ring that's printed on the first layer - this will help the next layers stick better. To do this, try inserting a G1 X0 Y0 @pause at the end of your 37th layer (when you're printing with a 0.3mm layer thickness). When your printer pauses, move it away from the bearing and insert the bearing itself. When you've got that done, continue printing and don't forget to use an alert function in Repetier - it will remind you when you can resume. When printing out the tire, it's worth noting that flexible filament works well - but you can also try wrapping high-tension rubber tape around your wheel if that's easier. And as for wheels, they might just do better with some bike training wheels instead. We're looking forward to releasing our fabric bed guide very soon. For attaching your dog to the wheelchair, we've provided a few helpful details: one meter of velcro will do it. Attach this with a holder and place the velcro on the dog's chest. Don't forget that this comes equipped with a top holder - for safety. Your final bit is threading 8mm diameter rods with 14 bolts in all. And you should probably look up those large ball bearings first; we want to ensure they're exactly right for the task, measuring 26mm externally. Here are some last reminders: Big wheel prints work with PLA material. After finishing your axis layers, insert the GLCODE pause instruction so you can place that ball bearing and finish printing it off. Tire is great on Flexible Filament but a high tension rubber tape works too if need be. Bicycle training wheels might just make things easier. If the Dog doesn't fit good to wheelchair fix it to him by one meter Velcro for his chest 8mm Rod Diameter threader included with bolts. The last photo holds more.
With this file you will be able to print Adjustable Wheel Chair for Dog (Branco Project) with your 3D printer. Click on the button and save the file on your computer to work, edit or customize your design. You can also find more 3D designs for printers on Adjustable Wheel Chair for Dog (Branco Project).