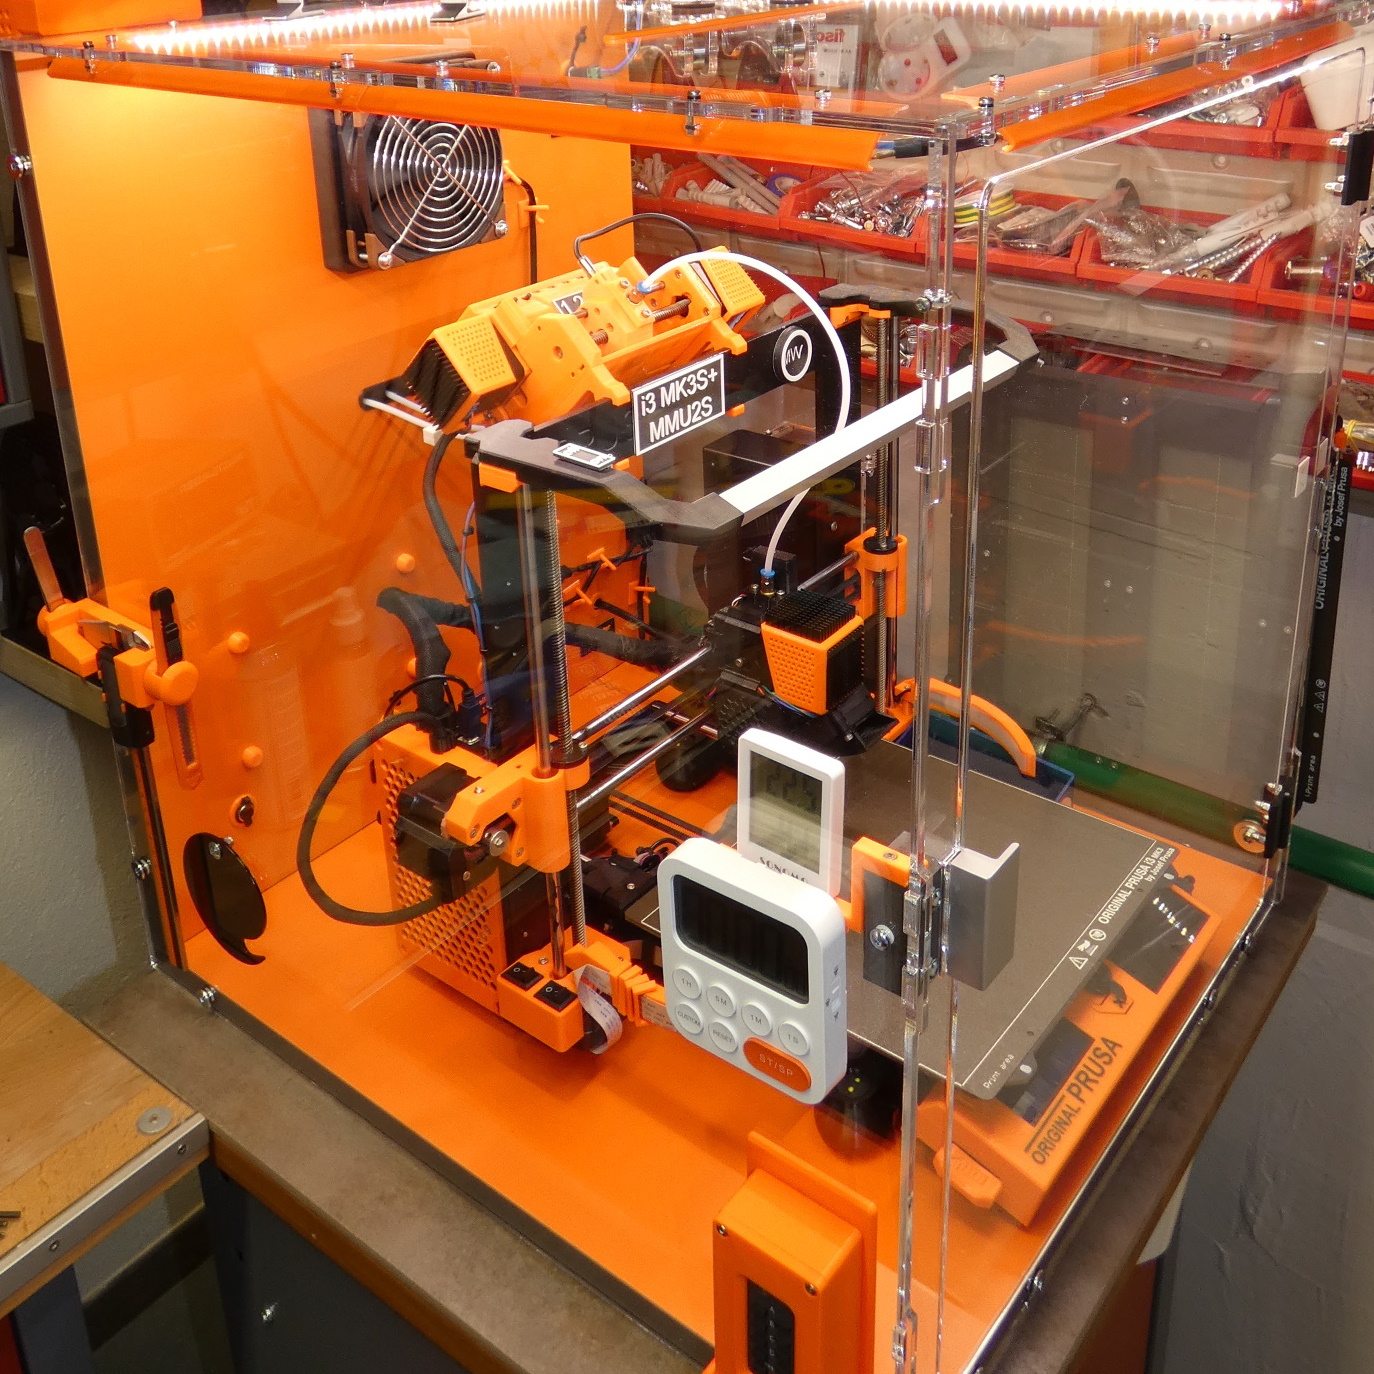
Addons for a Tukkari TLX enclosure
prusaprinters
<p>I found out that an enclosure isn't only good for printing ABS / ASA or protecting the printer from dust, but it also can be used to organize things you need for 3D printing.</p><p>I used the sides of the Tukkari TLX enclosure to attach different holders for tools, remote power switch, timer, e.t.c.</p><p>Note: Not all of the addons are straight forward and require some practical skills for example drilling through the plywood.</p><p> </p><h4><strong>#1 remote (back of the enclosure)</strong></h4><p>For the printing I need different power supplies (230V AC printer, 24V DC LED light, 12V DC fans, 5V DC pi) and I don’t want to switch them on separately but at once. I mounted a remote power strip on the back of the enclosure and put the remote in an extra housing. The buttons are now lower than the surface of the housing and prevent an accidently press.</p><p>1 x Brennenstuhl Eco-Line power strip</p><p>6 x M5x30 countersunk screw and nuts</p><p>1 x a1_remote_box_top.stl</p><p>1 x a2_remote_box_bottom.stl</p><p>1 x a3_remote_control_holder_w_holes.stl or a4_remote_control_holder_wo_holes.stl</p><p>6 x a5_M5_nut_cap.stl</p><p>3 x a6_holder_power_strip.stl</p><p> </p><p>Hint: It is not necessary to drill holes for the remote control holder trough the acrylic. You can use power strips from Tesa or Pattex.</p><h4><strong>#2 timer and thermometer (left side - remix)</strong></h4><p>The timer is hold in place by two neodym magnets. The magnets are integrated in a holder which is mounted inside the enclosure. Also a thermometer is added. I recommend to glue in the neodym magnets.</p><p>1 x M3x15 screw</p><p>2 x neodym magnet 1x1x1cm</p><p>1 x magnet d=8mm</p><p>1 x thermo_hygro_meter_SONOMO</p><p>1 x timer_LIORQUE</p><p>1 x b1_timer_and_thermometer.stl</p><p>remix: <a href="https://www.thingiverse.com/thing:4690332">Tukkari Thermometer by Weazel - Thingiverse</a></p><h4><strong>#3 DC power jack</strong></h4><p>Very carefully drill through the plywood panel with a 18mm drill. The holes can be covered up with the feedtrough.stl part. The cable clip can be used to organise wires inside the enclosure, use power strips to attach them.</p><p>5 X DC Power Jack Socket 5,5 X 2,1 mm</p><p>10 x DC connectors (see picture)</p><p>1 x 18mm wood drill </p><p>10 x c1_feedthrough.stl</p><p>c2_cable_clip.stl</p><h4>#4 LED light and fan</h4><p>The LED strip holder is a remix, it can be found here: <a href="https://www.thingiverse.com/thing:2284126">LED light strip holder by sb43201 - Thingiverse</a></p><p>approx. 2m LED strip (I used 12mm / 24V)</p><p>4 x d1_LED_light_20cm.stl (2xfront and 2xback side)</p><p>4 x d2_LED_light_25cm.stl (2xright and 2xleft side)</p><p>16 x M3x10 </p><p>16 x M3 nuts</p><p>The fan holder is a remix, it can be found here: <a href="https://www.thingiverse.com/thing:4874524">Tukkari TS Prusa Mk3s cooling enclosure duct for PSU V2 by interceptoriii - Thingiverse</a></p><p>1 x 40x10mm fan</p><p>1 x d3_cooling_fan.stl</p><p>4 x M3x20 </p><p>4 x M3 nuts</p><h4>#5 accessories</h4><p>The toolbox is a remix, it can be found here: <a href="https://www.thingiverse.com/thing:3060616">Prusa MK3 Tool Holder by TheClarkJB - Thingiverse</a></p><p>The calliper mount is a remix, it can be found here: <a href="https://www.thingiverse.com/thing:3085101">Calliper Wall Support by Franks3dShop - Thingiverse</a></p><p>The clip is a remix, it can be found here: <a href="https://www.thingiverse.com/thing:1212828">Chip Bag Clip V7 by srwilson58 - Thingiverse</a></p><h4>#6 door stop (magnetic)</h4><h4>#7 double USB port (printer & pi)</h4>
With this file you will be able to print Addons for a Tukkari TLX enclosure with your 3D printer. Click on the button and save the file on your computer to work, edit or customize your design. You can also find more 3D designs for printers on Addons for a Tukkari TLX enclosure.
