ACK60 ANSI Keyboard - Underglow case and Alps plate
prusaprinters
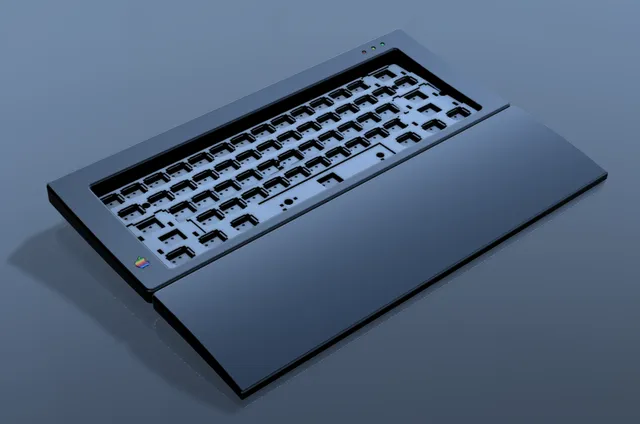
Important notice Thoses models cannot be used with a Apple Extended Keyboard ISO version (e.g. The azerty one). All the switchs location are shifted and required both different plate design and case design (Holes aren't compatible with standard 60% tray mount case). This is designed for a USB-C connector. All thoses plates are designed for Alps switchs or clones, not Cherry MX clones. Introduction Hi there, This is 60% keyboard called Apple Compact Keyboard based on the Apple Extended Keyboard case ANSI version. The case is designed for underglow with a Resin Epoxy bottom layer. You can basically re-use a used AEK keyboard to salvage switchs and caps, and choose multiples ways to build your own : Only use the standard traymount design case and use any 60% PCB, switchs and keycaps. If so please verify the holes location. (PCB examples AEK64 from Hasu or GH60 etc) Only use the plate to fit a AEK60% ANSI into another 60% tray mount case. Use the plate version designed to fit with an Alps 60% PCB (AEK60 ANSI from Hasu or Tweezy 60% from Applet), Use the « PlateCB » to handwire a custom keyboard. Use the « PlateCB » to handwire a custom keyboard with Postage PCB or Postage Mini PCB. Also both the plate and case are designed to be printed in one or two piece. This option is here for thoses with a small printer. Parts to print It really depend of your project and your printer… Parts that you need AEK ANSI : Alps Switchs, keycaps, stabs. Probably Screw. A teensy / Postage mini / Postage or a well designed PCB Tools A 3d printer Screwdiver Tweezer. Epoxy resin. A4 plastic folder. A hot glue gun with cheap glue. A dremel can really help. Cutter knife. Insert threads. Solder Iron (for insert threads). Instruction The printing process is really straight forward. Just choose what you need in term of plate. If you want a PCB then be carefull to not take the PlateCB design. The plastic plate will be too thick and your soldering process will be hard to do. Use inserts threads on the case, be gentle and don't push the temp too hard. Time is our allie on that. About the 3 leds, just isolate them and solder 2 wire on them. You just have to solder them on the board. For the back of the case wich is transparent, you will need epoxy resin and patience. Basically what you want to do is isolating the top of the back with twos rectangles of plastic (that why you need a plastic folder) that you need to perfectly join with hot glue. When perfectly Joined, reverse the case (top need to be on the ground which some support to help), and just apply the resin in a way that the resin have to fill every hole and stick on the plastic folder. Let dry the resin, and then you have to remove the plastic folder. Based on my test it's a very convenient tway to do. I tried to fill the resin directly on a glass and it was really hard to remove. About the glue, you will need to remove it after. It's supposed to be very easy on PLA and plastic but it really depend of the plastic folder that you choose. Good luck. Category: Other
With this file you will be able to print ACK60 ANSI Keyboard - Underglow case and Alps plate with your 3D printer. Click on the button and save the file on your computer to work, edit or customize your design. You can also find more 3D designs for printers on ACK60 ANSI Keyboard - Underglow case and Alps plate.