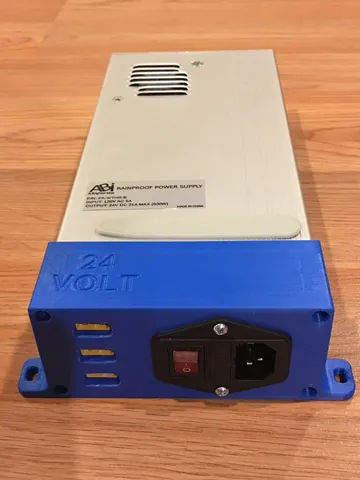
ABI 24V 500W Power Supply Cover Plate - REMIX
prusaprinters
This REMIX of mrpaulwoods design uses a different switch assembly. v1 has a horizontal switch, v2 has a vertical switch. Both v1 and v2 have mounting wings. Purchase Items: ABI PSU - https://www.amazon.com/gp/product/B01IU8QBCO Switch Assy. - https://www.amazon.com/gp/product/B00ME5YAPK XT60 Connectors - https://www.amazon.com/gp/product/B07CWF8CRX 12 AWG Wire - https://www.amazon.com/gp/product/B00TG1TSUC Notes: ABI PSU - Fan can get noisy, so plan on replacing it at some point. All three 24v taps are on the same rail. total is 500W 12 AWG Wire - Can use automotive 12 AWG wire, but the silicon wire is more flexible. XT60 connectors - Makes it nice and easy for adding components. STL Notes: I printed in PLA. The initial prototype tests made to test XT60 clips worked well with no issues and the XT60 slipped into the opening nicely. After printing the entire case, one clip from each XT60 snapped off, and there is a tight interference fit between the case and the XT60 connectors. If you have issues, just add a spot of glue to hold the XT60 connectors to the case. PETG offers more flex, so it might be the better material to use. Assembly Notes: Remove aluminum end-plate by connector rail, save the 4 screws for securing the case to the PSU Solder lengths of 12AWG wire to each XT60 terminal and snap on end cap. I put the red wire on the square end (left side). Fasten fork spade connectors on the other end of each wire. Make 3 sets. Slide XT60 connector into the cover plate from the side. Be careful not to push too hard or clip can snap off. Might try warming up the clip area just before assembly. Wire up the switch assembly. Use 14-18AWG wire from a PC extension cord if you need wire. Fasten fork spade connectors to the end of each HOT, NEUTRAL, and GROUND. Assemble to cover plate using two #6-32 screws or similar metric size. Screw down each fork space connector to the corresponding terminal on the PSU. Carefully route wires into PSU/Cover Plate and screw cover plate to PSU using the four screws that held on the aluminum plate. Print Settings Printer: Anet A8 Rafts: No Supports: No Resolution: 0.2 to 0.3mm Infill: 35% Cubic Filament: 3D Solutech PLA Category: 3D Printing
With this file you will be able to print ABI 24V 500W Power Supply Cover Plate - REMIX with your 3D printer. Click on the button and save the file on your computer to work, edit or customize your design. You can also find more 3D designs for printers on ABI 24V 500W Power Supply Cover Plate - REMIX.
