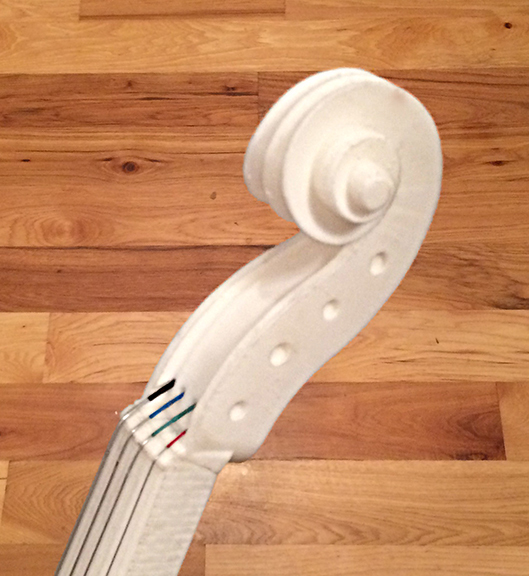
A Scroll 'ello for your O'cello
prusaprinters
<p>I really wanted a scroll for the O'Cello so I found this wonderful violin print designed by bchan based on a Stradivarius and scaled it up to use as a base model to design and build the scroll. <a href="https://pinshape.com/items/24608-3d-printed-violin">https://pinshape.com/items/24608-3d-printed-violin</a> Also, since there were no major changes, if you have already printed an O'cello, you can easily swap to this design as well.</p> <p>First I had to make them mate up. I redesigned the top of the neck and the bottom of the scroll. I wanted a joint that had a mechanical fit and I also wanted to integrate the through holes for the strings.</p> <p>This all took a fair bit of work to design, but the real challenge was to generate an FDM printable scroll. I tried a couple of orientations and supports systems, but everything came out ugly, until I had the idea for integrated support.</p> <p>This is a challenging print, but with a little filing and sanding, the result is worth it.</p> <p>I have included a "fit testing" file that just has the basic joint. You can use this to test your print settings or practice filing. Trust me, you should print this first, just to make sure!</p> <p>Scroll further down the page for printing tips!</p> <p>In hindsight, the design for the scroll join may be more complicated than it needs to be, but I am a former woodworker and like dovetails! The complicated support stand is an absolute must to get a decent print for a filament printer. After all the work, I was happy to get it working and am going to leave it as is.</p> <h3>Print Settings</h3> <p><strong>Printer Brand:</strong></p> <p>MakerGear</p> <p><strong>Printer:</strong></p> <p>MakerGear M2</p> <p><strong>Rafts:</strong></p> <p>Yes</p> <p><strong>Supports:</strong></p> <p>Yes</p> <p><strong>Resolution:</strong></p> <p>.20-.25mm</p> <p><strong>Infill:</strong></p> <p>30%</p> <p><strong>Notes:</strong></p> <p>You will need supports on both pieces. I used 4 perimeters and 3 tops and bottoms</p> <p>On the neck piece, make sure there is support generated where the M5 nut is located and also inside the dovetail. You don't need it anywhere else. You don't need a raft for this piece.</p> <p>On the scroll, use the "full print" model. Also, use supports generated from the build platform only and just under the scroll, you don't need them elsewhere. I have included the support base and scroll as separate models if you need to customize the fit. The full print model has a .25mm separation from support base to scroll. I did my print with the support touching the scroll, but it was very hard to remove, so I left a small gap to ease separation.</p> <p>You should use a simple 2 layer raft for the scroll as bonding insurance. The scroll print is tall and the printhead can generate enough leverage to knock it over. It is a four hour print for the scroll, so a few minutes extra of insurance won't hurt.</p> <p>You need to have good support settings and a well-tuned printer. This is print will not tolerate sloppiness.</p> <h3>Post-Printing</h3> <p>You will have to do some light filing and sanding to get the right fit. Take off the minimum you need to flatten the mating surfaces.</p> <p>The dovetail needs some light cleanup filing, but be careful and test the fit as you go. When done right it will be tight to start, but can be press fit by hand, then snap into place. Be careful the dovetail may seem hard to fit, but will get easier once it gets going. If you make it too loose at the entry point it will be very loose by the time it is fully mated.</p> <p>Also, you will want to test fit the parts on the 12mm rod before assembly, maybe ream out the long hole with a drill bit so you don't have to force anything.</p> <p>This joint MUST be glued up. You could probably use superglue or epoxy to assemble this. I would caution against superglue so you have some working time.</p> <p>I used this plastic glue. https://www.amazon.com/gp/product/B00JFPF0UQ/ref=od_aui_detailpages00?ie=UTF8&psc=1</p> <p>It is super thin and melts the PLA. Once dry, the joined PLA is a solid piece. It is nasty stuff, but did a perfect job.</p> Category: Music
With this file you will be able to print A Scroll 'ello for your O'cello with your 3D printer. Click on the button and save the file on your computer to work, edit or customize your design. You can also find more 3D designs for printers on A Scroll 'ello for your O'cello.
