A REALLY COOL coffee table
prusaprinters
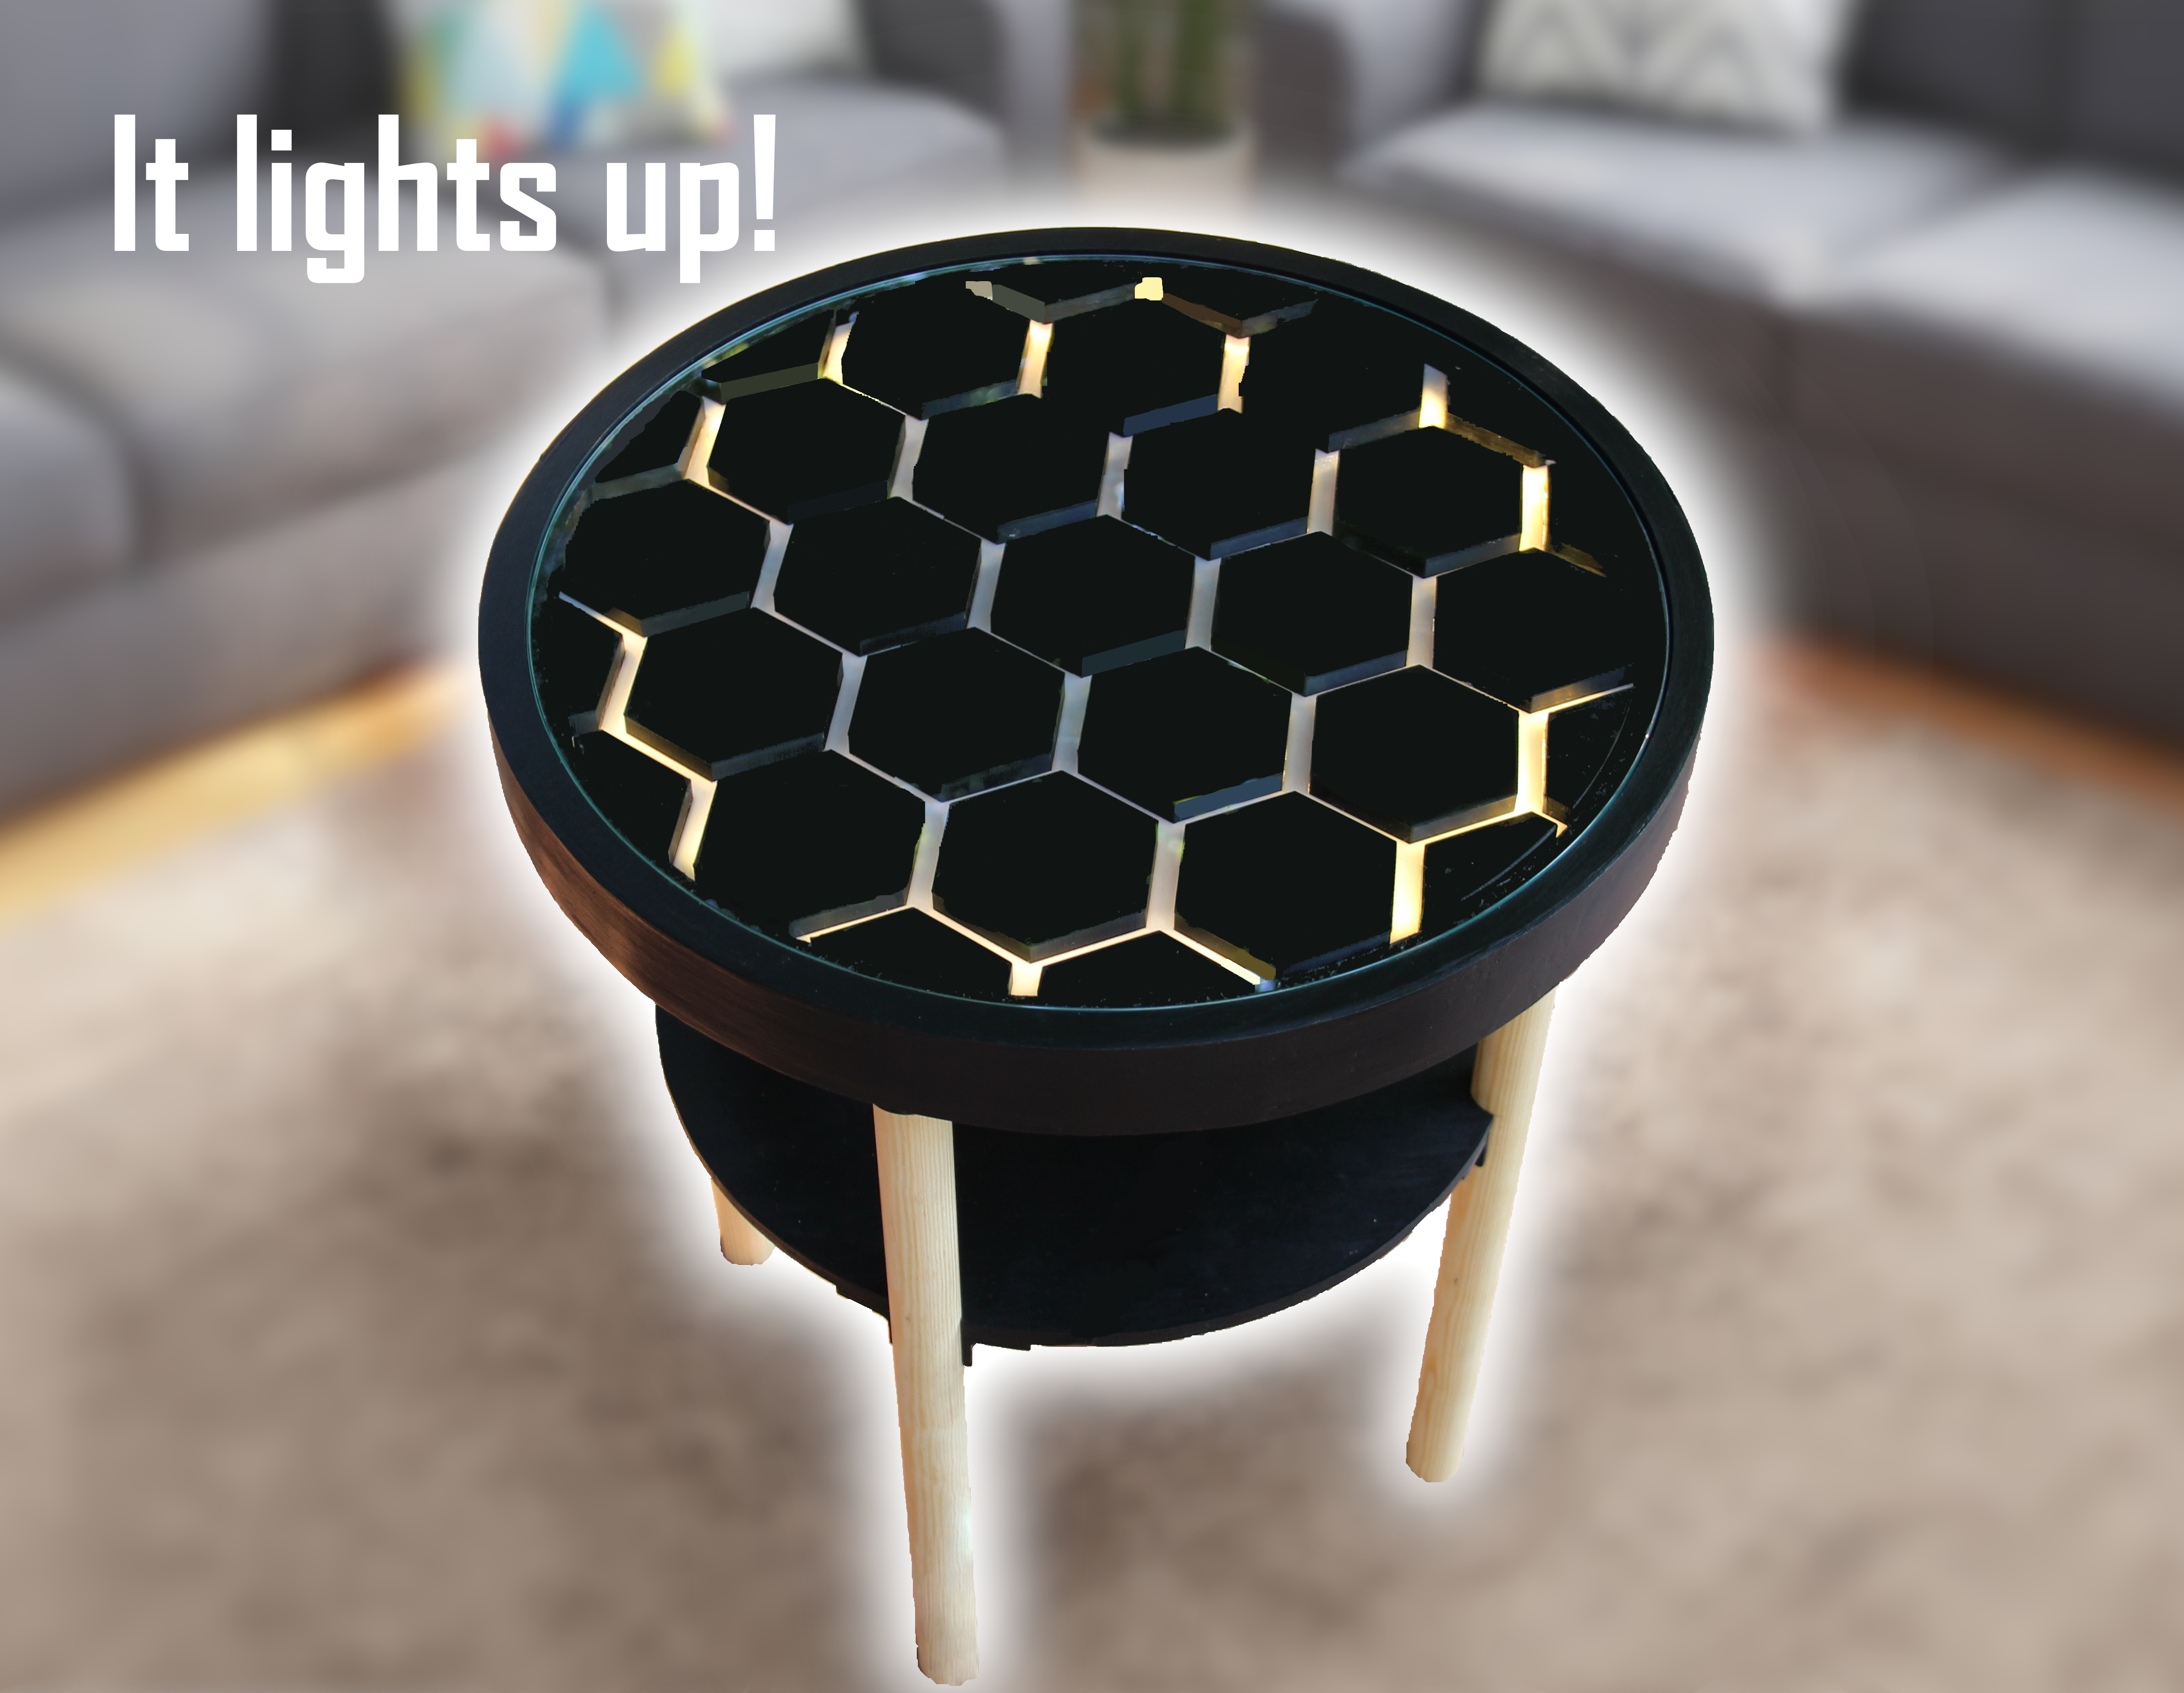
<p> </p><h3> <i>!!! NOT RECOMENDED TO BUILD!!!</i></h3><p> The curent design is very hard to replicate, thus I'm working on a simpler version 2.</p><h3> </h3><h3> A VERY COOL coffee table</h3><p><strong>Quick overview:</strong></p><p><i>Hi, this is <strong>a VERY COOL coffee table.</strong></i> I have been working on it for a long time and I'm confident to say that it's very easy to print, but although much I put much effort into trying to make the woodworking on this project easy it isn't for you if you have absolutely no woodworking skills. However there is an option for you if you have deep pockets and don't want to cut wood, glue and get your hands dirty, you can pay for someone to CNC machine the wood parts for you, after finishing this project I think the previously mentioned solution would have been much easier than the self-made method.</p><p><strong>Here are some stats:</strong></p><ul><li><strong>cost:</strong> about $150 (without the filament and tool costs and if you do the woodworking yourself)</li><li><strong>ease of making: </strong>the printing is as easy as it gets and you need no supports at all, the woodworking part can get a bit hard but if you pay someone to CNC machine it, it gets much much easier</li><li><strong>the time needed: </strong>the printing is altogether <i>60 hours</i> on a really slow printer, it sounds like a lot but it isn't</li></ul><h3> Build guide</h3><p><strong>Overview of the build:</strong></p><p>The table is made out of two wooden circles glued together with different inner diameters, but with the same outer diameter. (<i>If you have access to a CNC machine the circles can be cut quite easily.)</i>The upper one needs to have a circle cut in it with a handheld CNC to lower the glass into the wood (for the glass and the wood to be flush)or you can skip this step and simply glue the glass tabletop on the top. </p><p>The wooden circles were cut with a jigsaw, then to cover the ugly chipboard I glued veneer(thin bendable plywood) on the side. The imperfections can be hidden by some plasticine epoxy. The circle on the bottom is secured by a couple of 3d printed brackets. The printed honeycombs and the semi-translucent “spacers” are glued together with two-component glue. </p><p>A LED strip is glued to the inside of the downer most circle, so it lights up the whole honeycomb pattern. I used a white led strip but an individually addressable RGB led strip is going to be fitted and I will update the guide once it's finished.</p><figure class="image image_resized" style="width:36.82%;"><img src="https://media.printables.com/media/prints/204712/rich_content/a97cb5e7-6a94-40ae-8eb6-ff1ad2500317/1kep.png#%7B%22uuid%22%3A%229a904da1-dd85-40cb-af9c-96189abfc4d6%22%2C%22w%22%3A1081%2C%22h%22%3A748%7D"></figure><p><strong>Materials need:</strong></p><ul><li>chipboard (<strong>2 cm </strong>thick enough to cut out <strong>2 </strong>circles with a diameter of <strong>500 mm</strong>) <strong>or </strong>one sheet of <strong>4 cm</strong> thick wood enough to fit one <strong>500 mm</strong> circle</li><li>filament ( 1 semi-translucent and 1 black, if you only want to buy one you can paint the semi-translucent)</li><li>a <strong>4 mm</strong> thick glass circle with a diameter of <strong>465 mm or 500 mm</strong> glass tabletop </li><li>about <strong>2 x 2 meters</strong> of 1 mm thick veneer (thin plywood that is bendable) to cover the edges of the table</li><li>paint (I recommend <strong>black</strong>)</li><li>wooden beam (<strong>2 meters</strong> for the legs, each <strong>50 cm</strong> long)</li><li>plywood (about <strong>1 cm</strong> thick enough to fit one <strong>400 mm</strong> circle and one <strong>500 mm</strong> circle)</li><li>wood glue</li><li>two-component glue <strong>or </strong>hot glue gun</li><li>plasticine epoxy (not mandatory, just to hide the little mistakes)</li><li><strong>1.5 meters</strong> of a battery LED strip <strong>or </strong>you can covert one to battery power</li><li>screws</li></ul><p><strong>Tools needed:</strong></p><ul><li>jigsaw (if you cut the circles yourself) <strong>or </strong>CNC machine</li><li>paintbrush</li><li>sanding papers</li><li>handheld CNC (optional)</li><li>drill and drillbit </li></ul><p><strong>Let's build it:</strong></p><p><i>The tables body:</i><img class="image_resized" style="width:28.53%;" src="https://media.printables.com/media/prints/204712/rich_content/b8a22c47-348e-41d9-8aab-4a4d7bc3cc16/downer.jpg#%7B%22uuid%22%3A%22bdb1b5e5-81d4-4ba2-b42c-bf0c6b29d739%22%2C%22w%22%3A922%2C%22h%22%3A785%7D"></p><ol><li>cut out a the <strong>downer </strong>circle with an outer diameter of <strong>500 mm</strong> and an inner diameter of <strong>440 mm </strong>(chipboard)</li><li><strong>(optional)</strong>into the wood intended for the <strong>upper </strong>circle cut a <strong>4 mm</strong> deep circle with an outer diameter of <strong>468 mm </strong>it should be about 10 mm wide (chipboard)</li><li>(this is where the glass will be sitting)</li><li>cut out the <strong>upper </strong>circle with an outer diameter of <strong>500 mm</strong> and an inner diameter of <strong>450 mm </strong>(chipboard)<img class="image_resized" style="width:24.8%;" src="https://media.printables.com/media/prints/204712/rich_content/c0ba9a84-dab0-41dc-98e2-f44fa0b0567c/upper.jpg#%7B%22uuid%22%3A%2282de1a6b-bbc8-4e51-9a2f-29ecfa5e46db%22%2C%22w%22%3A884%2C%22h%22%3A702%7D"></li><li>cut out a circle with a diameter of <strong>500 mm</strong> (plywood) </li><li>glue the three circles together</li><li>cover the circle's outer side with veneer and the downer inner circle of the upper circle </li><li>once the glue dried, sand it and paint it and repeat until it looks good</li></ol><p><i>The shelve under the main body:</i></p><ol><li>cut out a circle with a diameter of <strong>400 mm </strong>(plywood) <img class="image_resized" style="width:36.57%;" src="https://media.printables.com/media/prints/204712/rich_content/86711d04-cabe-4661-945f-388ccb2d84b4/downershelve.jpg#%7B%22uuid%22%3A%22a9f29154-f711-4d9f-99bb-e2316c1b702a%22%2C%22w%22%3A819%2C%22h%22%3A709%7D"></li><li>cut out 4 half circles opposite each other with a diameter of <strong>30 mm</strong></li><li>paint it</li></ol><p><i>The legs:</i></p><ol><li>cut the legs into equal <strong>500 mm </strong>pieces</li></ol><p><i>The printing: </i></p><ul><li>the leg holders don't have clearances built into them because you need a snug fit and just a tiny tiny bit of sanding is enough the to fit (you just have to sand each leg for about 30 seconds)</li><li>the honeycombs should be printed in black, you can pint them in vase mode, but it is much slower and you can only print one at a time plus you can get some elephant foot like effect on the first few layers because the walls aren't as thick, if you pint it in normal mode it is much faster but you will have to sand a bit (the seems)</li><li>when printing the semi-translucent spacers be careful not to remove them before the heated bed cools down because they can warp and that is very bad</li></ul><p><i>Assembly of the legs and shelve:</i></p><ol><li>sand down each leg a tiny bit until you can push it into the ones that connect the to the main body<img class="image_resized" style="width:19.01%;" src="https://media.printables.com/media/prints/204712/rich_content/15779ce6-71a7-46d1-8028-8aed3ecfe407/legs.jpg#%7B%22uuid%22%3A%22a4fbc0af-f4dc-479e-a9ed-841dee88f8f6%22%2C%22w%22%3A654%2C%22h%22%3A800%7D"></li><li>drill a hole and fix the shelve holders onto the legs </li></ol><p><i>Assembly of the honeycomb pattern:</i></p><ol><li>sand every part that doesn't fit </li><li>before gluing you should try to fit the pieces together</li><li>glue the pieces with a hot glue gun together, avoid the sides, if you put glue under them they lift up the whole thing</li><li>if there are gaps between the pieces you can use a 3D pen to repair them or just use a flathead screwdriver and melt the plastic together</li></ol><p><i>Final assembly:</i></p><ol><li>use the shelve as a spacer when drilling out the holes on the main body for the legs</li><li>be careful and try making the legs vertical</li><li>if you want it to be more rigid you can glue or even screw the shelve onto its holders</li><li>glue the LED strip to the side of the downer most circle</li></ol><p><strong>Part count:</strong></p><ul><li>1 x <strong> </strong>circle with an outer diameter of <strong>500 mm</strong> and an inner diameter of <strong>440 mm </strong>from <strong>20 mm</strong> thick chipboard</li><li>1 x circle with an outer diameter of <strong>500 mm</strong> and an inner diameter of <strong>450 mm </strong>with a place for the glass tabletop (optional)</li><li>1 x circle with a diameter of <strong>500 mm</strong> from <strong>10 mm</strong> thick plywood</li><li>1 x circle with a diameter of <strong>400 mm </strong>from <strong>10 mm</strong> thick plywood with <strong>30 mm</strong> half holes </li><li>4 x main body holder</li><li>4 x shelve holder</li><li>19 x hexagon</li><li>6 x half hexagon</li><li>6 x mirrored half hexagon</li><li>1 x middle spacer</li><li>6 x side spacer</li><li>4 x <strong>500 mm</strong> x <strong>30 mm</strong> wooden rod</li><li>1 x <strong>465 mm</strong> glass tabletop <strong>or 500 mm</strong> glass tabletop</li></ul><p><strong>The OR s: </strong></p><ul><li>if you don't have access to a handheld CNC you can just leave that part out and simply glue or fix the 500 mm glass tabletop on top of the main body</li></ul><p><strong>Tips and tricks:</strong></p><ul><li>if you messed up something and the pattern and the glass don't fit, you can quite easily carve out some of the chipboard to make it less tall (just after gluing, and don't use this technique where it is visible)</li></ul><p><strong>Links to learn from the pros:</strong></p><ul><li><a href="https://www.youtube.com/watch?v=6dTzIHCPBuk&t=35s">cutting a circle with a jigsaw</a> (it didn't work for me the blade started to lean in a direction but probably I did something wrong)</li><li><a href="https://www.youtube.com/watch?v=A-B5FXN_lUg">veneer aplication</a></li><li><a href="https://www.youtube.com/watch?v=zmK9R6zsWw4">painting wood</a></li><li>if you get stuck somewhere you can just type in your problem and there are tons of videos for everything online</li></ul><h4>If you get stuck or have criticism or ideas please write a comment and I will help you or make the necessary changes.</h4><p> </p>
With this file you will be able to print A REALLY COOL coffee table with your 3D printer. Click on the button and save the file on your computer to work, edit or customize your design. You can also find more 3D designs for printers on A REALLY COOL coffee table.