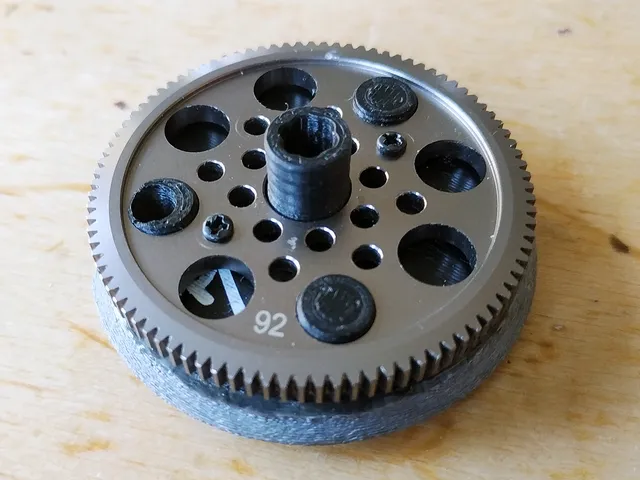
92T 48p gear adapter for Toranado Precision Geared Extruder
prusaprinters
Since the hardware sets for the Toranado Precision Geared Extruder https://www.thingiverse.com/thing:1246951 aren't sold anymore I looked for a metal gear alternative. I found some gears for RC cars that fit with some tinkering. Here is a solution to use these gears on the Toranado v2.1. I also added a shaft collar for an M4 grub screw. As of release (Nov 2020), I have this running very well for almost 2 years. Please report back in the comments how well the assembly worked for you or what values you had to change!There are some additional .stl to adjust the fit. If you need to do more changes: I added User Parameters in the .f3d Fusion360 file (Source), so you can change all important dimensions precisely without messing up everything else. I also reverse engineered the gear cover.Assembly InstructionsStep 1: Get all the parts92T 48p and 19T 48p gears You can buy them on Aliexpress. Usually they are for RC cars. M3x6 bolt (x2) ISO 4017, DIN 7984 or similar bolts with a low head, alternatively you can use self-tapping screws that are used in the original Toranado project (DIN 7981 M2.2 or imperal #2)M4 grub screw e.g. from an old lead screw couplingGlue e.g. acetone if you use ABS or super glue, ...5mm shaft to glue both pieces togetherGrease lithium or ball bearing5mm drill bit and 5mm reamer (optional)Step 2: Prepare and printThe 19T gear comes with a 3mm hole. But the Nema14 has a 5mm shaft. Remove the grub screw and widen the hole with a 5mm drill bit. If you have a 5mm reamer, use it!The shaft in the Toranado will need a flat side, so the grub screw has good grip. Use a file or an angle grinder.Print the adapter_0.00 and cover_0.00Try to fit the 92T gear to the adapter and both pieces to the 5mm shaft. It must fit firmly without any slack. If it's too loose, reprint the .stl with a positive value (e.g. +0.05). You can also do your own adjustments in the .f3d Fusion360 source files. There are user parameters. When everything fits nicely, I also recommend to print 1 or 2 spares so you are prepared if something goes wrong.Step 3: Glueing the cover and the adapterMount the gear cover to the 5mm shaft for the Toranado. Insert a M4 grub screw and TIGHTEN IT! This is very important or the gear won't run true!Put some glue on the flat side of the gear cover. Especially on the "arms" and the outer ring. Mount the adapter to the shaft so you can press both flat sides of the pieces together. Don't cover the hole of the adapter disk with any of the cover's arms! Let it dry then unmount it.Step 4: AssemblyMount the gear to the adapter and secure it with 2 bolts (M3 or #2). Put some grease on the gear and put it in your Toranado. Align the grub screw to the flat side on the shaft and tighten it. Give it a spin and check if it runs fairly true.Loosen the 3 stepper bolts (there is a hole for that in the adapter). Mount the 19T gear to the stepper shaft. Adjust the stepper position so the gears mesh nicely. Turn the gears and make sure they don't bind up - some slack is better than binding up and losing steps. Then tighten the stepper bolts.Step 5: E-StepsBecause the gear is 92T instead of the original 94T the E-Steps are slightly lower.I use 512 steps/mm for my Toranado with 1.8deg Nema14 stepper, MK7 hobbed gear and 1/16 microstepping.Print SettingsRafts:NoSupports: NoResolution:0.1Infill: 30Notes:0.4mm nozzle3 walls6 top / bottom Category: 3D Printer Extruders
With this file you will be able to print 92T 48p gear adapter for Toranado Precision Geared Extruder with your 3D printer. Click on the button and save the file on your computer to work, edit or customize your design. You can also find more 3D designs for printers on 92T 48p gear adapter for Toranado Precision Geared Extruder.
