5th Generation Replicator Build Plate Stablizers
thingiverse
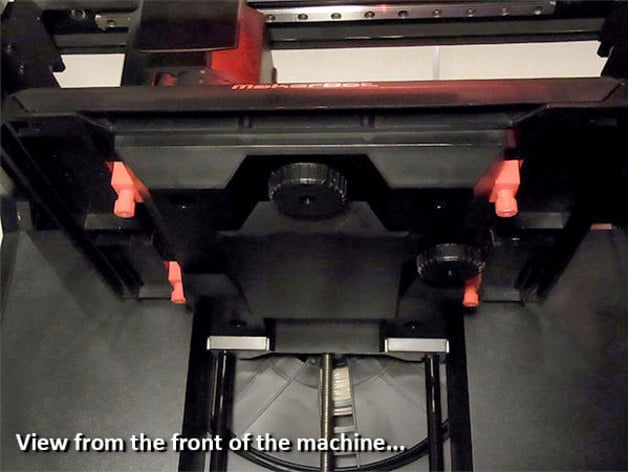
A crucial aspect to consider when it comes to 3D printer build plates is their levelness. To ensure smooth printing, the build plate must be perfectly level. The Replicator 2's spring-mounted build plate design allows for ease of leveling, but any pressure applied during this process can cause movement in the build plate. Developed specifically for the Replicator 2, a similar solution has been adapted for the 5th Generation Replicator. If you're unsure whether your Replicator benefits from this fix, simply push down on each corner of your build plate one at a time. You'll likely notice more movement in the front left and back left corners. The goal here is to enable users to level their 5th Generation Replicators as they normally would while minimizing movement. This requires adding four stabilizers, which can be installed by following these steps: Print the stabilizers using standard settings at 0.20mm resolution, with raft enabled but without support required. Four shells and 50% infill are recommended to ensure strength. To install the stabilizers: 1. Remove the filament. 2. Start assisted leveling and cancel when the build plate is below the nozzle (2-3cm). This allows you to access the build plate from underneath. 3. Slide out the glass build plate. 4. Loosen both large standard adjuster knobs fully until they're almost off their mounting screws. 5. Insert the four stabilizers, positioning them correctly: front ones at the front and rear ones at the back. Refer to images for guidance. This requires some effort, as you may need to push the build plate up in certain corners to clear space for the Stabilizer. Once inserted, ensure the Stabilizers slide along the channel without obstructing build plate movement. 6. Locate the front stabilizers as far forward as possible within the available channel and rear stabilizers at the back edge of the channel, taking care not to compromise build plate levelling. 7. Tighten the two large standard adjuster knobs almost fully until they just bind against the mounting bracket along the front edge of the build plate. 8. Insert and tighten the four Stabilizer Adjuster Bolts up to their full stop when the build plate is wound down. Once this setup is completed, replace the glass build plate and proceed with normal leveling as instructed on the display screen. When performing future levelling, loosen each Stabilizer bolt slightly, adjust the standard levelling knobs if required, then re-tighten the Stabilizers to their contact position. Repeat these steps as needed until the printer is levelled accurately without needing extensive adjustment.
With this file you will be able to print 5th Generation Replicator Build Plate Stablizers with your 3D printer. Click on the button and save the file on your computer to work, edit or customize your design. You can also find more 3D designs for printers on 5th Generation Replicator Build Plate Stablizers.
