5 Gallon Bucket side handle
prusaprinters
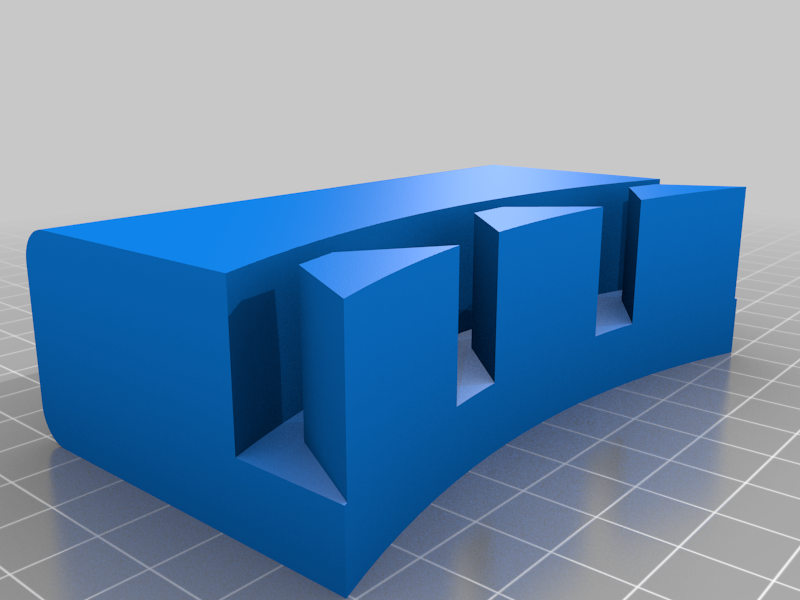
<p>Every Monday I walk around the house and pick up trash. We live across from a park, and after a weekend of ball games and some wind, a lot of that garbage blows our way. So with a 5-gallon bucket in one hand and a grabber in the other, I clean up around the place. For ages I've been sticking my fingers under the lip because the bucket has to be at an angle to work best. After I picked up my first 3D printer I decided to make this side handle. It took a while to get to, and a few prototypes to get to this point.</p> <p>There's two parts to the handle. The handle and the body. The body has the three triangles that interlock with the lip on the bucket, and the handle you grip. They are separate for a couple of reasons - first, zero supports. Next, the angle of the handle can be adjusted to your liking before glueing together.</p> <p>After printing the two pieces (I used three walls and 35% infill - I wanted this strong), check the fit of the body. The three triangles should mesh perfectly with the openings in the bucket. A little loose is OK. If it's too snug, they can be sanded.</p> <p>After the body is attached to the bucket, slip the handle on and clamp it in place. Then tilt the handle back and try the grip - look at the bucket angle and the gap between your knuckles and bucket. Once you get it where you want it, draw a couple of lines to mark it. Remove the clamp and handle - keep the body on the bucket. Put CA glue (super glue) on the sides of the body, pull the handle apart a little (it will have some flex) and release when it's in the right spot. Clamp lightly. Check the angle and gap of your fingers from the bucket. Once it's right, tighten the clamp all the way. You'll have 10-20 seconds to do this, depending on the glue. I have some 60 second CA glue just for stuff like this.</p> <p>Let sit for a while. Remove from the bucket, use CA glue to fill any gaps. For extra strength, I heated up some roofing nails and pressed one into each side with some needle nose pliers. Once in place I brushed on water to set them. If you have any rough spots, now's the time to sand them.</p> <p>Print time totaled around 13 hours at 50mm. .28 layer height.</p> <h3>Print Settings</h3> <p><strong>Printer Brand:</strong></p> <p>Creality</p> <p class="detail-setting printer"><strong>Printer: </strong> <div><p>Ender 3 Pro</p></div> <p><strong>Rafts:</strong></p> <p>No</p> <p class="detail-setting supports"><strong>Supports: </strong> <div><p>No</p></div> <p><strong>Resolution:</strong></p> <p>.28</p> <p class="detail-setting infill"><strong>Infill: </strong> <div><p>35%</p></div> <p><strong>Filament:</strong> Any PLA Any</p> <p><br/> <p class="detail-setting notes"><strong>Notes: </strong></p> </p><div><p>Should work with any stiff filament. Rafts and supports not needed. You may have to rotate the model so it sits correctly on the bed.</p></div> Post-Printing ============= <p class="detail-caption"><strong>Checking the fit and gap.</strong></p> <p class="detail-image"><img src="https://cdn.thingiverse.com/assets/7f/ef/1a/86/f9/IMG_4721.JPG"/></p> <p class="detail-caption"><strong>Angle so you can see the handle position. Body is all the way in. The ends of the handle (parts under the lip) rest against the bucket and lip.</strong></p> <p class="detail-image"><img src="https://cdn.thingiverse.com/assets/67/26/8c/4d/87/IMG_4732.JPG"/></p> <p class="detail-caption"><strong>Nail melted in for extra durability. I painted it black later.</strong></p> <p class="detail-image"><img src="https://cdn.thingiverse.com/assets/c5/25/02/2e/f8/IMG_4728.JPG"/></p> <p class="detail-caption"><strong>All done. Glued, santed and the nail heads painted.</strong></p> </p></p></p> Category: Other
With this file you will be able to print 5 Gallon Bucket side handle with your 3D printer. Click on the button and save the file on your computer to work, edit or customize your design. You can also find more 3D designs for printers on 5 Gallon Bucket side handle.
