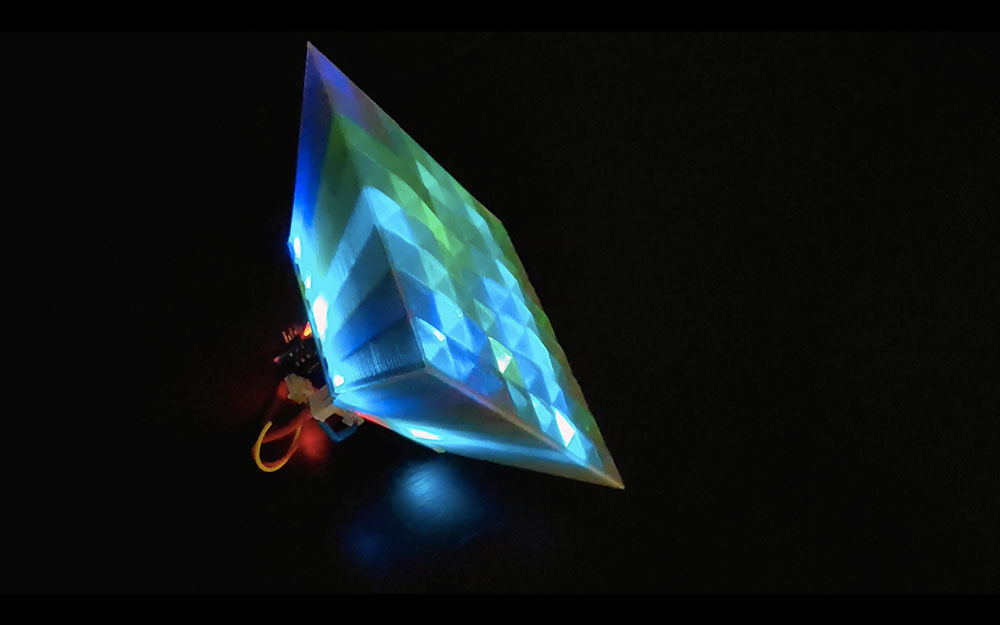
4x magnifier LED display. Lamp, clock & more
prusaprinters
<p>This device increases the area of the LED matrix by 4 times. My idea is to use an expanding light separator. If you print it from a translucent material (and my silver plastic turned out to be a little translucent), then the image elements are "voluminous", and, for example, if you use the firmware to display the clock, the numbers will also be three-dimensional. But you can print them in black plastic and get a classic scoreboard, but 4 times larger at the price of a small one. And all the electronics will cost about $7.</p> <p>Depending on the firmware, you can use as a clock, lamp, creeping line, night light or color music.</p> <p>The design does not use filling, but only walls, so printing is relatively fast and low material consumption. Also, no screws or other fixing methods are used.</p> <p>How it works can be seen in the video <figure class="media"> <oembed url="https://www.youtube.com/embed/O-WCk1mXSQI"></oembed> </figure> </p> <p>UPD<br/> I added a version in two sides in the form of frames, its printing a third faster and when printing a model, corners closed by cooling by a fan are not created. This option has not yet been tested, but I guess it is better to print it from a more rigid PLA.</p> <h3>Print instructions</h3><p>It is better to print the box out of partially flexible plastic, for example, SBS. I printed with a 1 mm nozzle at a layer of 0.3 and low speed (this requires material, in addition, my extruder cannot heat very much). It is important to prevent overheating, as the part may become deformed.<br/> You will need an Arduino Nano board, an 8x8 color display matrix, a 200-500ohm resistor with any power and some wires. For electronics, I used the information from this site <a href="https://alexgyver.ru/gyvermatrixbt/">https://alexgyver.ru/gyvermatrixbt/</a> and chose the simplest option.</p> <p>BOM (approximately $7)</p> <p>WS2812 LED Full Color Module 64 Bit 5050 RGB<br/> (approximately $ 4)<br/> <a href="https://aliexpress.ru/item/32658218780.html?spm=a2g0s.9042311.0.0.264d33edPrg17W">https://aliexpress.ru/item/32658218780.html?spm=a2g0s.9042311.0.0.264d33edPrg17W</a></p> <p>Arduino Nano with bootloader compatible Nano 3.0 CH340 USB driver 16 MHz ATMEGA328P / 168 P<br/> (approximately $ 2)<br/> <a href="https://aliexpress.ru/item/32341832857.html?spm=a2g0s.9042311.0.0.264d33edPrg17W">https://aliexpress.ru/item/32341832857.html?spm=a2g0s.9042311.0.0.264d33edPrg17W</a></p> <p>Power supply with adapter, 5 V, 2 A, 2000 mA<br/> (approximately $ 1)<br/> <a href="https://aliexpress.ru/item/32661794396.html?spm=a2g0s.9042311.0.0.264d33ed0JAM9T">https://aliexpress.ru/item/32661794396.html?spm=a2g0s.9042311.0.0.264d33ed0JAM9T</a></p> <p>In the example, I used this Arduino sketch:</p> <h3>include <FastLED.h></h3> <p>FASTLED_USING_NAMESPACE<br/> // FastLED "100-lines-of-code" demo reel, showing just a few<br/> // of the kinds of animation patterns you can quickly and easily<br/> // compose using FastLED.<br/> //<br/> // This example also shows one easy way to define multiple<br/> // animations patterns and have them automatically rotate.<br/> //<br/> // -Mark Kriegsman, December 2014</p> <h3>if defined(FASTLED_VERSION) && (FASTLED_VERSION < 3001000)</h3> <h3>warning "Requires FastLED 3.1 or later; check github for latest code."</h3> <h3>endif</h3> <h3>define DATA_PIN 13</h3> <p>//#define CLK_PIN 4</p> <h3>define LED_TYPE WS2812</h3> <h3>define COLOR_ORDER GRB</h3> <h3>define NUM_LEDS 64</h3> <p>CRGB leds[NUM_LEDS];</p> <h3>define BRIGHTNESS 96</h3> <h3>define FRAMES_PER_SECOND 120</h3> <p>void setup() {<br/> delay(3000); // 3 second delay for recovery</p> <p>// tell FastLED about the LED strip configuration<br/> FastLED.addLeds<LED_TYPE,DATA_PIN,COLOR_ORDER>(leds, NUM_LEDS).setCorrection(TypicalLEDStrip);<br/> //FastLED.addLeds<LED_TYPE,DATA_PIN,CLK_PIN,COLOR_ORDER>(leds, NUM_LEDS).setCorrection(TypicalLEDStrip);<br/> // set master brightness control<br/> FastLED.setBrightness(BRIGHTNESS);<br/> }</p> <p>// List of patterns to cycle through. Each is defined as a separate function below.<br/> typedef void (*SimplePatternList[])();<br/> SimplePatternList gPatterns = { rainbow, rainbowWithGlitter, confetti, sinelon, juggle, bpm };<br/> uint8_t gCurrentPatternNumber = 0; // Index number of which pattern is current<br/> uint8_t gHue = 0; // rotating "base color" used by many of the patterns</p> <p>void loop()<br/> {<br/> // Call the current pattern function once, updating the 'leds' array<br/> gPatterns<a href="">gCurrentPatternNumber</a>;<br/> // send the 'leds' array out to the actual LED strip<br/> FastLED.show();<br/> // insert a delay to keep the framerate modest<br/> FastLED.delay(1000/FRAMES_PER_SECOND);<br/> // do some periodic updates<br/> EVERY_N_MILLISECONDS( 20 ) { gHue++; } // slowly cycle the "base color" through the rainbow<br/> EVERY_N_SECONDS( 10 ) { nextPattern(); } // change patterns periodically<br/> }</p> <h3>define ARRAY_SIZE(A) (sizeof(A) / sizeof((A)[0]))</h3> <p>void nextPattern()<br/> {<br/> // add one to the current pattern number, and wrap around at the end<br/> gCurrentPatternNumber = (gCurrentPatternNumber + 1) % ARRAY_SIZE( gPatterns);<br/> }<br/> void rainbow()<br/> {<br/> // FastLED's built-in rainbow generator<br/> fill_rainbow( leds, NUM_LEDS, gHue, 7);<br/> }<br/> void rainbowWithGlitter()<br/> {<br/> // built-in FastLED rainbow, plus some random sparkly glitter<br/> rainbow();<br/> addGlitter(80);<br/> }<br/> void addGlitter( fract8 chanceOfGlitter)<br/> {<br/> if( random8() < chanceOfGlitter) {<br/> leds[ random16(NUM_LEDS) ] += CRGB::White;<br/> }<br/> }<br/> void confetti()<br/> {<br/> // random colored speckles that blink in and fade smoothly<br/> fadeToBlackBy( leds, NUM_LEDS, 10);<br/> int pos = random16(NUM_LEDS);<br/> leds[pos] += CHSV( gHue + random8(64), 200, 255);<br/> }<br/> void sinelon()<br/> {<br/> // a colored dot sweeping back and forth, with fading trails<br/> fadeToBlackBy( leds, NUM_LEDS, 20);<br/> int pos = beatsin16( 13, 0, NUM_LEDS-1 );<br/> leds[pos] += CHSV( gHue, 255, 192);<br/> }<br/> void bpm()<br/> {<br/> // colored stripes pulsing at a defined Beats-Per-Minute (BPM)<br/> uint8_t BeatsPerMinute = 62;<br/> CRGBPalette16 palette = PartyColors_p;<br/> uint8_t beat = beatsin8( BeatsPerMinute, 64, 255);<br/> for( int i = 0; i < NUM_LEDS; i++) { //9948<br/> leds[i] = ColorFromPalette(palette, gHue+(i<em>2), beat-gHue+(i</em>10));<br/> }<br/> }<br/> void juggle() {<br/> // eight colored dots, weaving in and out of sync with each other<br/> fadeToBlackBy( leds, NUM_LEDS, 20);<br/> byte dothue = 0;<br/> for( int i = 0; i < 8; i++) {<br/> leds[beatsin16( i+7, 0, NUM_LEDS-1 )] |= CHSV(dothue, 200, 255);<br/> dothue += 32;<br/> }<br/> }</p>
With this file you will be able to print 4x magnifier LED display. Lamp, clock & more with your 3D printer. Click on the button and save the file on your computer to work, edit or customize your design. You can also find more 3D designs for printers on 4x magnifier LED display. Lamp, clock & more.
