42 - Version42 (and everything explained!)
prusaprinters
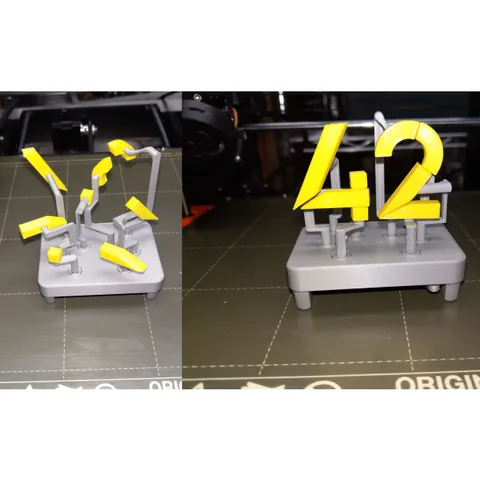
The Answer. This one : 42 and some Gears This way too complicated print uses a set of gears to rotate segments into place to show the number 42. The Explanation : If you have looked at any of my other "42" prints you have probably already done a web search and you know this is a reference to the book "The Hitchhikers Guide to the Galaxy". If you didn't know before, you know now, and you can guess that I am a fan of the author Douglas Adams. But it was also an excuse to have some fun, to improve my 3D CAD skills, and to provide myself with ways to experiment with 3D printing. More versions on the way. So just as with the third book of the Hitchhiker trilogy, we come at last to the end of the series. OnShape 3D CAD files : https://cad.onshape.com/documents/d62ee5638f685d63a4e1109b/w/4e6f775f74f263e34609e2da/e/2c8e3e0c9c6002d84e3c1ac7 Print instructionsPrint in PLA using the 3mf files provided. Some terminology for discussion below : The print consists of the following: gear : self explanatory axles : fit in the center of each gear; there are three different kinds of axles base : the gear axles sit in recesses in the rectangular base cover : fits over the gears to hold them in place feet : fit into recesses in the cover (from below) and hold the base to the cover number segments : each number ("4" and "2") consists of four segments. In general these are printed with 0% fill and positioned with the hole down. legs : a leg connects each number segment to a gear axle; each segment has a specific leg. Each of the legs print print a bit differently, but in general 0% fill 4 perimeters. lever : inserts from underneath to operate the gears I printed all parts on a smooth build plate. I applied a small amount of glue stick and smoothed it out with denatured alcohol to ensure good adhesion. I suggest printing the number segments first in a different color from the rest of the assembly, and then the remainder of the parts in the order discussed. Printing the base and cover is straightforward. The gears can all be printed at the same time. The feet can all be printed at the same time. The gear axles can also all be printed at the same time, but note there are three different kinds of axles : gear axle with square hole for most gears gear axle with square hole all the way through "short" gear axle. Insert a gear axle into each gear, making sure the gear is seated fully. Place the gear/axle sets into the base with the short axle in the middle and the through-hole axle over the hole in the base. Place the cover over the base and gears, and insert the feet to hold the base to the cover. The number segments can all be printed at the same time. I recommend using a different and contrasting color filament for the number segments so they will stand out from the rest of the assembly. With gears, cover, base, and feet assembled, add the lever from the bottom with the lever arm between the two front feet (the front is the part facing you when the lever is on the right). I recommend printing each leg in order to match the number segments from the bottom up (for example leg2a, then leg leg2b, leg2c, leg 2d, etc.). It is a good idea to scrape the round part of the leg that inserts into the gear lightly with a razor knife. Ideally the leg will fit into the gear firmly but not too tightly. Put each number segment on its respective leg before inserting the leg into the gear. The segment orientation should be obvious in most cases, but note that some segments have some edges rounded and that the "cubical" segments for the "4" should have the rounded edges properly oriented (see photos). With the lever set fully counter-clockwise (when viewed from above) against the front right leg, insert each leg into its respective gear. Insert the leg so that the number segment is properly oriented - some adjustment is possible after the leg is inserted but it is more difficult then. My method is to insert the leg slightly into the gear, rotate to make any fine adjustments, and then fully seat the leg into the gear. Each leg must be fully seated in its gear for the legs to clear properly when rotating. Be sure to support the gear from below when inserting the leg. As each leg/number-segment is added to the assembly, rotate the lever to make sure the legs and segments are clearing properly, and make adjustments as needed. Ideally all of the parts will fit together without glue, but I did use a tiny drop of superglue on one of the number segments.
With this file you will be able to print 42 - Version42 (and everything explained!) with your 3D printer. Click on the button and save the file on your computer to work, edit or customize your design. You can also find more 3D designs for printers on 42 - Version42 (and everything explained!).
