40MM FAN OFFSET
prusaprinters
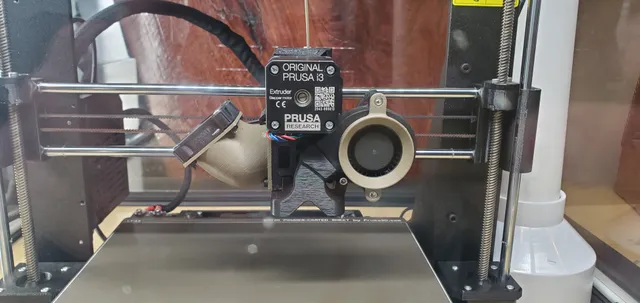
I made this model to get the 40mm fan pointed up away from the build plate to stop the draft on thin models and finnicky filament. It offsets to the left to clear the z screw and home correctly. I printed with an mk3s plus using organic supports. (I changed organic support parameters to Branch diameter angle to 9 and branch diameter with double walls to 1mm. ) You will need 4 m3 screws. 3 at 12mm and one at 16 mm for the longer part cooling duct(bottom right). Plus 4 12mm screws and nut to attach fan (you can use the original provided but will still need 4 nuts). The stock fan will reach just barely but need to make a little notch in the center of the fan wire channel. ( be very careful) You can see the notch in one of the photots. I notched it at the seam of the two pieces.I printed in ASA at .2 layer height, 2 perimeters. Fixed my issue and been printing nonstop with it since. Doesn't seem to affect cooling negatively. It might even be pulling in cooler air when printing with high bed temps. ( I print exclusively in asa or pc blend.)The way the file imports in prusaslicer is upsidedown compared to the the way I printed it. (less supports) but do you.I had to shave the z screw mount on the one you see in the picture as i was half a mm hitting and didn't feel like printing another. I was surprised at the wall thickness on the z screw mount where i shaved it( found the inside) but doesn't seem to have weakened it. I since changed the model to have the clearance and no shavings of the z mount will be necessary.
With this file you will be able to print 40MM FAN OFFSET with your 3D printer. Click on the button and save the file on your computer to work, edit or customize your design. You can also find more 3D designs for printers on 40MM FAN OFFSET.