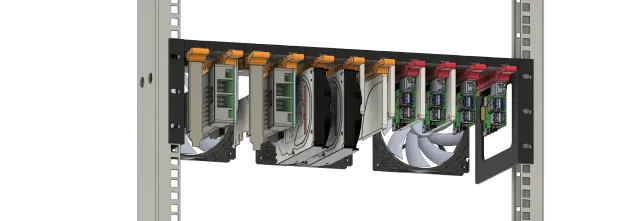
3U Modular Rack for ZimaBoard, Raspberry Pi, SSD, HDD, PCI cards and more
prusaprinters
Please note this design should be considered a BETA, I'm still making some tweaks for the following:Improve all hangers to make latching less stiffImprovements to PCIe hanger.Modular 3U Rackmount for ZimaBoards, to be co-located with Raspberry Pi's, PCI card and 2.5" or 3.5" drives.The design provides 11 “slots” to make up the 19" rack, which can be made from single-width holders or merging the multiple singles to create a larger piece with multiple slots. The top hanging section is supported and secured together with a 5mm threaded rod. “Hangers” for different mounting options can then be added to suit your needs and slot securely into place.Please excuse the poor quality image of the design installed in my loft space, due to a heat wave hitting the UK I had to quickly complete the printing and get it installed before I hit thermal issues. I hope to replace the image with a better one (and clean up the cabling too). Thanks for your understanding.NotesThe Raspberry Pi hanger:Compatible with both Raspberry Pi 3 and Raspberry Pi 4 as the spacing is the same.Supports mounting one 2.5" drive on the opposite site to the Pi.The ZimaBoard hanger is designed to be fairly universal.Supports 1 ZimaBoard.Supports 1 x 3.5" HDD (secured from two screw holes at the top) check hole spacing as it doesn't appear consistent especially on older drives.Mounting a Zimaboard or 3.5" HDD provides sufficient space to mount a 2.5" drive on the opposite side of the hanger.Supports 2 x 2.5" SSD mounted back to backThe PCI card hanger:Supports mounting cards via the standard bracket. With just a single mounting point it won't be suited to heavy cards. Though the holes in the bracket and a cable tie might help provide some added security.The hanger holders come in two versions, one with the slot centred and the other with it aligned to the right. This may be useful to provide better spacing. (I opted to use right-aligned holders for most slots, with centre-aligned holders just for the PCI card hanger.)I used some 120mm PWM fans I had spare in a cupboard, there is a Molex PicoBlade fan header on the bottom of the ZimaBoard. Use of this is not officially supported and fan speed can only be controlled by setting a value in the BIOS, it isn't (at present) being exposed to the OS. (Learn more in the Discord channel where this is discussed)PartsRack:1m M5 threaded steel rod4 x M5 nuts to secure rod, I opted for Nyloc nutsZimaBoards:Remove lower most plastic cover and mount using original M3 bolts. If removing the bottom 2 plastic layers you'll need to use shorter M3 bolts.(optional) Power over Ethernet adapter, gigabit network speed, 5.5mm x 2.5mm barrel jackRaspberry Pi:M2.5 bolts, 4 per Raspberry Pi (I used the bolts that came with the PoE HAT)M2.5 nuts, if not using the PoE HAT.PCI Card: M3 BoltPCI cards are attached to the ZimaBoard using PCIe x4 extension cables. I found these on AliExpress and used the R22SR 5CM version.Fans:3 x 120mm Fans6 x M4x12mm bolts to secure fans to top rail6 x M4 nuts slid into the rear rail before the rack ears are attached.Printing Suggest using PETG for its additional strength and better performance in hot environments where racks tend to be.Please look at the example G-Code files showing how each piece should be placed for printing.Material: PETGPrint Settings (PrusaSlicer):Rack ears: 0.20mm Quality, 25% InfillOther components: 0.10mm Quality, 15% InfillSupports: Brim when printing holder upright.Parts to Print:1 x Rack Ear Right1 x Rack Ear LeftHolders for 11 slotsHangers to suit.Note there is an intentional gap at the end of the hanger to provide a spring latching mechanism into the holder.Additional notes for printing holdersParts need to be printed upright, this can make them unstable as the bed moves, this can be improved by using a brim, but I still had some failures until I rotated the holder so that the narrow edge faced the front of the printer, I assume due to the accelerations and decelerations of the bed.Whilst a single slot holder gives the most flexibility, merging multiple holders into a few larger pieces (2 x 4 slot and 3 slot) uses less material and was easier to print.AssemblyCut the threaded rod to length (sorry I didn't make a note of the exact length I used).Each holder can be secured together with a pair of pegs for extra strength (optional)Use the pin file from: https://www.thingiverse.com/thing:4756812/files Thread the rods through the holes at the front and rear of the holders and secure with nuts.Attach components to the hangers. Note there are small rings to support the holes when printing, these should be removed before inserting bolts from the flat side of the hangers.Slide the hangers into the holders, depending on printing tolerances the hangers may be very tight, but should hopefully free up with some movement.Mount into rack enclosure using standard Rack cage nuts and bolts.Version HistoryDesign file V27 - 4 September 2022 - Updated hangers to improve the latching mechanism.Design file V23 - 19 July 2022 - Initial releaseCreditsWhilst this is my own design, I took a lot of design cues from previous work on a Raspberry Pi rack mounting solution:Raspberry Pi 4 2U rack-mount Mark III for 14 Pi with 2.5" SSD by MerocleThingiverseUptime Lab website with more details
With this file you will be able to print 3U Modular Rack for ZimaBoard, Raspberry Pi, SSD, HDD, PCI cards and more with your 3D printer. Click on the button and save the file on your computer to work, edit or customize your design. You can also find more 3D designs for printers on 3U Modular Rack for ZimaBoard, Raspberry Pi, SSD, HDD, PCI cards and more.
