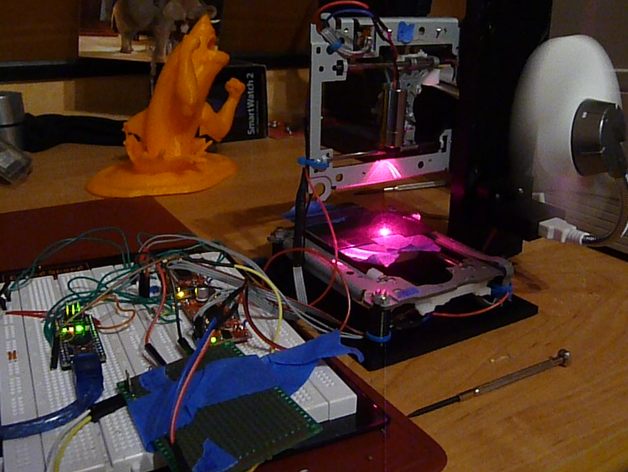
3DPILE - a 40$ DIY Laser Engraver
thingiverse
Human V3 coming soon! Introducing Spark - a revolutionary, Affordable Laser Engraver Special thanks to Maker's World for publishing an article about my project. This is my submission for the BrightItUp contest, because a laser diode is basically just a focused LED emitting one specific wavelength. Introduction: Find the printed components and instructions to build a fully functional laser engraver out of two DVD drives and some electronic parts for just 15-40 dollars. Why is this project cool/special? You might wonder: Why is this project so awesome? There's only one answer. It's the price point, which makes it truly unique. You can construct this amazing laser engraver for as low as 15 dollars if you already have some parts at home and source them carefully. And having an accurate, 3D printed laser engraver for just 15-40 dollars is absolutely fantastic. Design objectives: I designed this project using Fusion 360. I aimed to keep everything simple (nearly no nuts, screws will create their threads) and focused on the printability of all components (all parts can be printed on a standard RepRap printer). And I wanted to minimize costs as much as possible. How it operates: It works basically like a 3D printer, only that it carries a laser diode instead of an extruder. Use GIMP with a plugin to generate the files the printer uses. Then send them to the engraver and it will initiate the engraving process. To demonstrate how it functions, I created a short video: https://www.youtube.com/watch?v=D2gE9T0ZuXk Costs: The costs of this project range from 15-40 dollars, depending on where and what you purchase and whether you need to acquire the DVD drives or other components. Changelog: 17th June 2016: I reworked the base since it was too wobbly; now it is stiff. 21st June 2016: Added an optional fan holder - useful for cooling your laser and blowing away particles. Also included an Arctic USB Fan (5 dollars) as a suggested accessory. That's the total if you already have the DVD drives, cables, and breadboard, amounting to 20 dollars. Recommended print settings: Extrusion width: 0.35mm Layer height: 0.15mm Infill percentage: 30-50% (the higher, the better) Print speed: 20-60mm/s (depending on your printer) Support: no support except "Extender.STL", which isn't a required part Assembly instructions: Disassembling the DVD drives: Open the DVD drives, take out the carriages and remove the red laser from the DVD reader/writer. This step is individual depending on your DVD drive model. Mounting everything: Screw together like in the pictures and attach the linear carriages. Press-fitting the laser: Use a vice and a towel to press-fit the laser into its housing. Another way to do it is to heat up the laser housing (don't overheat it or you'll damage the laser) and then insert the laser. Connecting your laser: Connect your laser driver to the laser. Refer to the laser drivers data sheet for specific instructions on this step. Mounting the laser and bed: Glue the bed onto the carriage (I used an old piece of plastic), and glue the laser diode onto the carriage. Wiring everything up: Wire everything up. I'll leave you to figure out the wiring as it varies depending on your setup; I used an Arduino Mega running GRBL. Configuring your firmware: Use 30,30 steps/mm for X and Y and 50mm/s^2 for acceleration. Configuring the software: Download GIMP and install this plugin: https://github.com/303engineering/GIMP The fun part: Put on your safety goggles and start working with your laser engraver. Enjoy! One last time: You will be using a high-powered laser. Be cautious!
With this file you will be able to print 3DPILE - a 40$ DIY Laser Engraver with your 3D printer. Click on the button and save the file on your computer to work, edit or customize your design. You can also find more 3D designs for printers on 3DPILE - a 40$ DIY Laser Engraver.
