3D ROBO R1 Dual Fan Mount "Black Widow" 10mm and 20mm fan setups
thingiverse
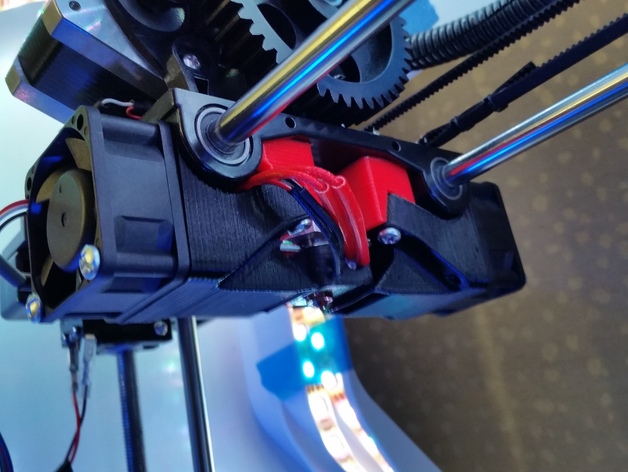
You may want to use the short shroud for the rear found at thingiverse.com/make:170101 Thanks everyone for your positive feedback, I am glad to be part of this community. These parts allow you to install dual 10x40x40mm fans or 20x40x40mm fans on the stock ROBO R1 3D Printer with Hex extruder installed. Stats: Stock Robo R1 = ~ 6 CFM Dual 10mm Fans = ~ 14 CFM Dual 20mm Fans = ~ 40 CFM Amazon link to the exact fans I am using. You may notice that it states 10.2 CFM, however, the air is flowing 2-3x that when forced through the small flat vent at the end of the shroud. So 2.5V x 10.2F = 25.5CFM per fan. Additionally, this fan has 3 wires: only use the red and black, do not use the white wire. http://www.amazon.com/dp/B000QEAXDO/ref=wl_it_dp_o_pC_nS_ttl?_encoding=UTF8&colid=1IX7YR7U22M7O&coliid=I3OKV5MMOPXL26 Tested. Please read all instructions before getting started. Instructions Material: PLA ( I used Hatchbox) On the fan mount I used 100% infill, 3 shells On the fan shrouds I used 40% infill, 4 shells Hardware: 3 x 25mm course thread screws Weight difference with fan and mounts: Stock: ~33g Dual 10mm fans: ~45g Dual 20mm fans: ~92g ^ The additional weight has not impacted my print speed. Installation: Print all the parts you wish to install. You can install these parts without removing the X carriage. First remove all of the fans connected to your current fan mount. Then remove the two bolts holding the current fan mount in place. You should then be able to slide the current fan mount out. If you have resistance, use finesse; do not break your hot head! Now install the dual fan mount in reverse, and if you are installing dual 10mm deep fans, reconnect all of your fans ensuring the direction of airflow points in or down. For dual 20mm deep fans, install your fans to the shrouds then install the shrouds to the dual mount bracket. Print the fan shroud fan side down. Install the Dual fan mount before the shrouds. Notes: ^The dual mount is a remix of Mike Kelly's design with an added cutout for wire routing. ^Splice your wires to the male clip before installing the fans. ^I would twist, solder, and heat shrink the wire connections. ^Test that the fans work BEFORE you heat shrink everything up. ^These fans should be connected in parallel. ^I personally increased my nozzle temp by 5 degrees to compensate for the cooling effect. In theory, this will keep the filament from getting hard inside the nozzle causing clogs. ^There is a very low margin for error when using the dual 20mm deep fan shrouds. ^After installation, no part of the fan shroud or mounts should hit the surface during autolevel. If a fan or shroud hits the surface before the nozzle you should stop and reconfigure your parts. ^Because there is so little room for error and very little tolerance, your particular machine may not be able to use the 20mm deep dual fan setup. For example, on mine when I do autolevel, the fans are only about 2-3 mm above the surface. This should be fine as long as the nozzle does not have to go back below any other printed surface. ^You should take note that the 20mm deep fan does not stick out past the stepper motor. This means you should maintain your max print height. However, you may want to test it on you machine first before taking your print to max height. I had fun designing this, hope it helps. It certainly increased the quality of my prints and the ability to bridge gaps. If there is something I can help you with, let me know. V/R TSG
With this file you will be able to print 3D ROBO R1 Dual Fan Mount "Black Widow" 10mm and 20mm fan setups with your 3D printer. Click on the button and save the file on your computer to work, edit or customize your design. You can also find more 3D designs for printers on 3D ROBO R1 Dual Fan Mount "Black Widow" 10mm and 20mm fan setups.