3D Printer Safety Shutdown - Smoke Detector
thingiverse
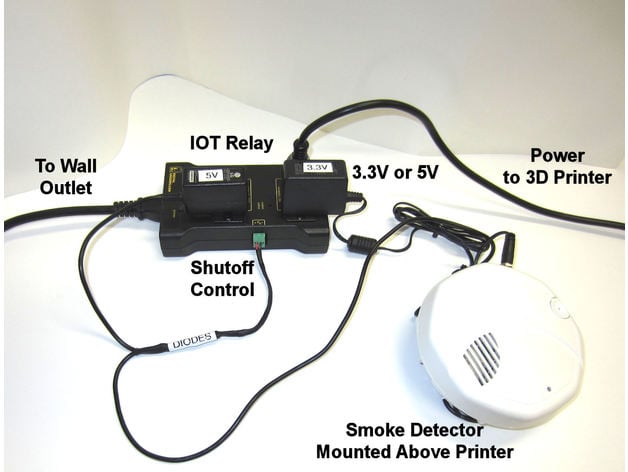
Have you ever fretted about leaving your printer running for those long 20-hour prints? With a heated bed, hot extruder, and cheap power supply, there's much that could go awry. I have fretted about leaving my printer unattended and wanted an automatic smoke detection and shutdown solution. This post contains all the information you need to build a 3D Printer Safety Shutdown. I am not selling anything. This is merely the information needed to make your own printer shutdown device. This solution uses an IoT Power Relay from Digital-Loggers.com, which has an input that can turn the IoT Power Relay strip on or off with a low-voltage signal. The IoT Relay also has a "Normally On" pair of receptacles and a "Normally Off" pair of receptacles. The IoT Power Relay control connector is connected to an off-the-shelf First Alert Dual Mode Smoke Detector, which has an output that can trigger other smoke detectors. The First Alert Dual Mode Smoke Detector is a very sophisticated dual smoke detector that is far better than the Arduino smoke sensors that some people are using to build safety-off devices. That trigger output is used to turn off the IoT Control Relay. The power will stay off only as long as the smoke detector senses smoke, so I added a feature to latch the off action. I did this by adding a 5V wall transformer to the "Normally Off" side of the IoT Relay. That wall transformer powers up when the printer has been shut off and keeps the input to the IoT Relay in the off state. For safety reasons, I powered the Smoke Detector with its own 3.3V wall transformer to avoid having 110 VAC in the circuit. You can use a second 5V transformer with three power diodes to drop the voltage to 3V. To connect power to the smoke detector, solder wires to the battery tabs inside the battery compartment. You can also just power the smoke detector with a battery. One of the photos shows a pictorial wiring diagram of the design. This device uses two power diodes to provide an "OR" function between the smoke detector output and the 5V wall transformer output. In other words, "Keep power off if Smoke is detected or the 5V wall transformer is on." The diodes block the current flow from conflicting as the device switches from the smoke detector holding the power off to the wall transformer holding the power off. The design works smoothly and requires no Arduino, software, or special parts. The wall transformers can be old cell phone chargers. The total cost for IoT Control Relay and smoke detector is about $50. Add another $15 if you have to buy the wall transformers and power diodes. I've included a smoke detector spacer ring which allows the cable to exit on a flush installation. Update: It's acceptable to power the smoke detector with 110 VAC. If you use 110VAC, it can be plugged into the "always on" outlet of the IoT Relay. I didn't suggest this in the original design because it requires 110V in the circuit which some people may not be comfortable with assembling. It also acceptable to use a battery with the smoke detector. This design still works regardless of how the smoke detector is powered. What can happen without a safety shutdown: A 3D printer can catch on fire and cause significant damage to your property and belongings. There have been several instances where 3D printers have caught on fire, causing extensive damage and even hospitalization. It's essential to take safety precautions when working with 3D printing. Here's a video showing the 3D Printer Safety Shutdown in action: The video shows that the device shuts the printer off after just a wisp of smoke and that the smoke detector doesn't continue to blare. The smoke detector also shuts off after doing its job. It is easy to reset the power and the smoke detector by cycling power to the IoT Relay. 3D Printer Safety Shutdown: https://www.youtube.com/watch?v=P-1EX5GqZd4 Update Sept 9, 2017: Data Loggers has redesigned the IoT Relay which is thankfully available again. They changed one of the switched Normally "ON" outlets to be an "ON" always outlet. You can still use this design. Plug the Smoke detector wall transformer into the "ON" always outlet. The only difference with the newer IoT Relay is that the Smoke Detector will continue blaring until the smoke has cleared. The printer will still stay off as it did previously. Update Feb 10, 2018: It's acceptable to power the smoke detector with 110 VAC. If you use 110VAC, it can be plugged into the "always on" outlet of the IoT Relay. I didn't suggest this in the original design because it requires 110V in the circuit which some people may not be comfortable with assembling. It also acceptable to use a battery with the smoke detector. This design still works regardless of how the smoke detector is powered. Update Dec 14, 2019: YouTube video regarding fire safety for 3D printers: https://www.youtube.com/watch?v=VK_K6fp4BIk&t=15s
With this file you will be able to print 3D Printer Safety Shutdown - Smoke Detector with your 3D printer. Click on the button and save the file on your computer to work, edit or customize your design. You can also find more 3D designs for printers on 3D Printer Safety Shutdown - Smoke Detector.
