3D Printed Wheel + Axle, Parametric
thingiverse
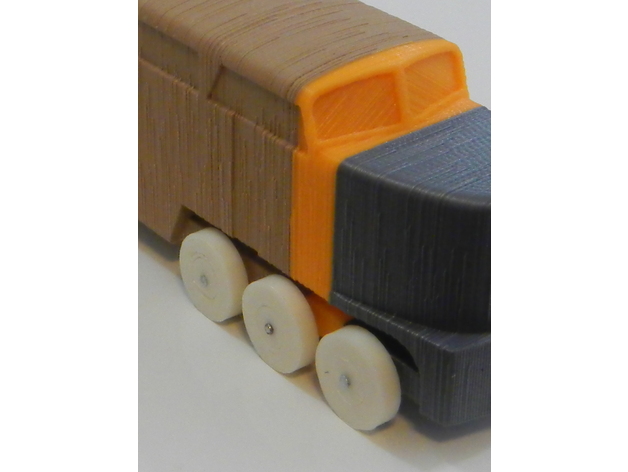
Here's a basic, parametric definition for toy wheels created in Rhino + Grasshopper. The axle has a square shaft for assembly into whatever vehicle you dream up. The part is generated with a user-defined gap between the hub and wheel (0.4mm worked well for me). You can also include a through-hole to use a nail or screw for a more durable toy. I've used a small nail in the included photo to lock in the 3D printed wheels. The nail does two things: it reinforces the plastic where the hub narrows to the plastic axle and expands the axle section for a tighter fit into the hole. You could use glue, but I found that the nail does a great job of locking the wheels on. The reinforcing hardware allows you to use a much smaller axle size (that can stand up to enthusiastic toddlers). I used these wheels on my Modern Diesel Train. After assembling onto the train and hammering in the nails, I had to work the wheels back and forth to snap the 1st layer skin that occasionally binds the wheel in place. After breaking this loose, the wheels spin smoothly, with some resistance. One note: you may need to slightly oversize the central through-hole, in case your printer/slicer isn't completely accurate on ID dimensions. Print Settings Printer Brand: SeeMeCNC Printer: Rostock MAX Rafts: No Supports: No Resolution: 0.2mm Infill: High, rectilinear Notes: I had very good results with ABS (from SeeMeCNC). Post-Printing Light sanding on the bottom surface will help un-bind the wheel. If still stuck, use a hobby knife to separate. Then, gently rock the wheel back and forth on the hub. (removed foreign characters) Basic parametric definition for toy wheels is created in Rhino + Grasshopper software. The axle has square shaft designed for assembly into vehicle you imagine. Part is generated with user-defined gap between the hub and wheel (0.4mm worked well). You can include through-hole to use nail or screw for more durable toy. Small nail is used in photo to lock 3D printed wheels in place. Nail does two things: it reinforces plastic where hub narrows to plastic axle and expands axle section for tighter fit into hole. I used these wheels on my Modern Diesel Train. After assembling onto train and hammering nails, I worked wheels back and forth to snap 1st layer skin that occasionally binds wheel in place. After breaking this loose, wheels spin smoothly with some resistance. One note: you may need to slightly oversize central through-hole if your printer/slicer is not completely accurate on ID dimensions. Print Settings Printer Brand: SeeMeCNC Printer: Rostock MAX Rafts: No Supports: No Resolution: 0.2mm Infill: High, rectilinear Notes: I had very good results with ABS from SeeMeCNC. Post-Printing Light sanding on bottom surface will help un-bind wheel. If still stuck, use hobby knife to separate. Then, gently rock wheel back and forth on hub. Basic parametric definition for toy wheels is designed in Rhino + Grasshopper software. The axle has a square shaft that allows assembly into whatever vehicle you design. The part is generated with a user-defined gap between the hub and wheel (0.4mm worked well). You can also include a through-hole to use a nail or screw for added durability. In the included photo, I used a small nail to lock in the 3D printed wheels. I used these wheels on my Modern Diesel Train. After assembling them onto the train and hammering in the nails, I had to work the wheels back and forth to break free from any binding that may have occurred during printing. Once loose, the wheels spin smoothly with some resistance. One note: you may need to slightly oversize the central through-hole if your printer or slicer is not accurate on ID dimensions. Print Settings Printer Brand: SeeMeCNC Printer: Rostock MAX Rafts: No Supports: No Resolution: 0.2mm Infill: High, rectilinear Notes: I had excellent results with ABS from SeeMeCNC. Post-Printing Light sanding on the bottom surface can help to loosen any binding that may be occurring with the wheel. If still stuck, use a hobby knife to carefully separate the wheel from the hub. Then, gently rock the wheel back and forth on the hub to ensure it is properly seated.
With this file you will be able to print 3D Printed Wheel + Axle, Parametric with your 3D printer. Click on the button and save the file on your computer to work, edit or customize your design. You can also find more 3D designs for printers on 3D Printed Wheel + Axle, Parametric.
