3D Printed Watermill
pinshape
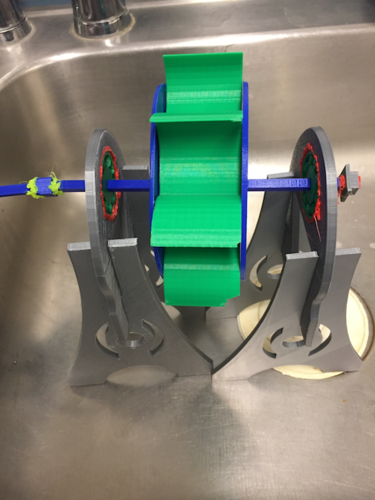
We decided to try out a cool science experiment, my daughter and I, to see if we could print a real working watermill using 3D printing technology. We wanted to exclude only two components: a DC motor to generate electricity and a multimeter to measure power output. Fortunately, our efforts were successful without needing any screws or glue to assemble the parts together. The only screws used were for mounting the RS-550 motor to its corresponding 3D printed motor mount. Here's a video showing the watermill in action: To "glue" the parts together, we utilized the Kuman 3D drawing pen as demonstrated in these videos. The first video was a test to determine how well the parts would stick together, and the second video showed us attaching the ball bearing to the windmill's frame. This next video showcases how we attached the RS-550 DC motor to its 3D printed motor mount. You'll need to print the following components: * 2 ballbearings * 1 motor holder * 2 Gear holders * 4 Gear holder stands * 1 Water Wheel * 2 Water Wheel sides * 2 Beam to Motor pieces * Several beams, connectors, and 2_beam_connectors The beams connect the water wheel to the motor. The Beam_to_Motor piece connects directly to the motor. The 2_beam_connectors are used to link two beams together. We "glued" the connector to the beams, and it's also used to keep the pieces in place on the beam. This experiment was an absolute blast, and if you're looking for a fun science project to do with your kids (or even by yourself), this might be just what you need.
With this file you will be able to print 3D Printed Watermill with your 3D printer. Click on the button and save the file on your computer to work, edit or customize your design. You can also find more 3D designs for printers on 3D Printed Watermill.