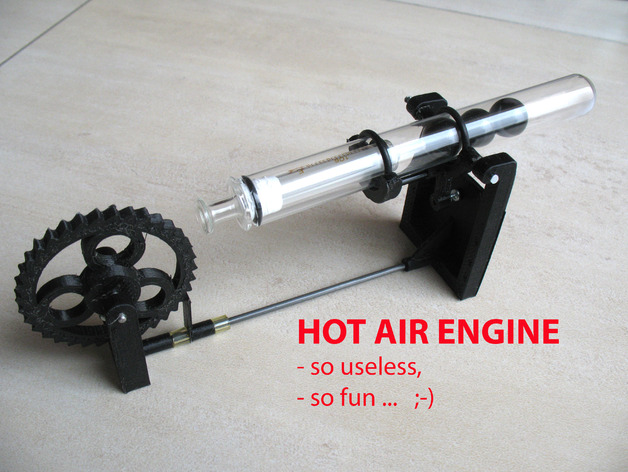
3D printed marble Stirling engine
thingiverse
This Stirling Engine, known as Beta Configuration, Features One Cylinder with a Hot End and a Cool End, Driven by Marbles. The Working Gas Moves from the Hot End to the Cold End Using a Device Called a Displacer, Whose Function is Performed by Three Glass Marbles in This Design. The Diameter of the Marbles is Smaller than the Diameter of the Cylinder, Ensuring that their Motion does not Alter the Volume of the Gas in the Cylinder, but Rather Transfers it from One End to the Other. To Achieve this Motion, an Appropriate Inclination is Given to the Cylinder, Which Sets the Marbles Rolling. As the Gas Expands, It Pushes Against the Syringe Piston, Causing it to Turn and Reach a Higher Position, whereupon the Marbles Roll Towards the Hot End. This Causes the Gas to be Pulled towards the Cool End, Which Results in the Piston Retreating and Returning to its Original Position. The Process Continues, with the Marbles Rolling towards the Cold End and Pushing the Gas Back towards the Hot End, thus Forming an Unbroken Cycle. For a Visual Demonstration of this Design in Action, Watch This Video Here: https://youtu.be/i0iqq27CjOs It's worth Noting that the Stirling Engine Produces a Captivating and Disturbing Sound Effect, so be Sure to Turn Up Your Volume while Watching. Assembly Instructions for the Model: * A Syringe is Made from a 2ml Glass Container with an Outer Diameter of 18mm, Used in Combination with a Test Tube. * The Materials Used are PLA (Polylactic Acid), Printed at a Thickness of 0.5mm on the Hot End and 0.2mm on Layers. * A Total of Four O-Rings are Required, each Measuring 2mm in Diameter. Two Fit onto the External Diameter of the Test Tube, while the Other two Sit on the Syringe. * Additional Materials include PTFE (Polytetrafluoroethylene) Plumber Tape, a Carbon Rod with an Outer Diameter of 3mm, and a Nail also measuring 3mm. * A Small Screw is Also Needed to Tighten the Rest Position. Assembly Process: * Begin by Cleaning the Syringe Piston to Eliminate Friction using Copper Paste and Water. This will Allow the Piston to Slide Smoothly through the System. * Next, Insert the Glass Marbles Inside the Tube, Followed by Two O-Rings Placed at Opposite Ends of the Syringe. This Prevents Leaks. * Wrap PTFE Tape around the Syringe to Hold the First O-Ring in Place and Center it with the Second. * Push the Syringe into the Test Tube from Both Ends to Ensure Air Tightness. * Once Assembled, Support the Tube using a 2mm Nai Inserted through two Pre-made Holes. Roll large O-rings onto the tube, then Press-fit the Supports to Hold it Firm. To Adjust the Rest Position, Locate the small screw attached and fine-tune its positioning as desired. Safety Reminders: * Use caution when working with the engine due to its hot operating temperature (especially the Hot End) after each operation cycle. * Exercise Safe Operating Practices Under Adult Supervision.
With this file you will be able to print 3D printed marble Stirling engine with your 3D printer. Click on the button and save the file on your computer to work, edit or customize your design. You can also find more 3D designs for printers on 3D printed marble Stirling engine.
