3D Printed Clock with Perpetual Calendar
prusaprinters
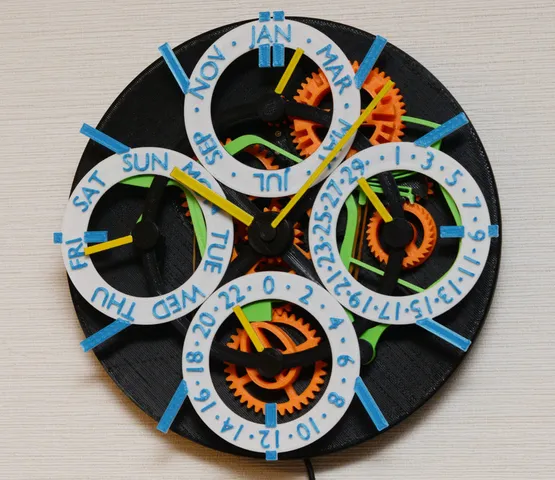
Clock with Perpetual CalendarPerpetual calendar is one of the representative mechanism of complication clocks and watches. It shows correct date up to 2099 without correction because it can handle all kind of month lengths including February of leap years.FeaturesMechanical perpetual calendar which is only seen on very expensive watches and clocksThis clock has four sub-dials to show 24hours, month, date and day of the weekReady for practical use. The clock itself is driven electrically and more accurate than mechanical one. No winding necessaryEasy calendar adjustment by direct manipulation of handsDesign highlightsFour sub dials are arranged regularlyAll six hands rotate CWSkeleton design to maximize the visibility of the mechanismNo bearings or metal shafts are used but works smoothlyNo screw heads in frontYou do not need supports in 3D printPrintable with relatively smaller printers including Prusa MINI (size of maximum part is 180 x 180mm)To design the gears, I used "Precision Gears" addon for Blender, https://makertales.gumroad.com/l/PrecisionGearsVideoHow to makeNecessary parts28BYJ-48 geared stepper motor and driver circuit comes withArduino nano or other micro controllerOne tactile switch2mm tapping screwsThin rubber bandsLubricants (silicone grease)Double sided adhesive tapePlease take a look at the "Assembly Guide" video above.Step 1. Assembly of Front SectionFront frame holds all hands and several gears.Please make sure that all axes rotate smoothly before assembly.Remove debris and blobs from the parts well for smooth rotation.Adjust the strength of the rubber bands. The main arm (green part) should be smoothly returned by the tension of the stronger rubber band.Step 2. Assembly of Rear SectionRear board holds several idler gears, click hooks and a stepper motor.Step 3. Engage Two UnitsEngage front and rear assemblies.Watch here and there to engage them without interfering parts. Especially, click hooks and main arm tend to block them.It is better to engage them with the program wheel at the position of February (at deepest channel)Adjust positions (phase) of the month gear and program wheel.Adjust positions (phase) of 12 and 24 hours.Confirm the smoothness of the motion of the all parts without motor.Then attach the stepper motor with two tapping screws.Step 4. Print and Stick Sub DialsYou can select two types of month sub-dials. One has DEC at top, and the other is JAN.Print the sub dials with the function of "pause at height" to change the material during print. Change the material at height=1.5mm.Stick sub dials to the front frame with double sided adhesive tape.Step 5. Test and Runthe clock with "stepper-test.ino" which rotates the minute hand as fast as possible.Then flash "clock.ino" to use it as an usual clock.Use optional parts (hanger.stl and driver-holder.stl) to fix the circuitry and hang the clock to the wall.OperationTo adjust the time, press the tactile switch. The clock runs fast.By pressing reset button, the clock advances one minute.To adjust the date, rotate the date hand or the corresponding gear.You can advance the date by pulling up the left end of the main arm (green part).To adjust the month, pull up the main arm to disengage the hook to the program wheel, then rotate the program wheel. Note that the program wheel rotates CCW. "L" letter means leap year.To adjust the day of the week, just rotate the week hand.Category: Gadgets
With this file you will be able to print 3D Printed Clock with Perpetual Calendar with your 3D printer. Click on the button and save the file on your computer to work, edit or customize your design. You can also find more 3D designs for printers on 3D Printed Clock with Perpetual Calendar.