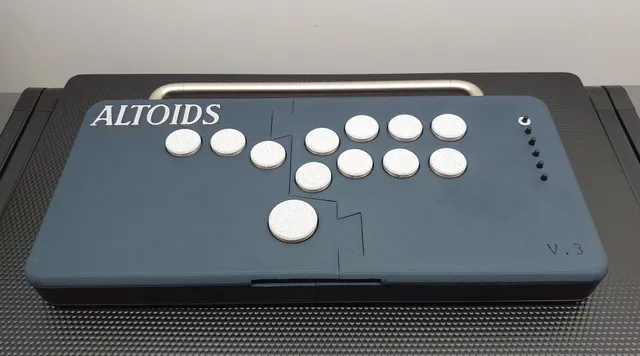
3D Printable Hitbox Controller
prusaprinters
Check out this project's successor here. OverviewI was looking to replace my giant Fighting Edge hitbox with something a bit more compact and found the Snackbox Micro, while a really great product, a bit too small for me. Even the Micro would be too large to print on most 3D printers, so I decided to go with a split-body that can be disassembled in quadrants for future modifications, repairs, or upgrades to save plastic. HardwareHitbox SwitchesThe Snackbox Micro uses Kailh Choc switches. In order to match the feel of that device, I used the same flavor as the ones they sell on the Junkfood Arcade website. Get a tester pack and figure out which one you like before buying a whole set.Menu ButtonsI bought a set of these 6x6mm push buttons. Make sure yours are the same dimensions. Variety packs like these are nice because they give you a chance to try out different heights. My design has slots for six menu buttons. The top three are intended to be Start, Select, and PS. The bottom three are for expanding functionality in the future.BatteryThe controller's chassis has a slot for a specific model of 20,000 mAh batteries. Not everyone is going to want to (or be able to) include this, so a second version of the part is available as well, “base left no battery”.Fighting BoardMy board of choice was the Brook Universal. You could also go with something else, like an Arduino or ESP32 if you'd prefer to save some money.MagnetsThe lid is held in place by eight bar magnets measuring 25x5x3mm. There's a variety of different sources for magnets like these online.WiringYou're going to need some tinned, stranded wire to hook everything up. In order to keep everything compact I soldered it together rather than using crimps or clips. I used zip ties for cable management.HandleMine has a metal drawer pull for a handle, which I find (along with the battery) gives the controller a nice weight that prevents it from sliding around. This is optional, obviously. I don't have a good source for the handle I used, you'll need to find one you like and drill holes for it yourself.USB Cables and AdaptersI used small USB A to C adapters to get a clean IO. I highly recommend getting this right-angle USB B to A cable for anyone using the Brook Universal. For the external USB C to A, just make sure it's short and flexible enough to store in the chassis. PrintingI used Prusament PLA on the i3 MK3S+. For the results you see in the photos, use a 0.15mm layer height on base and lid parts as well as supports and a fairly wide brim to keep it all stuck down. The tolerances do need to be quite close for these to snap together properly, a poorly calibrated printer won't do. You can go ahead and remove the Altoids logo if you want lol.The buttons used in the photos were not of my design. You can find them here. Full disclosure, this model was used to get the dimensions for the Kailh switch slots as well. AssemblyThoroughly clean the edges of the base and lid parts. Ideally, you'd use a burr remover to chamfer them slightly. Remove all support materialOn a flat surface (countertop, glass), align the two halves of the base and press them together like puzzle pieces. This may take quite a bit of force depending on how well your print turned out.Repeat step 2 for the lid.Use the bracket to line up and glue the backstops in place. The backstops overlap the seam of the lid, do not glue the left backstop to the right lid if you ever want to disassemble it.Use super glue to fix the bar magnets into their slots. Double-check their orientations.Super glue the USB A to C adapter into its slot on the right half of the base.(Optional) glue in the cable storage bracket. I find this helpful for storing the cable away easily.Press-fit your Kailh Choc switches into place, checking the orientation to make sure the pins don't contact the battery pack when the lid is closed.Insert your menu buttons. Make sure they're all the same way around so you can keep track of the ground.Glue the menu button support in place at the top and bottom such that it adheres to the lid but not the switches.Mount your board.Get to wiring. Brook provides guides for how to wire up their boards. If you're using something else I'm going to assume you can figure it out.
With this file you will be able to print 3D Printable Hitbox Controller with your 3D printer. Click on the button and save the file on your computer to work, edit or customize your design. You can also find more 3D designs for printers on 3D Printable Hitbox Controller.
