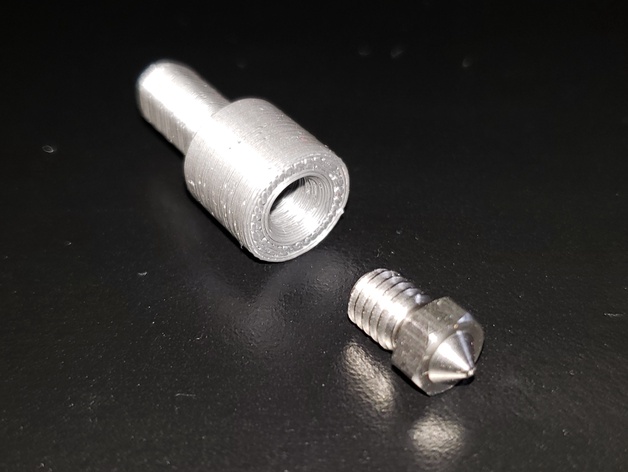
3D nozzle deburring / polishing bit
prusaprinters
<p>Have you seen those cheap Chinese E3D-compatible nozzles? If you look at one in a micrsocope you will see pits and burrs on the tip. Well, I thought I'd make something to help me polish those nozzle tips, and make the nozzles actually worthwhile to use, instead of risking failed prints due to the nozzle's poor quality.</p><p>This is a bit that fits in a standard 1/4" electric drill chuck. Screw your nozzle into it, put it into the electric drill, and spin it against some fine sandpaper for 20-30 seconds.</p><p>The photo shows a 0.3mm stainless steel nozzle that came with a package of nozzle cleaning tools, before and after polishing. I wanted the tools, not the nozzles, but it seems I can rescue the nozzles. I gave up on the 0.2mm one because the hole is way off center.</p><h3>Print Settings</h3><p><strong>Printer Brand: </strong>Prusa</p><p><strong>Printer: </strong>I3 MK3S</p><p><strong>Supports: </strong>No</p><p><strong>Resolution: </strong>0.4mm nozzle, 0.2mm layers</p><p><strong>Infill: </strong>At least 20%</p><p><strong>Filament:</strong> Prusament PLA</p><p><strong>Notes: </strong></p><p>Print with at least 4mm brim or the part might pop off due to the small surface area on the print bed.</p><h3>Post-Printing</h3><p>I used the magnifier on my phone to take a picture through a magnifying glass of my nozzle tip.</p><ol><li>First be sure your nozzle tip actually needs polishing by looking at it in a microscope or using your phone camera through a magnifying glass at maximum zoom.</li><li>Screw the nozzle into the bit<i>just finger-tight,</i> so you don't strip the threads.</li><li>Put some 3000-grit sandpaper (available at Home Depot) against a hard, flat surface.</li><li>Carefully align the bit against the sandpaper, checking by eye from two angles (top and side) to ensure that the bit is perpendicular to the surface. If you don't get it perpendicular, you'll end up with a rounded or conical polishing, not flat.</li><li>Spin the bit for 20-30 seconds against the sandpaper (do it in short bursts in different spots on the paper). If you got it perpendicular, the bit should stay in one place and not skitter across the sandpaper.</li></ol><p>Examine the bit under high magnification as in step 1. Repeat the steps if more polishing is needed.</p><h3>How I Designed This</h3><p>Deisnged with Tinkercad, using a thread shape generator I made. The Tinkercad file is available here (made in my son's Tinkercad account): <a href="https://www.tinkercad.com/things/7AkGhIP63rK-3d-nozzle-polishing-bit">https://www.tinkercad.com/things/7AkGhIP63rK-3d-nozzle-polishing-bit</a></p><p> </p><p>Category: 3D Printer Accessories</p>
With this file you will be able to print 3D nozzle deburring / polishing bit with your 3D printer. Click on the button and save the file on your computer to work, edit or customize your design. You can also find more 3D designs for printers on 3D nozzle deburring / polishing bit.
