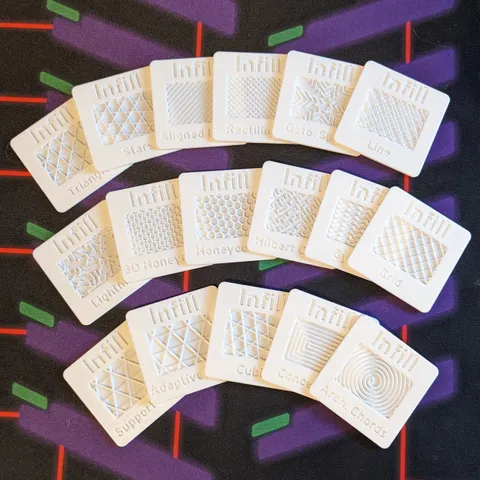
35mm Slide Infill Samples
prusaprinters
This is a set of infill swatches to match the “35mm slide”-style filament swatches created by George. They have the same external dimensions, and the filament “window” is roughly the same dimensions and orientation as the sample image on the original slide swatches, so they will visually match and can be kept in the same boxes as the filament sample slides.There are two groups of files already set up for PrusaSlicer and as gcode for the Mini/+:15% infill and 0.2mm layers (6 layers of infill) (on the left in second photo)20% infill and 0.1mm layers (12 layers of infill) (on the right in second photo)The latter does a much better job of showcasing the infill patterns, but it takes nearly twice as long to print all 17 slides. If you're impatient, the 15%/0.2mm set is perfectly adequate!You can also play around with changing whatever settings you'd like, but I strongly recommend paying close attention to what the slicer spits out and printing one single test slide before printing the rest. (That's why “Set 1” is just a single slide.) If you want to create completely custom slides with your own text, start from “Creating and Importing Your Own Slides"; otherwise, skip to “Changing the Infill.” If you're working from the STLs posted here rather than the 3MF files, start with Step 6 of “Creating and Importing Your Own Slides,” though the specifics may not apply to your slicer. (I know, this looks like A Lot, but I promise it's really not that hard! If you follow the instructions, you can't go wrong.)Need a case to hold all these neat slides? There are several in the original project; or you could try my remixed case that fits the Prusa Mini/+ and holds 60 slides.These slides were inspired by:33mm Slide Filament Samples: Actual physical slide modelInfill Swatch: Method for creating infill swatchesIf all you want to do is use the existing set of slides, STOP HERE! You're good! None of this crazy stuff below applies to you!Otherwise, if you want to make your own slides or change the existing ones, read on.================Creating and Importing Your Own Slides(Read me to learn how to make a slide with your own text! Otherwise, skip me!)Copy this Tinkercad project: 35mm Slide Infill SampleDuplicate the models for as many new slides as you wantFor each slide:Edit the text, abbreviating if necessaryIf the text has any descending letters (g, j, p, q, or y), increase the length and width of the text box by 25% (the new height will be 6.25 and the new width will be the old width times 1.25; ensure that the height grows down, not up, or you'll have to realign it)Center the text horizontally on the main body of the slide (select text box & slide together > type “L” > click circle in the center of the horizontal axis), ensuring that this does not move the main body (i.e., make sure the text is entirely contained within the main body before centering it)Group the text with the main body of the slide (do NOT group the red block in the center!)Export the slide model(s) to STLImport the STL into PrusaSlicerFor multiple slides (for a single slide, skip to Step 7):Separate the model into objects (right-click > Split > To objects)Merge each pair of objects (select both a slide body and its infill block > right-click > Merge)Skip to Step 8For a single slide: Separate the model into parts (right-click > Split > To parts)Ensure that the infill blocks are at the correct height (Z coordinate should be 1.2 in World Coordinates and 0.2 in Object Coordinates)For each slide:Select the infill block partRight-click > InfillRight-click > Layers and perimetersSelect the “Infill; Layers and Perimeters” lineSet layers and perimeters to 2 bottom layers, 0 perimeters, 0 solid top layers Changing the Infill(Read me to learn how to change the infill patterns on an existing slide—whether one from a downloaded project or one you imported in the previous steps!)Verify or set the following global print settings for the file:For 0.2mm layers:0.2mm layers2 perimeters3 top layers2 bottom layersFor 0.1mm layers:0.1mm layers2 perimeters3 top layers6 bottom layersFor other layer widths:At least 2 perimetersAt least 2 top layersAt least 2 bottom layersIf you can see your default infill at the bottom of the infill pattern, you need more bottom layers; bump the number up, re-slice, and check again For each slide:Select the “Infill; Layers and Perimeters” lineSet infill percentage and type
With this file you will be able to print 35mm Slide Infill Samples with your 3D printer. Click on the button and save the file on your computer to work, edit or customize your design. You can also find more 3D designs for printers on 35mm Slide Infill Samples.
