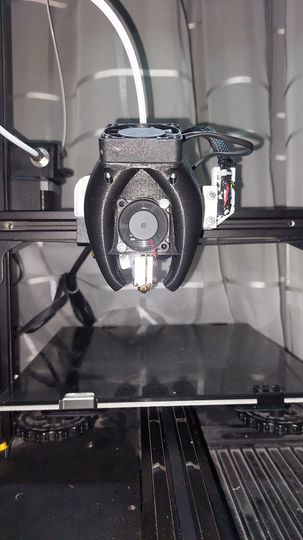
30s Quick tool swap system for the Ender 3 V2
prusaprinters
<p>It's a tool swap system for the ender 3 v2, that works using strong 6mm magnets and a rail system. In my 4 months of using it non-stop it has never come loose or moved, the force needed to take it off the rail is a bit more than the force needed to make the motor skip steps so something would have to go CATASTROFICALLY wrong to make the tool detach. <br>To assemble the base you will need: </p><ul><li>6mm magnets (might make a 5mm magnet version) </li><li>m3 nuts and bolts (i cut them to custom lengths as needed) </li><li>3d printed parts (Connector Plate, Clamp female side printer extended, Toolchanger Base) </li><li>dupont crimp on connectors (female)</li><li>dupont housings (i used 2 4pin housings, but you can use any that will fit)</li><li>dupont crimpers or just a pair of pliers which is how i did it</li></ul><p>If you have trouble assembling this system, make sure to message me on PrusaPrinters</p><p>To assemble the printheads you will need </p><ul><li>the hotend </li><li>a heater cartridge </li><li>a thermistor </li><li>m3 nuts and bolts (also cut to size) </li><li>a hotend mount depending on the hotend used </li><li>3d printed parts (Plate with connector mount 6mm magnets, Plate side male connector clamp and the optional mounts or ducts)</li><li>a cooling duct </li><li>dupont crimp on connectors (male) and housings</li></ul><p>After switching two printheads with a different length (like a v6 to a volcano) you can change the z offset (for my it's 8.50mm for a volcano) You need to level the bed to the shortest hotend and you will change the offset if you use longer hotends.</p><p>Assembly instructions for the base:</p><ol><li>take the belt on the x axis off</li><li>remove the carriage (unscrew the v slot wheels using an allen key and holding the nut with pliers)</li><li>cut the hotend mounting pegs off using a Dremel or hacksaw ( I will correct this if I make a V2, I have a few things I want to change)</li><li>put the M3 nuts into the hexagon holes in the “base plate” printed part, they might be a tight fit so you might need to melt them in</li><li>Put magnets into the 6mm holes on the front of the “base plate”</li><li>put m3 nuts into the “connector plate” (located on the back)</li><li>screw on the “connector Plate” part onto the “base plate”, mark off the end of the screw, cut it down to the length and reassemble it </li><li>crimp the wires for the hotend and fans to the dupont female connector and put the pins in housings, use the “clamp female printer side extended” printed part to mount it to the “connector plate” you will need to put a spacing block between the dupont connector and then clamp it down using two m3 screws cut to size same as with the base plate</li></ol><p>Assembly instructions for the Printheads:</p><ol><li>Press in the magnets into the printed plate (plate with connector mount 6mm)</li><li>Crimp the connections for the thermistor, heater and fans</li><li>Clamp the dupont casing using the “Plate side male connector clamp” printed part and M3 nuts and bolts cut to size </li><li>Screw on the hotend mount or hotend (Depends on the setup, the mk8 mounts without a separate mount)</li><li>clip or screw on the hotend cooling and part cooling fan </li><li>you may need to bend the pins to fit the base or apply lube to the sliding surfaces of the plate to make it fit into the base easier (it gets looser after a few times ; ) )</li></ol><p> </p><p>The screws to mount the MK8 to the plate need to be cut to size </p><p>The mount for an E3D V6 is this one: I unfortunately can't find the thingiverse page, but the files are “adapter v48” and “clamp v48” The screws that mount the adapter to the plate need to be cut to size </p><p>The hotend cooling fan for the mk8: https://www.prusaprinters.org/prints/119975</p><p>The duct for the E3D V6 is this one: https://www.thingiverse.com/thing:4131980</p><p>The duct for the E3D V6 w/ volcano block is this one: https://www.thingiverse.com/thing:1519726</p><p>After i find a fitting Bowden quick connector and i make a mk8 cooling duct i will make a V2 to this system in which i will</p><ul><li>make it weigh less </li><li>put a couple more pins in the connector system for stepper motors (for heads like the titan aero)</li><li>make the system possible to mount on a linear rail carrige </li><li>i will make the system use less fasteners and use only standard lengths ,not cut to size as on this one</li><li>i will correct the model so that you dont have to cut the pegs down on the plate</li></ul><p> </p><p> </p><p> </p>
With this file you will be able to print 30s Quick tool swap system for the Ender 3 V2 with your 3D printer. Click on the button and save the file on your computer to work, edit or customize your design. You can also find more 3D designs for printers on 30s Quick tool swap system for the Ender 3 V2.
