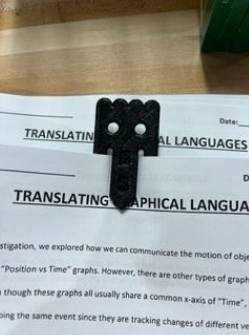
2D Ghost Paper Clip
prusaprinters
<p><strong>Lesson Plan: </strong></p><p>For this project, our goal was to create a 2D-printed ghost clip focusing on collaboration and accuracy. </p><p><strong>Construction Instructions: </strong></p><p>Create a sketch of the original ghost 2x the size on graph paper, but label the dimensions with the actual measurements. These measurements can be taken with a ruler and compass, and both actual dimensions and construction geometry should be recorded. Below is a drawing of the sketch with the correct dimensions.</p><p><br><img class="image_resized" style="width:34.16%;" src="https://lh4.googleusercontent.com/Q_lhHNf5LkORxKk9C2W3sOFODJ5lT6a2VmVu0iHhPyLLvhdE3lYHF7OoHcbLmS2u-iAiq54Qa6uREVJnAt9gyA-zCMAIAJSItt8FaqLzbbdA4pswKKZ-EjX7y720-FwKT10Q5t1THQQBx0w1UXOabuNXkCNmIDNV-MIRAzLUxixcKGeQi2uiITd9qg"></p><p>Here are the instructions to build it in Solidworks</p><ol><li>Create center rectangle centered on the origin </li><li>Set as construction geometry </li><li>Add smart dimensions to constraint box </li><li>Add construction lines for where arcs and spikes start </li><li>Add construction line for bottom of mouth to lowest point on constraint box </li><li>Set smart dimension for construction lines </li><li>Add construction line for bend on mouth (right side) to constraint box wall </li><li>Set smart dimension for construction lines</li><li>Add construction line for point on top of mouth to construction line for arcs (right side) equal length to previous construction line and 4.3 up from bottom of constraint box</li><li>Add lines for mouth from bottom anchor point to mid anchor point, then mid anchor point to top of the mouth only for right side (set vertical/horizontal as needed) </li><li>Offset on the inside </li><li>Use trim entities to remove extra line </li><li>Add arc on top of mouth </li><li>Add construction line from top construction line for arcs </li><li>Add construction line intersecting with previous line</li><li>Add circle</li><li> centered where the construction lines intersect </li><li>At bottom of constraint box, add a vertical construction line in from right wall </li><li>Add a second vertical construction line off of the previous line </li><li>Connect anchor points in triangles and construction lines </li><li> Inside top constraint box, add vertical construction line from middle line</li><li>Connect arcs from created anchor points</li><li>Mirror over center line so other half of design is filled </li></ol><p><img class="image_resized" style="width:60.06%;" src="https://lh3.googleusercontent.com/3NL8GE148VStCDj3wd8JjDAn7DIcDZKrXUW_wBHwc77MXk1fnxJO8gQW0MEnsfcauVF3rCJAr8YPlWQRo0SAh6DzG0guWP7MlDvD1A4H9QTWbCiVb4u866yGNI_eQj5cCZBkSsq5cLfjXcEcH9P2XuPeYgDj3gAcWbadCaE4DklcNo1oKcJkJS9gQA"><br> </p><p>Finally, compare side by side with the original model and tweak as needed for accuracy. Engrave the mouth with your initials and print! </p><p> </p><p><img class="image_resized" style="width:50%;" src="https://lh5.googleusercontent.com/vVkVPSRw44Br0v3Y2VQVP_huL16uyj0Hd-22kRcX8gBvCIqwq0vk0W5r7-W2dA4snn8zShKoqkNbZk5qJacvk6WryDYvfy1_tBvfWByZCTh42ob0BLAPLBsd5eg6Vpsxzul1zWCiQUGk8t7dCzze2TSSN8wGJSoT73VS4PMsXhcYP2-In7YB8t9Rig"></p><p><strong>Design Choices</strong></p><p>When designing the model in Solidworks<strong>, </strong>we had to resolve several errors to make our models more similar to the original. The first error we noticed before even beginning to compare our designs was the spacing between the starts of the triangles and circles and the body of the rectangle. Our original measurements recorded both the bottom and the top at 0.6cm. However, when the circles were placed, there was a gap between the top of the circle and where it was actually supposed to end in the constraint box. </p><p><br><img class="image_resized" style="width:49.56%;" src="https://lh3.googleusercontent.com/YBemJe6HxyekJo3RfS2RmGDuqZgPrgHQ1hiMUygifdV650hl44NZwl4tZ6E1g9ejQp39n9kmf7BN9zlHUXqTNUs0fw_FpiYCTZQhJ5OHb-e5fjz1REWy5vgIOku3WgUS7_taVB0VWJ7cIDf2pNLdlCSqoYOh6qHD2nZMSte2MtE9iaiBABf35KYhyA"><br> </p><p>Confident in the measurements of our circles, we remeasured the distance and realized that it was actually 0.4 between the top of the circle and the base of the rectangle. Once corrected, the first change we made to make the models more similar was the size of the eyes. We noticed the eyes were too far apart and changed the length from the wall to the center of the eye to 0.85cm.</p><p><br><img class="image_resized" style="width:52.55%;" src="https://lh6.googleusercontent.com/z2fXqdi-AQi6cuixH7FYBuUiouwnpvI-iVe2uMyPGnDfl4wQwjx7b3FKKVH-AQW37HA6Rycs9UfNGPhRebZEbfgGqEYfLYEJhe74NYBFNIfA02WHtMu3s42E7Jk8knD7c0-tH8uWRO8r9YGYsHSWmylXXewd3vtZ8MmlW_IoDMFNMsqx7yBfNrXTNg"><br><br> </p><p>Next, the radius of the eyes was too small so we changed the size from 0.5cm to 0.58 cm and <img class="image_resized" style="width:55.39%;" src="https://lh6.googleusercontent.com/u2mICPCaqaKDIxBKjAff3qwdRtCS_uhA4Z5eIRkV8-rcb5ODW3BSZsNZ2msW4R9WDgFcQKnKeeh484NBV3jj9ianLZmELEWVC8NSeAUNZSPjXln1-gdgAIfVPJY7eBVZhpPS5sMW9Z3KqTVeOB-bUly1BZGLMH4zJJZl7j3z74zKBsVfkRZP3aOTUA"></p><p>Finally, we lowered the bottom anchor point of the mouth by 0.1 </p><p><img class="image_resized" style="width:50%;" src="https://media.printables.com/media/prints/299316/rich_content/d69fd64f-3613-47e9-840c-0f40fae7aaee/image.png#%7B%22uuid%22%3A%22ce3dff76-cb3b-41ca-b563-7c3182aae214%22%2C%22w%22%3A433%2C%22h%22%3A156%7D"></p><p> </p><p>Those were all the changes we made during this process! </p>
With this file you will be able to print 2D Ghost Paper Clip with your 3D printer. Click on the button and save the file on your computer to work, edit or customize your design. You can also find more 3D designs for printers on 2D Ghost Paper Clip.
