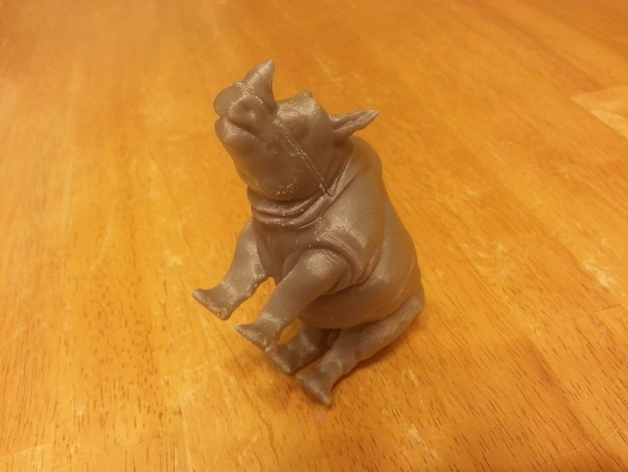
1x2x3 Rhino puzzle
thingiverse
I've always been fond of Rubik style puzzles, and designing one myself has been a dream for me. Recently, I printed an adorable Ozo 1x2x3 puzzle bear for my daughter, who loved it. However, this created a problem for my boys, as they wanted their own custom puzzle animal, too. I enjoy showing them the unique possibilities of 3D printing and custom objects, so I decided to take on the challenge. Together with my kids, we browsed Thingiverse for the perfect animal model while deciding what type of creature we could design together. We finally settled on a Rhino model from YahooJapan and started brainstorming in Tinkercad, where we also added snap pin holes. After discussing the puzzle's layout with my 5-year-old and 9-year-old sons, we agreed to split up the legs for more engaging puzzle pieces. They enjoyed twisting and turning their new rhino friend into silly shapes. Realizing that printing support materials might hinder our creative endeavors, I designed some custom middle piece supports using Tinkercad. The final result is both beautiful and functional, with clean holes and a smooth twisting mechanism. Adding an extra touch to the puzzle's excitement, we decided to reverse the orientation of the head while slicing. Our little rhino puzzle turned out even better than expected! Here are the detailed instructions for building your own 3D printed Rhino Puzzle: Print one copy each of all four pieces, using a mix of high-quality filaments and the Lily version with included support. If you have trouble finding lily pads in your local hardware store, don't worry – they can also be added digitally. As for my personal preference, I like printing models using three top layers, two bottom layers, and a ten percent infill. I believe this approach offers great flexibility without sacrificing durability or stability. Plus, it helps prevent unwanted sagging. Another clever detail I implemented into the design is a set of custom support structures specifically tailored to support each leg separately, which you won't need with Tinkercad. Simply load up your preferred 3D printing software and add your model pieces as you go! Upon completion, use high-strength adhesive and snap pins carefully along every corner. Hold your finished Rhino puzzle in mid-air while twisting it gently back and forth, checking if any unexpected edges or joints become lodged. Finally, tidy up by cleaning out the holes and replacing all those unsightly scraps. If things seem rough at this point, re-clean the holes with gentle force. That way, they'll look neat even when twisted. After putting in that much effort, share it proudly among friends! They can play just as happily with the twisty puzzle as your kids have enjoyed with their brand-new rhino friend, and the hours spent together making a game or having endless fun turning 3D print heads is guaranteed – because now that's simply magic.
With this file you will be able to print 1x2x3 Rhino puzzle with your 3D printer. Click on the button and save the file on your computer to work, edit or customize your design. You can also find more 3D designs for printers on 1x2x3 Rhino puzzle.
