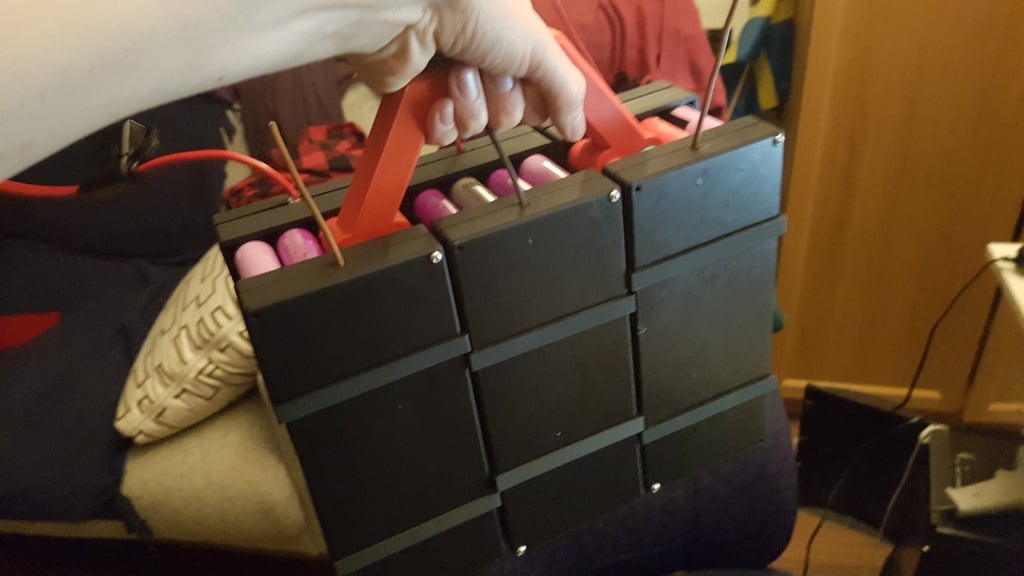
18650 x40 case
thingiverse
A Compact 18650 Battery Module Print the Connector to Unite Multiple x40 Packs at Will! Print the Attachment Board to Mount Components on the Pack's Side. (Updated 09-15-2019) My 40p3s Pack of Mixed 18650 Cells Still Functions Well. A Few Cells Went Dead Due to Overcharging, as Some 18650 Cells Charge Quicker Than Others, Resulting in Overcharging. I'm Allowing Natural Selection to Resolve This Issue. For a Single Module (Up to 40 Cells), You Will Need: 2x Lid and 2x Battery Holder. If You Don't Plan on Using Springs Inside the Battery Holder, Design Your Own Ring Parts or Print 2x Ring for a Better Fit. If You Plan on Connecting Multiple Modules, Print One or Two Holder Connector Wide to Link Them Together. The Handle Part Will Only Fit as Shown in the Pictures Across Three Boxes on Top. For Safety Reasons, Add 5 Amp Fuse Wire to Connect the Springs to the Bussbar on at Least One Side. This Prevents Batteries from Shorting Out and Becoming a Large Conductor, Which Could Cause Damage. If a Battery Dies by Shorting Out, the Fuse Wire Will Melt, Disconnecting the Dead Battery from the Pack. When Assembling a Module, Ensure All Batteries Within It Are Approximately the Same Voltage. Once Both Battery Holders Are Securely Attached, the Batteries in That Module Will Even Out Their Voltages. If the Voltage Difference is Too Great on One Battery, the Rest Will Charge it with Excessive Amps, Potentially Damaging it. I Use a Victron SmartSolar as My Solar Charge Controller and Have Experimented with Its Settings. For My 12V Battery Pack, I've Set Up the Following: Selecting LiPo Preset and Adjusting Float Voltage to 12V and Absorption Voltage to 12.10V. This Allows the Charger to Transition from Bulk Charging to Absorption Mode for Up to 4 Hours Before Entering Float Mode. On Sunny Days, I Can Simultaneously Charge My Laptop and Battery Pack Using a 100W Solar Panel. There's Sufficient Power in 100W for My Needs (USB-Charged Devices Like Phones, Tablets, and Drone Batteries), but You Must Determine Your System's Dimensions Based on Your Requirements. Once the Solar Panel Voltage Reaches Almost Zero (Like at Night), the Charger Will Consider Initiating Another Absorption Charge. For Some Reason, the Solar Charger Won't Allow Me to Drop Below 11.7V. In the Future, I May Add Another Module to My Pack to Increase Voltages. (Updated 09-15-2019) I Needed to Remove a Jumper from the Solar Controller for the Software Settings to Take Effect. Important: You'll Need a Battery Balancer to Regularly Even Out the Packs, Otherwise the Solar Charger Will Overcharge the High-Voltage Packs and Damage the Batteries. You Should Also Install a Fuse That Limits Maximum Output from the Battery Pack, Protecting the Bussbar and Internal Wires. This Prevents a Short Circuit Outside the Battery from Melting the Used Wires. I Found a Fuse Holder at a Local Car-Part Dealer and Am Using a 15 Amp Car Fuse (the Black Box on the Red Wire). Determine the Wire/Plate Thickness for Your Bussbar Based on the Load (Amps) You Plan to Draw from the Battery Pack, and Then Some. If the Holder Doesn't Have Springs, Consider Cutting Off Excess Material to Save Resources. Apart from M3 Screws, I Used the Following Items: https://www.aliexpress.com/item/50-Pairs-Metal-Battery-Spring-Plate-Set-for-AA-AAA-Positive-Negative-Contact-New/32870772743.html?spm=a2g0s.12269583.0.0.73621fd6ToAKLI Twisted Wires Car Fuses
With this file you will be able to print 18650 x40 case with your 3D printer. Click on the button and save the file on your computer to work, edit or customize your design. You can also find more 3D designs for printers on 18650 x40 case.
