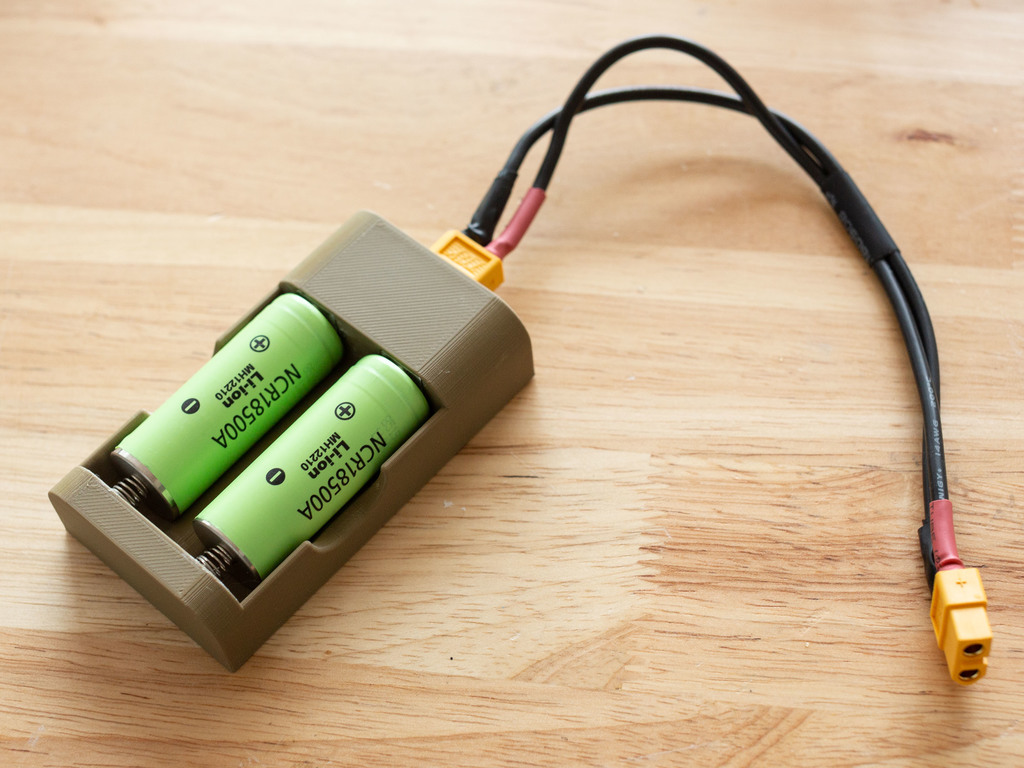
18650/18500 holder for charging with XT-60 connector
prusaprinters
<p>These two holder designs allow either 2x 18500 LiPo cells, or 2x 18650 LiPo cells, to be charged in parallel by connecting it to your existing LiPo charger with an XT-60 cable. You need to use an actual charger with this holder, not just a power supply!</p><p>The cells will be connected in parallel, so your cells must already be at a similar voltage before you put them into this holder. Otherwise the more-charged battery could push a large current through the flat battery. This is only likely to be a problem when combining a nearly-charged battery with a nearly-flat one, batteries that are used as a pair won't develop large voltage differences like this.</p><p>There is no reverse-polarity protection, and fault-current protection is provided by using thin 26 AWG wire - there is no dedicated fuse. The wire should fuse in around 10 seconds with a 20A fault current.</p><p>Required components:</p><ul><li><a href="https://hobbyking.com/en_us/nylon-xt60-connectors-male-female-5-pairs-genuine.htmls">XT-60 connectors</a> x 3 pieces total</li><li><a href="https://octopart.com/5202-keystone-47041">Keystone 5202 negative AA terminal</a> x 2 pieces</li><li><a href="https://octopart.com/5224-keystone-154900">Keystone 5224 positive AA terminal</a> x 2 pieces</li><li>Solid core 26 AWG wire (I'm using <a href="https://octopart.com/r26blk-0100-jonard-164843">Kynar</a>). Wire must be solid-core due to the installation method required, gauge must be 24-28 AWG</li><li>Thicker stranded wire for making an adapter cable to connect to your charger, e.g. 14 AWG silicone</li><li>Heatshrink tube</li><li>Liquid electrical tape is useful too</li><li>M3 hex nut x 2 pieces</li><li>M3 machine screw x 6-9mm length x 2 pieces</li></ul><p>Required tools:</p><ul><li>Soldering iron etc</li><li>Soldering flux (e.g. a flux pen)</li><li>CA glue (superglue)</li><li>Multimeter</li><li>Hammer</li></ul><h3>Printing</h3><p><strong>Printing the battery holder</strong></p><p>Choose the correct holder STL for the batteries you're using (18500 or 18650), and slice it using these settings:</p><ul><li>Material: Anything, I used PLA</li><li>Layer height 0.1mm</li><li>Infill 15% grid</li><li>Supports: None</li></ul><p>Add a colour-change at 13.80mm, this is the point at which the two hex nuts need to be inserted into the print at the XT-60 connector end. Insert them with one edge pointing downwards (rather than a flat side pointing downwards) and ensure that the top of the nut lies below the surface of the print before resuming, because otherwise the print head will crash into it on the next layer:</p><figure class="image"><img src="https://media.prusaprinters.org/media/prints/143765/rich_content/6dc28eb0-e41f-4f1a-a0b1-eddd4a3b518d/nut-insertion-spots.jpeg#%7B%22uuid%22%3A%225d428563-d0fe-40c5-8ada-2af891d605cd%22%2C%22w%22%3A1024%2C%22h%22%3A874%7D"></figure><p><strong>An M3 hex nut needs to be inserted point-downwards into both of these channels during the colour-change pause</strong></p><p><strong>Printing the XT-60 panel mount</strong></p><p>Use these settings to print <strong>two copies</strong> of this mount:</p><ul><li>Material: Ideally PETG, but PLA works too</li><li>Layer height 0.1mm</li><li>Infill 100%</li><li>Supports: None</li><li>You may want a brim to increase bed adhesion</li></ul><h3>Assembly</h3><figure class="image"><img src="https://media.prusaprinters.org/media/prints/143765/rich_content/7e07915f-f7a1-497d-9b8d-f1b354f42cb9/xt-60_panel_mount_insertion_demonstration.gif#%7B%22uuid%22%3A%22c66eb68b-6687-41fa-be2f-165f8f47442f%22%2C%22w%22%3A580%2C%22h%22%3A435%7D"></figure><p><strong>XT-60 panel mount</strong></p><p>The XT-60 connector needs to be installed into the panel mount holder using a tap from a hammer. The original XT-60 connectors from HobbyKing are high quality nylon and should survive this process without a problem.</p><p>Because the pins of the connector will protrude out of the bottom of the panel mount once installed, be sure not to just stand the mount up on your desk to tap it in (you'll end up with two dents in your desk from the pins!). Instead, print two copies of the panel mount, and hold them together as a stack as shown above while you tap the connector in. The bottom mount will act as a protector for the pins.</p><p><strong>Assembling the holder</strong></p><p>Apply flux to the rear of all four keystone battery connectors and tin the centre of these, just enough to fill the cup in the rear of them.</p><p>Strip the end of 4 x 26 AWG wires and solder them to the rear of the connectors in the centre.</p><p>The flat positive terminals go at the top of the holder, feed the wires through the holes there and out the back where the cavity for the XT-60 connector is. Trim the wires a couple of inches beyond the end of the holder and strip their ends (you need enough length protruding here so that you can solder the wires to the rear of the XT-60 connector).</p><p>The spring negative terminals go at the bottom of the holder. Feed the wire through the channel that runs from the negative terminals all the way through the middle of the charger to the XT-60 connector.</p><figure class="image"><img src="https://media.prusaprinters.org/media/prints/143765/rich_content/50d92506-6d87-47aa-ab81-6d2f042c830d/negative-terminals.jpeg#%7B%22uuid%22%3A%22365cd4df-297b-40b5-b651-8d7920fc40c3%22%2C%22w%22%3A1024%2C%22h%22%3A896%7D"></figure><p>Apply CA glue to the back of all four terminals and stick them into their cavities. These terminals are rectangular rather than square, so you need to rotate them to put the two little screwholes vertically rather than horizontally or they won't fit.</p><p>Now strip the ends of the wires. Solder the negative (spring terminal) wires to the negative connector of the XT-60, and the positive wires to the positive terminal. Insulate the connections with liquid electrical tape or by some other method:</p><figure class="image"><img src="https://media.prusaprinters.org/media/prints/143765/rich_content/4c1756ed-ba78-44d8-bae2-81874f2529a3/img_20200227_151055920.jpeg#%7B%22uuid%22%3A%22d7ff97d2-f078-4b15-bd27-178aa0b0616c%22%2C%22w%22%3A2880%2C%22h%22%3A2160%7D"></figure><p><strong>Wires soldered to the XT-60 and insulated with liquid electrical tape. Try to ignore the mess I made with the CA, lol</strong></p><p>Now use the M3 screws to install the XT-60 jack into the top of the battery holder. Try to avoid pinching the wires while doing this.</p><p>Use your multimeter to confirm that the wires are connected to the correct terminals of the XT-60, and the terminals are not shorted together.</p><p><strong>Connecting to your charger</strong></p><p>Now you just need to create a cable to connect this to your charger. I went with a cable with XT-60 female connectors on both ends, but you might need a cable with an XT-60 on one end and banana plugs on the other, depending on what charger you're using.</p><p><strong>Tweaking this design</strong></p><p>I've included the Fusion 360 archive file for this design, so you can customise it for the dimensions of your batteries (using the Modify -> Change Parameters menu).</p>
With this file you will be able to print 18650/18500 holder for charging with XT-60 connector with your 3D printer. Click on the button and save the file on your computer to work, edit or customize your design. You can also find more 3D designs for printers on 18650/18500 holder for charging with XT-60 connector.
