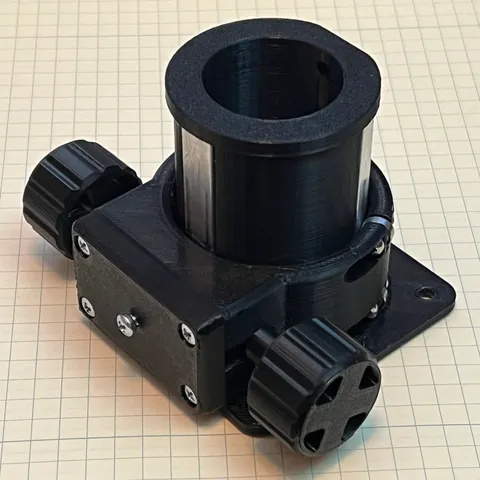
1.25" Crayford Focuser for telescopes
prusaprinters
This focuser was made to use with my Skywatcher Heritage 130P. The mounting holes are 57mm spacing, which matches the secondary piece I made here: https://www.prusaprinters.org/prints/122949-skywatcher-heritage-130p-secondary-piece-remixThe focuser itself is similar to a bunch of other designs I saw online but is not a remix. The drawtube is a new approach, rather than stick metal pieces to flat sides of a tube this uses pieces of aluminium inserted into slots in the top and bottom of the tube. When the tube is assembled then the metal bearing surfaces are captive with no glue. I used 10x3mm aluminium extrusion 64mm long. (If you can accurately cut flat pieces of steel that would be better) The drawtube is assembled using M3 brass inserts and 12mm M3 bolts. It must be assembled when in the main tube.The main piece has four 3x8x3 bearings held in place with a 10mm M3 bolt and a M3 nylock nut. It has four M3 brass inserts for the 20mm M3 front cap bolts to engage.The pinion is a 90mm long stainless steel shaft 5mm in diameter. It passes through the pinion block and is pressed against the front bearing surface. In the back of the pinion block are two holes for springs, that are compressed by the tension plate - a piece of the same 10x3mm aluminium as the bearing surfaces, this time 37mm long. These springs are 6.5mm uncompressed, 3.5mm compressed, a bit under 5mm in diameter. Pen springs are not quite strong enough. The tension is adjusted by the central bolt in the front cap, threaded through the inserted M3 hex nut, which compresses the springs and pushes the pinion against the front bearing surface. A thumbscrew here would be ideal - very similar to the ones used on the Boss guitar pedals are what you need.(An earlier design used bearings on the pinion shaft but more friction here is good; with bearings the focuser would not hold much weight as it rotates too freely)Once everything is printed (I used Prusament PETG, 0.2 layer height with 0.4mm nozzle) and the supports cleared off begin by inserting the bearings into the body with the locknuts. Don't overtighten. Next put the pinion shaft through the bearing block - make sure the pinion is cut cleanly and the ends slightly chamfered with a file to make insertion easier. The pinion block might need a slight sand to enter the main body easily depending on your print quality. Also get the M3 brass inserts for the front cap bolts inserted. Insert the M3 hex nut into the matching recess inside the front cap. With the front cap facing down put the tension block in the slot, then springs, then pinion block - insert this all in the main body as one unit keeping the springs and plate in place. As you tighten the four bolts to hold the front cap in place be sure the tension plate is in its slot and the spring are in the holes, this should not be hard to assemble but you might want to poke it with a small screwdriver from the side to adjust part positions as the front bolts are tightened. This is the only hard part of assembly - see final photo with springs sandwiched between plate and block for correct assembly position.Then the drawtube can be assembled. There are two STL files, one for the tube itself and one for the cap. Orient both with the flange toward the print surface in the slicer. Add M3 inserts to this also and one M4 insert near the flat part of the top flange to hold a thumbscrew to secure the eyepiece. Take the three bearing surface plates and insert them in the slots in the large part. Insert the drawtube into the main body so that the bearings run on two plates and the pinion runs on one, then add the cap so that the plates enter the slots in the cap. The flat part with the eyepiece screw faces away from the pinion. Then add the drawtube cap, secured by 3 bolts, and the drawtube is locked in place. Find yourself a nylon M4 thumbscrew if possible to secure eyepieces. Finally you can cover the metal of the shaft that sticks out of the main body with one of the pinion spacers per side and then add a knob each side, The knobs are a tight fit but a hole for a M4 insert is provided, you can also file the end of the pinion a little flat to help with engagement.15 August 23: I have added STEP files for the printable parts. For the focus wheels I recommend you make your own - sorry but I have misplaced the original files! If you want to use the STEP files then likely you know how to do this already.Clear skies!
With this file you will be able to print 1.25" Crayford Focuser for telescopes with your 3D printer. Click on the button and save the file on your computer to work, edit or customize your design. You can also find more 3D designs for printers on 1.25" Crayford Focuser for telescopes.
