were raven 3d models
203565 3d models found related to were raven.
prusaprinters
Once aligned, the parts then need to be printed with different settings so the grating part needs to be selected with per model settings and then the following settings were selected for it: Mesh Type: Normal Model (I did not try the other settings...
prusaprinters
This is not important but it will give you a better preview of the result making life a bit easier.In the "Custom G-code" settings add "M600" to the "Tool change G-code" (M600 is the G-code command for a manual filament change).Setting up you...
prusaprinters
They should be inserted from the same side the bearings were pressed in (the side of Bone1 with the larger opening, the side with the smaller opening should face away from the Base and angled Bone2). ...This ensures that the bearings are retained...
prusaprinters
These 100mm Makerbeam extrusions replaces all the standoffs that were used to hold the body of the Chip-E together (the Arduino standoffs are still needed). The Chip-E UEK's Makerbeam extrusions offer convenient hard points mounts for other external...
gambody
Divided into 9 pieces and Solid for different sizes of buildplates;- All parts are divided in such way that you will print them with the smallest amount of supports.DLP/SLA 1.0 version features:- Same as FDM but smaller, also made as...
prusaprinters
Also, turning the Button produces a highly satisfying clicking sound. So what is this good for? Have something to fiddle with were ever you wear your clothes equipped with this button Show of the cool...
prusaprinters
These will work on this design, but I made my own PCBs that were larger and have 2 outputs for 1 input, in the direction of the next facet. I also modelled in clips for these PCBs to hold them in place whilst soldering up.</p><p><img...
thingiverse
Both were bad. I didn't discover this until I'd printed and assembled the printer, however, so I had to buy one. I chose the BTT SKR V3 (https://www.amazon.com/dp/B08LVTXT46?psc=1&ref=ppx_yo2ov_dt_b_product_details) Both other 32 bit boards should...
prusaprinters
If you need to secure your precious belongings in a safe place, you found what you were looking for. This safe is secured by a 3 digit combination to prevent anyone from opening it (unless they have a hammer or a heat gun, I mean it's just plastic at...
prusaprinters
Quick heads up: These remix designs were somewhat “intended” for the case being positioned on the X-max end (right side) of the LR3 gantry. If you are planning for placing it on the X-min (left side), then the only concern with simply sliding...
thingiverse
I glued them and make sure they were in the right position with the screws beforehand. Now you should try screwing the lock cover onto the lid (do not pull too hard) so that problems with the cover can be eliminated before steps 5 and 6 get fiddly. ...
cults3d
Included models I recreated and included the few rare models which I had found were viable in the previous version: "I♥U MOM", "I♥U MUM", "GOOD LUCK GRAD", "GOOD LUCK BABE" and "GOOD LUCK DUDE". If you want one of these, you might want to print the...
thingiverse
This will prevent the rack from coming apart over time, and is recommended if the pegs were not a snug fit. One advantage to not doing this is the ability to modify the rack in the future. Update: after using this rack for awhile, I suggest gluing...
prusaprinters
I used superglue to stick down any bridge lines that were dislodged inside the body.Apply silicone lube to the threads in the Body and screw that into the Middle and unscrew it a couple of times to distribute lube between these two pieces. Leave them...
prusaprinters
I used superglue to stick down any bridge lines that were dislodged inside the body.Apply silicone lube to the threads in the Body and screw that into the Middle and unscrew it a couple of times to distribute lube between these two pieces. Leave them...
prusaprinters
I wanted to go a different direction with most of the pieces, and I wanted to ensure they were all truly available as open source, so I ended up making my own parts. This is the first laser I have made or designed, so there may be some tuning...
prusaprinters
In the last weeks I got some notifications that some unknown users wrote to my WordClock bot and these messages were blocked which is OK, I think. ...Maybe it was one of you guys testing the functionality, but I think it might make sense to block...
thingiverse
//SoniC vel PrEzi P.S.2 If you were too fast with flashing the mainboard firmware even though you couldn't flash the TFT firmware because of the new GD32 microcontroller User lvpvsinfabvla has posted a stock firmware for Genius Pro. Revert back...
prusaprinters
The most popular way is through playing boardgames.By playing games her children learn not just basic skills and general knowledge about certain subjects, but they also develop better social skills like asking for information, taking turns,...
prusaprinters
I used superglue to stick down any bridge lines that were dislodged inside the body.Apply silicone lube to the threads in the Body and screw that into the Middle and unscrew it a couple of times to distribute lube between these two pieces. Leave them...
prusaprinters
This will be addressed in the future, including fixing the filament dry box.上にフィラメントドライボックスを乗せたところ、天面パネルが大きく撓んでしまいました。応急処置としてアルミの角パイプを置いています。これはフィラメントドライボックスの固定も含めて、今後対処するつもりです。Floating the enclosure筐体を浮かせるThe legs used to stand the acrylic panel up...
prusaprinters
IMO the noise profile wasn't annoying (although this is a bit subjective) and they weren't louder than the air purifier and the desiccant dehumidifier that were running in the same room as my printer (both appliances being rather quiet without...
prusaprinters
Originally the design called mainly for M4 screws so perhaps M2 screws could work with this 50% scale version instead?Besides scaling, the changes I made were to combine the six base pieces into a front and back base rail and remove the screw holes....
thingiverse
__Also note:__ Photos included below were taken of an existing Hero Me Mutant that had already been assembled to the Wham Bam Mutant. So, in some photos the wiring is seen as already connected to the Mutant Mobile plate. This would not be the case...
thingiverse
They were a bit tight on my print, so before I assembled it, I just twisted the filament back and forth like a drill bit as I was pushing it through the holes. I used a piece about twice as long as needed for the hinge so that it was easier to grab...
thingiverse
I replaced my larger vacuum with a smaller one and didn't realize the hoses were different sizes. Since I already had the 2.5" adapter glued in to the PVC tee, I created another adapter. (brim recommended)Vacuum_Adapter_PVC_Tee_To_2.50.stl adapts a...
thingiverse
[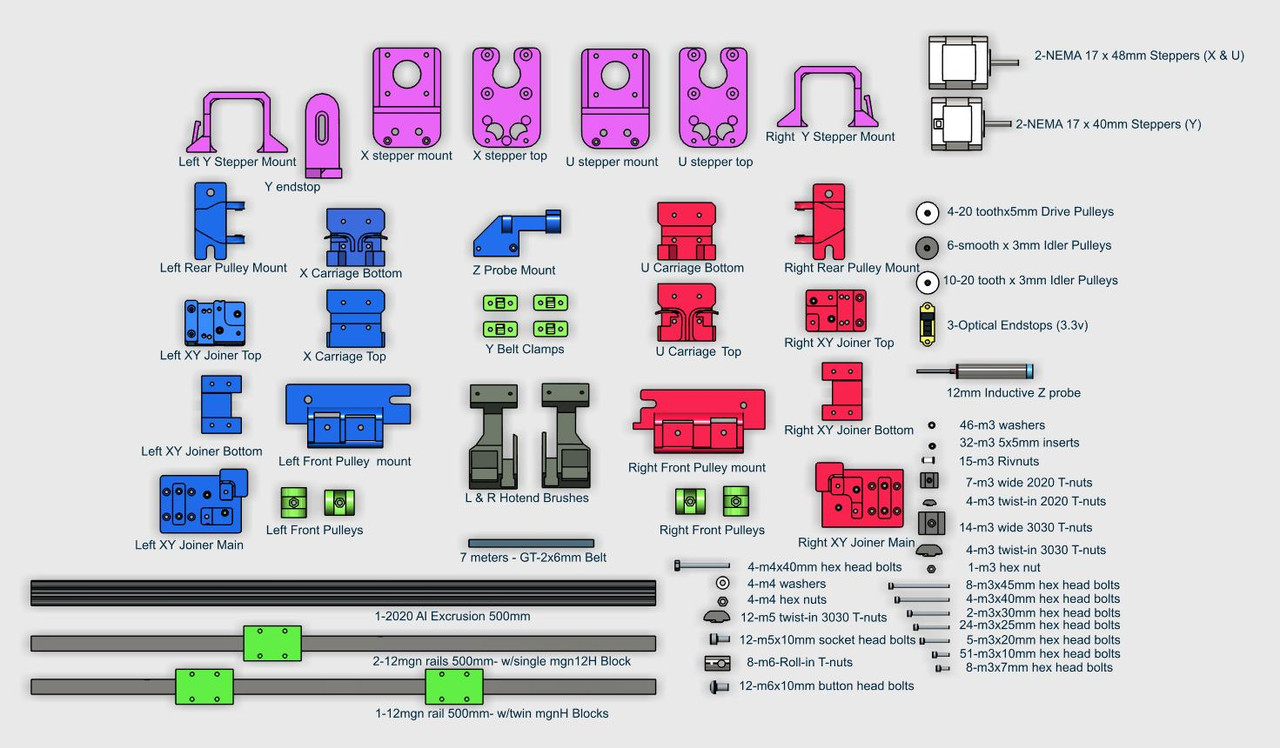](https://postimg.cc/dDrP2xJ4) When I started this project back in 2019 multiple CoreXY designs on Thingiverse and elsewhere were studied and partially built. I chose for the gantry XY...
prusaprinters
This had to end!Introducing the new Internals of the Third Generation!Through research plus trial and error, the root causes of previous inconsistencies were identified and eliminated. The amount of time to tune the parts after printing is...
prusaprinters
In a future version I want to fix this by constraining the leg and slide movements with a linkage and add a opened/closed passive locking mechanism.The pauses in the gcode were made with PrusaSlicer, so make sure they work for your...
prusaprinters
The Hero Me base supports the use of either heat press threaded inserts or M3 hex nuts. Also note: Photos included below were taken of an existing Hero Me Mutant that had already been assembled to the Wham Bam Mutant. So, in some photos the wiring is...