vibrating conveyor diagram 3d models
26160 3d models found related to vibrating conveyor diagram.
prusaprinters
Place the corner, screw, put the arms, screw, … · There is a hole for each screw, you can’t get it wrong. · For the wiring, please refer to the diagram. Firmware At this point all you need to complete the hardware part is to upload the firmware to...
prusaprinters
(6 pieces I think)If you build it all on your desk before touching a single bolt on your printer, you will see where these parts are working together.I will post up some tinkercad screenshots as a kind of airfix model instruction exploded diagram...
thingiverse
Additional diagrams and photos --------------------- #### Charge amplifier for piezo-electric force transducer #### Power source --------------------- #### Full setup References ==================== * Herrel, A., Spithoven, L., van...
prusaprinters
Because I am using a 12V power supply i chose one 470 Ohm to position in series with the LEDs Step 3:Here is the electric diagram of how the LEDs and resistor are physically arranged. Step 4:Cut the wires and strip the ends to attach...
prusaprinters
For the FlipClock device two units of the PCB have been used: one to control hours and minutes flaps, and another one to control weather flaps. Block diagram Layout Subparts MSP430FR2433 MCU INA333 comparators ULN2003A drivers 3D printed...
cults3d
Electronics: I’ve included a wiring diagram to wire up the Arduino Nano to the DRV8825 stepper motor driver and the driver to the stepper motor. It’s a pretty simple wiring job. Just take your time, making sure you correctly identify all the pins...
thingiverse
Electronics: I’ve included a wiring diagram to wire up the Arduino Nano to the DRV8825 stepper motor driver and the driver to the stepper motor. It’s a pretty simple wiring job. Just take your time, making sure you correctly identify all the pins...
prusaprinters
A wiring diagram is included in the attached images. Step by step assembly instructions will be uploaded shortly. </p><p>GRBL configuration is dependent on the motors and drivers you've purchased. The X axis is your linear axis and the steps...
prusaprinters
Consider the following diagram to see how. Assuming a rectangular triangle we can use trigonometric relations to calculate the Lorentz force: With a weight of about 20g and an inclined angle of about 10 degrees we get: Which is pretty much the same...
thingiverse
Images from this book including, including diagrams of the Federation class, appeared briefly in the background of Star Trek II and III, making it arguably screen-canonical! ...
thingiverse
Connection diagram Links to materials: Touch Buttons Arduino pro mini 5V 16MHZ Programmer Power Supply 5V 2.5A Counter MOSFET Screen Solenoid valve Encoder DC-DC step-up module Beeper Black hot melt Wires Terminal kit XH2.54 HER105 diodes Covers...
prusaprinters
Please use this diagram as a reference: If you haven't already, upload the code to the Arduino (detailed in the 'Code' section above). Insert the Adafruit Proto-Screwshield (Wingshield) into the Arduino Uno. Remove the female pin header connector...
prusaprinters
Check the exploded diagram for assembly orientation.Work "inner" and "outer" together for a bit then take them apart and wipe away any excess grease from anywhere it doesn't need to be.Work "outer" into "spacer" a few times then lock it down. When...
thingiverse
Please use this diagram as a reference: 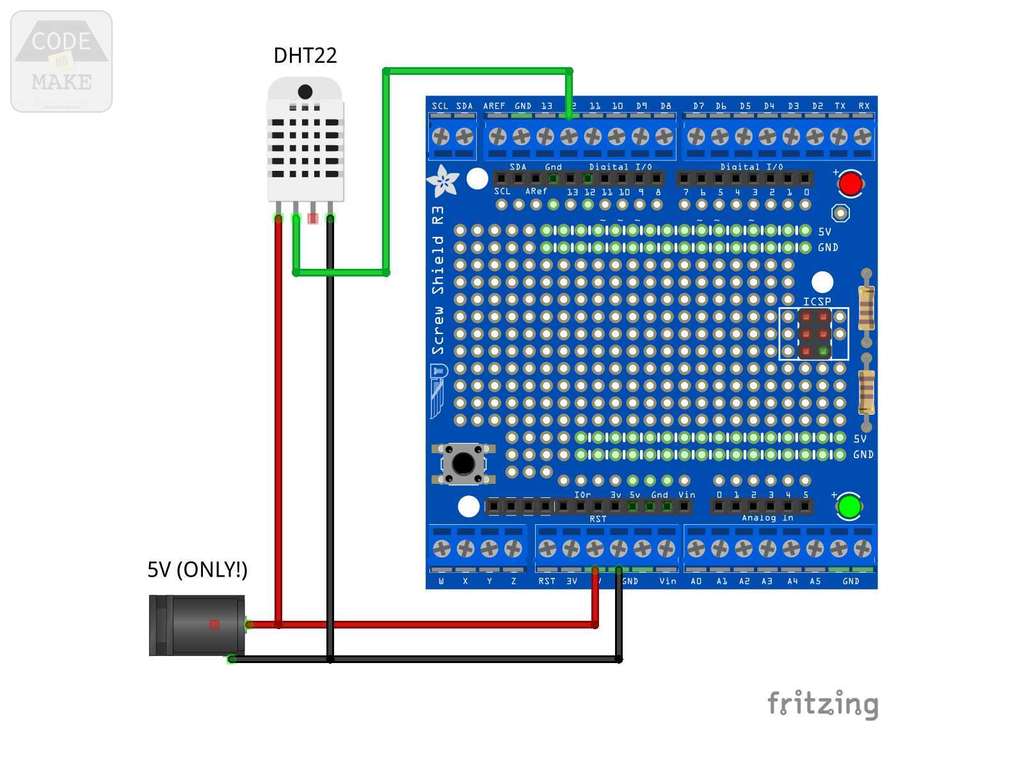 1) If you haven't already, upload the code to the Arduino...
prusaprinters
The soldering and electronics is not walked through, but you can see the diagram of how to do this. For the Arduino code click here:<br/> <a...
myminifactory
Please use the wiring diagram as a reference. If you haven't already, upload the code to the Arduino (detailed in the 'Code' section above). Insert the Adafruit Proto-Screwshield (Wingshield) into the Arduino Uno. Remove the female pin header...
grabcad
Here's a paraphrased version of the original text: A diagram featuring a finger joint with an evenly trimmed edge. If you would prefer a rephrased version, please let me know and I will be happy to provide it for you. Please also ensure that the...
thingiverse
* Uploaded a few diagrams showing the assembly of crucial parts. * Misc. changes in the project description. 01/13/2023 * Uploaded new images showing how to support the LED_holder_Tip when printing. * Expanded the "Plants & & Other Progress...
prusaprinters
Use a metal file to round off any sharp edges to make it slide in easier.Cut the LED strip at the designated cutting areas to fit the u-channel.Cut the wire to 90cm (36").MINI light bar kitWiring diagram Brass InsertUsing a soldering iron, heat...
cults3d
A thin strip of rubber (like a piece of bicycle tire) under the little mounting tab can help to avoid that the duct vibrates and rattles. If you have an older printer and yet have to install the blower fan, you may need to print the fan mounting...
thingiverse
CNC Kitchen (YouTube) already showed that vibration is not enough to keep recycled scrap material moving into the extruder with this kind of arrangement. And so, the Auger Assisted Vertical Hopper by...
prusaprinters
This is where I'm seeing the most vibration (only in short jerky infill moves) when I put acceleration above 4800. Feel free to ask about the parts required, but this is very much a beta setup.</p> <p>I've also uploaded an idler arm for the Titan, to...
prusaprinters
However, if your tripod isn't very good (mine non-Arca-compatible ones aren't) I'd suggest setting the camera to use electronic shutter and either remotely trigger it or use the self timer -- that will minimize misalignments due to vibration -- and...
prusaprinters
I would not recommend gluing the hose adapter in case hoses changes. Using Custom 3M ®© Filter adapter I had some cork vibration gaskets for NEMA 17 motors meant for a future 3D printer. They are 2.9mm thick and when compressed around 1.5mm thick. I...
grabcad
The solid state design of the LED lamps give this fixture superior resistance to damage from vibration, extremes in temperature and a lamp service life over twice that of standard fluorescent bulbs. This second generation lamp is offered in 5600K...
grabcad
The cast aluminum body and LED lamp give this light excellent durability and resistance to vibration and impacts. The housing is specially designed to dissipate heat which increases the efficiency and lifespan of the LEDs and electronics.Suggested...
prusaprinters
Maybe you can do better than me ;)(Optional) Bottom Feed This little border will help to reduce the noise and the vibration. It is a TPU part so keep in mind that not every 3D printer can print with TPU.</p><h3>Conclusion</h3><p><img...
thingiverse
○ The printed part has holes for Noctua anti-vibration pads but I didn't use them despite designing the mounts • Push fan cable out through the printed part via the hole • Add 10 SL1S enclosure noctua cable.stl pieces. The pieces are intentionally...
grabcad
The cast aluminum body and LED lamp give this light excellent durability and resistance to vibration and impacts. The housing is specially designed to dissipate heat which increases the efficiency and lifespan of the LEDs and electronics.Suggested...
prusaprinters
You will want this to be as tight as possible, as the fan will vibrate otherwise.Slide your 5" pipe clamps onto each end of your 4" exhaust tube. Then, connect the tube between your enclosure vent from above, and to the filter box inlet. Make sure...