traxxas slash rear bumper 3d models
70607 3d models found related to traxxas slash rear bumper.
myminifactory
The main features of MyDigitalSlot System are: - Lap count- Fuel and Health systems- Racing system without base controller, just with cars and their controllers- Race configuration and invitation system just with your controller!- Stop and Go system...
prusaprinters
It's my remix scaled down of the snowmobile of 3Drcnc.Lot of work and test on this open source project to make it easy to print, easy to build, powerful, reliable and easy to buy parts to make it (same screws and bearings for all the...
thingiverse
FYI: Removed rear hatch and ran boat into lake until it filled up with water. The outrigger and 6 inches of the nose stayed out of the water.MAXIMUM BATTERY 4-CELL unless 6-cell body is printed. 6-Cell body is heavier and takes longer to get on...
prusaprinters
NEW BOWDEN VERSION (PICS BELOW) Changelog 4/09/19 Added Pictures 4/01/19 Added Electronics Case 3/19/2019 Organized file section / added print guide 3/17/2019 Added Bowden .3mf file (courtesy of PteroDancer) 01/28/2019 Added wiring diagram in files...
prusaprinters
Tighten the screw on the base down that will go under the track.Install the first track (rumble strip down if that is where you want it).If that standoff looks good, go to the next and repeat the operation.If you are installing the REAR...
prusaprinters
The rear shifter I have is capable of switching between friction/index, but that is beyond the scope of this project. If anyone wants to fix it, by all means. Two versions of the shifter were made by Suntour. The later version used a clamp band...
cults3d
From the 'trigger+rearSight' parts use the rear sight piece (the longer part) and glue it to the slide piece aligning it with the top and back curve of the slide part. Slot this slide piece into the 'Mid' part with the rectangular part able to slide...
thingiverse
I am happy to share this design with others who may find it useful, but it comes with no warranties of any kind and by using it you agree to do so at your own risk. #### Key Design Requirements - Based on the "standard" Creality X carriage trolley -...
thingiverse
 ### Cover The cover consist on 3 main parts and 2 control wheels: - Floor - Top cover - Frontal - Volume wheel - Media wheel...
thingiverse
That was one of the first mods I did, right after the rear spool holder. My printer is getting old now and the carriage that the cartridge slides into is getting kind of worn and sloppy. It just doesn’t hold the cartridge nice n tight like it used...
prusaprinters
I removed them from this version. The rear ‘rubber’ seal should be printed in TPU. I lined the inside of the speaker with adhesive-backed foam tape… I have no idea if this helps, but it makes it look like I know what I'm doing.There is a...
prusaprinters
Go ahead and feed the power cable through the rear feet of the table at this time. Now that the table is in place you can add the doors. ...I used super glue in the hinges to make sure the doors don't fall out.</p> <p><strong>These instructions are not...
cults3d
Mount the fan of the original heatsink or one that you want by passing all the cables through the rear, through the channel that has the base. Remember to insert a wire for the 4-wire nema motor usually comes in the packs if you didn't need at...
cults3d
Parts | Part | Description | |----------------------------------------|-------------------------------------------------------------------| | aral-aft-hull.stl | Rear hull including cargo and shuttlebays, and impulse unit. | |...
cults3d
It features more substantial modifications to the base Ambassador parts, with an extended rear hull and two wing-like sensor modules at the top. Consul This is a modification of the Apollo Mk II suggested by Rolando Gámez over on the Facebook...
prusaprinters
You just fold the barrel down to rear load a single round, and than unfold it, prime, and fire. When firing, the latch for the barrel may come loose because of how short the barrel for half darts is, just as the Solo does when dry firing on the stock...
prusaprinters
This rear mounted design is the easiest to install and has the best cable management. Basically it just adds another zip-tie slot, and a few bumps that help push the endoscope to the correct angle. I'm sure someone can come up with a better design...
prusaprinters
Bill of materialsWemos D1 Mini16x16 Addressable led matrix (D6)Switch (D5)10k pull-up resistorOptional materialsUsb socket if making a plug at the rear Circuit connectionsThe LED Matrix is supplied 5V and GND from 5V and G on the...
prusaprinters
So I´ve got this stupid idea for a smaller RC-Benchy for a while. And I figured since it is such a small and simple project I just had to get it done, and in time for 2019 3D Meetup here in Sweden. So here it is, the Mini RC-Benchy, perfect for the...
thingiverse
The minor updates to the model are as follows:- HULL: A closed driver's viewport, a complete armour reinforcement on the front of the hull, aligned hammer and shovel on top of the hull to make room for easy turret rotation, and a slightly more...
myminifactory
From the 'trigger+rearSight' parts use the rear sight piece (the longer part) and glue it to the slide piece aligning it with the top and back curve of the slide part. Slot this slide piece into the 'Mid' part with the rectangular part able to slide...
prusaprinters
I also wanted to have all the tips and other accessories next to the soldering iron placed on the control block (easily removable because glued with velcro).I added a blue diode for the presence of 24V, a red diode to display the PWM output activity,...
prusaprinters
-=dave Print Settings Printer Brand: Prusa Printer: Prusa Mk2 Rafts: No Supports: No Resolution: 200 microns Infill: 11% Notes: Slice with Slic3rPE with following adjustments: Original Prusa i3 MK2 Colorprint* printer profile settings0.20mm NORMAL*...
prusaprinters
I have uploaded a step file of the mounting plate for ease of adaption to other hot end designs.The conversion will easily allow for the stock 220 x220 build volume and allows for the full 235 x235 dependent on duct design (My Manta design looses...
grabcad
Installing one at the top of the cab in the rear provides reverse illumination for backing up.LED Benefits: Unlike gas burning and arc type lamps that have glass bulbs, LEDs have no filaments or fragile housings to break during operation and/or...
prusaprinters
Lash the rudder assembly to the rear deck of your kayak. Make sure to lash the end of the cross tube down to the kayak deck as this is what keeps the entire assembly from rotating. You'll have to play around with the exact positioning for your kayak....
cults3d
The conversion will easily allow for the stock 220 x220 build volume and allows for the full 235 x235 dependent on duct design (My Manta design looses about 5mm at the front and side with 5015 fans, should be Ok with 4010 fans there is plenty spare...
prusaprinters
5/20/2019 Part Cooling Duct + Modified front hanger + Add custom support to front hanger and rear fillet 5/19/2019 Adjustments on Part Cooling Duct. + Thickened skin from .5 mm to .75 mm + Adjusted duct filleting for smoother air flow and...
thingiverse
Additionally, there is a dedicated channel that leads to a rear battery pack located in the base of neck. The battery pack slot should be able to support either a 9V battery case or a dual AA battery case. There is an additional overhead vent to...
thingiverse
The rear vertical Z rail support extrusion (500mm) is centered on the back frame rails, equal distance between the two rear corners. ####**Z Drive** [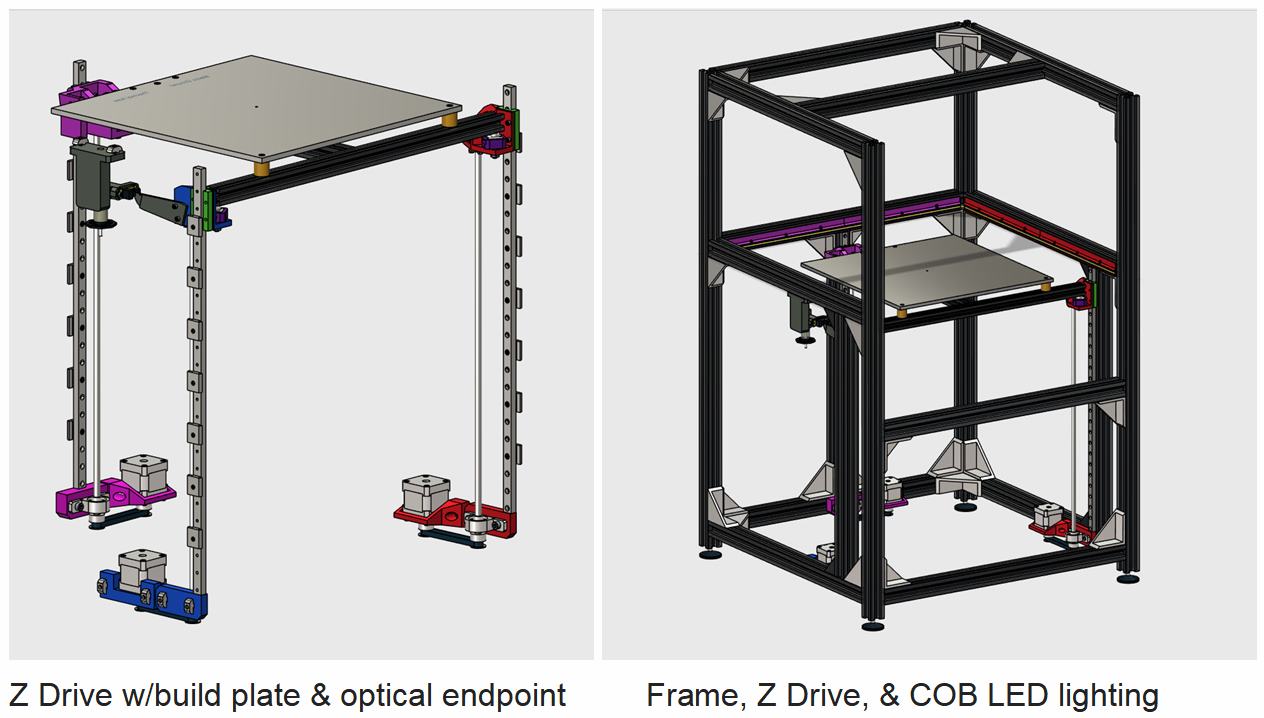](https://postimg.cc/QKs7nywc) ...