tamiya hornet rear suspension 3d models
65262 3d models found related to tamiya hornet rear suspension.
prusaprinters
It's my remix scaled down of the snowmobile of 3Drcnc.Lot of work and test on this open source project to make it easy to print, easy to build, powerful, reliable and easy to buy parts to make it (same screws and bearings for all the...
cults3d
Mount the fan of the original heatsink or one that you want by passing all the cables through the rear, through the channel that has the base. Remember to insert a wire for the 4-wire nema motor usually comes in the packs if you didn't need at...
thingiverse
I am happy to share this design with others who may find it useful, but it comes with no warranties of any kind and by using it you agree to do so at your own risk. #### Key Design Requirements - Based on the "standard" Creality X carriage trolley -...
thingiverse
FYI: Removed rear hatch and ran boat into lake until it filled up with water. The outrigger and 6 inches of the nose stayed out of the water.MAXIMUM BATTERY 4-CELL unless 6-cell body is printed. 6-Cell body is heavier and takes longer to get on...
cults3d
Moved the split far to the rear of the case for easier mounting. 12/26/18 Added dual shoulder buttons and finalized how the case fits together. Used larger mounting bosses for increased strength. All files updated. 12/27/18 Printed test prints and...
thingiverse
Make sure the tab at the back edge engages the slot in the rear of the Base. It will be necessary to deform the parts a little to get the tab into the slot. Leave the nut off the output jack for now. Install the Cover of the enclosure by first...
prusaprinters
supports R1 SP-SA Profile)6.25U Spacebars w/ a Centered Stem & max height of 13.60 mm Print SettingsInfill: 15-20% GyroidPerimeters: 2-3Layer height: 0.2mmSeam: Rear or Near (check the preview in your slicer to see what looks...
prusaprinters
So I´ve got this stupid idea for a smaller RC-Benchy for a while. And I figured since it is such a small and simple project I just had to get it done, and in time for 2019 3D Meetup here in Sweden. So here it is, the Mini RC-Benchy, perfect for the...
prusaprinters
The stock duct blasts air from just one direction while this is a dual side fan duct which cools from the front, sides and rear.While the duct is designed to blow air just below the nozzle, some air will still hit the nozzle and heat block so it's a...
gambody
Gatling cannon at the front of the carrier is poseable, as well as the roof turret, that it is mounted on a track to run down the rear of the APC for you to display the vehicle in a variety of scenarios. The windows on the driver compartment...
gambody
its rear hatchway, engine thrusters, crew seats, reaction control jets, glide wings, etc. are provided as separate STL files. The windows on the viewports are also provided as separate files for you to print them using transparent filament or access...
gambody
its thruster nozzles, entry hatch, interior compartments, landing feet, TARS support robot, rear venting panel, etc. are provided as separate STL files. The windows on the upper fuselage are also provided as 22 separate files for you to print them...
thingiverse
The rear vertical Z rail support extrusion (500mm) is centered on the back frame rails, equal distance between the two rear corners. ####**Z Drive** [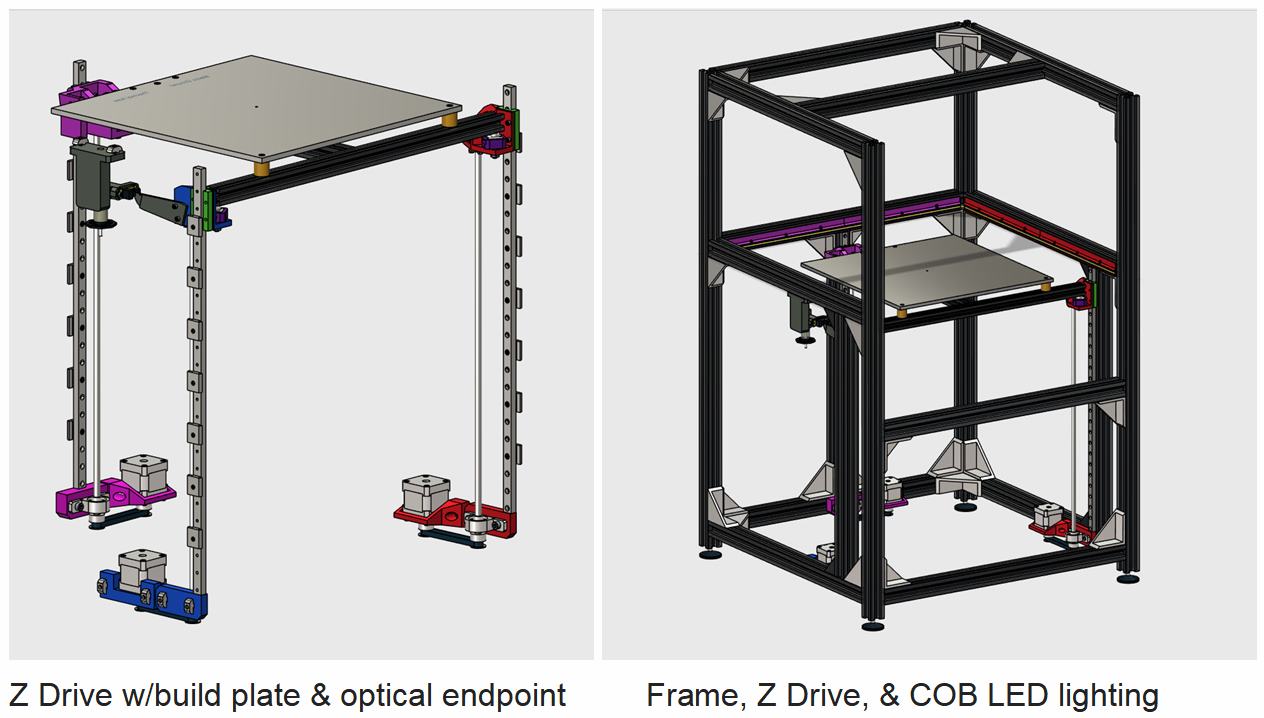](https://postimg.cc/QKs7nywc) ...
thingiverse
As I see it (without some smoke tests to be sure), the major airflow is from front fan to rear fan across the drivers. A secondary air flow will move from the vents across the board to the exhaust (partially driven by the suction the primary airflow...
prusaprinters
Klipper can power down most of the printer (fans, lights & motherboard) once the print is complete.I don't envisage shutting the Pi down unless the rear power switch is pressed. To accomplish this I've bought an <a...
prusaprinters
Modified settings: PrusaSlicer > Print Settings > 0.20 QUALITY MK3 > Layers and perimeters• "Ensure vertical shell thickness: disabled" - I had problems with thin 45° hanging angles when it was enabled.• "Perimeters: 6".• Seam position: Rear - I...
cults3d
Thanks to the side flaps and the rear metal flaps (all easily adjustable mind) a pretty good boat control is achieved. The transmitter: *is posible to improve? This one, in my opinion come with less finish than the boat. yes, makes its function, it...
prusaprinters
Great quality cuts and fair pricing/delivery time.you need to send the provided DXF files with the following instructions : PW20 (2" props) :1 x PW20 frame : 2.5mm thick Carbon Fiber1 x PW20 lower guard : 2.5mm thick Carbon Fiber (try 2mm for...
prusaprinters
Remove the rear motor screws and it will pull out the front. I dropped the cable chain but the stock chain should mount to the top holes. I velcroed my cable rope to the rail 'hat' from my dual bowden gantry (<a...
cgtrader
The default tolerance on the main bearing in Hull rear was slightly decreased for a tighter fit. After a discussion with Justin Wombwell, a tolerance mod for tighter tolerances on both seals and both bearings was added into the MODS folder. Also,...
thingiverse
Proceed to the bottom and work on the rear tension so that the speaker is pulled upright. It can help to keep an object in front of the woofer so that it does not swing around while this is happening. Once 3 of the 4 sides are complete, it should be...
prusaprinters
Sound doesn't travel in space, and electric vehicles don't have exhaust stacks, but at least you can look the part (and maybe make your own brrrrrrm brrrrrm noises).Mine is in Prusament Galaxy Silver PLA(more on that later) printed with...
prusaprinters
(stay tuned) On the right side of the lack instead there is the drawer that contains the USB transformer and the connections of the electrical contacts and a second drawer that contains 1 raspberry 2 modules of 4 relays and 2 esp8266 boards For now I...
prusaprinters
If you decide to purchase a new one, ensure the ID is 2.5mm and the OD is 4mm.I have moved the pneumatic stopper on the toolhead PTFE tube (the one sitting on the inside of the printer, next to the rubber sleeve where the PTFE tube exits the rear)...
thingiverse
Attach the secondary instrumentation package to the rear of the thrust chamber under the hot gas transfer duct (Fig 24). We just called it this because the name of this package is not in any of the documentation we found, and couldn’t remember what...
prusaprinters
Any combination can be true if the total Unit height matches across each stack of units. Print SettingsBase:Printed using the default “0.3mm Draft” settings on a Prusa MK3S, or “0.25mm Draft” setting on a Prusa Mini.Print either 4x the...
prusaprinters
I'm even powering the RPi from 5v from a spare endstop pin off the Mini RAMBo - who has 3hrs to same-dayAmazon' yet another USB charger ? No metal fasteners needed (the MK2 comes with an extra 12mm M3 screw to replace the stock 10mm one as part of...
thingiverse
> 2 pieces PCA 9685 (front and rear for a total of 8 pieces 4mm RGB Led as vehicle lighting and control of the cruise control) [Amazon-Link] > 4 pieces HC-SR04 ultrasonic sensors [Amazon-Link] > 1 piece PN532 NFC/ RFID Reader [Amazon-Link] > 4...
thingiverse
This head can perform all the WIFI functions available on the previous Digital Bird heads but brings host of new high end features including: NEW FEATURES: * 4 Axis support for Pan, Tilt, Zoom & Focus * VISCA support for wired connection to...
thingiverse
Please note that the code sets the print head to the rear corner of the print bed (Y changed to 220 for safety reasons). *Part 1: TESTING G-CODE MOVES* Filename: 'ejectmove.gcode' G28 ; home G90 ; Absolute positioning G0 X0 Y220 Z15 ; set...