sur ron rear fender 3d models
63052 3d models found related to sur ron rear fender.
prusaprinters
The MMU works best when the PTFE tubes feeding into it are straight as possible and come up from the lower rear of the printer. So I designed my <a href="https://www.prusaprinters.org/prints/30809-hanging-buffer-mount">Hanging Buffer Mount</a> to...
thingiverse
I made the front slots about 5.7mm wide and I believe the rear ones are 8mm (dont quote me on that though!) 2. I shrank the original box to save space and material, it is now about 210mm long instead of the original 230mm I believe (i could be wrong...
thingiverse
So allowing for 1" per corner for the PVC diameter, the maximum panel sizes are 22" x 34" (front and rear), and 32" x 34" (sides). The fixed back will get those full sizes. This enclosure will ave two doors for better access to the printer. Both...
prusaprinters
I have uploaded a step file of the mounting plate for ease of adaption to other hot end designs.The conversion will easily allow for the stock 220 x220 build volume and allows for the full 235 x235 dependent on duct design (My Manta design looses...
thingiverse
### Parts | **Part** | **Description** | |----------------------------------------|-------------------------------------------------------------------| | aral-aft-hull.stl | Rear hull including cargo and shuttlebays, and impulse unit. | |...
prusaprinters
supports R1 SP-SA Profile)6.25U Spacebars w/ a Centered Stem & max height of 13.60 mm Print SettingsInfill: 15-20% GyroidPerimeters: 2-3Layer height: 0.2mmSeam: Rear or Near (check the preview in your slicer to see what looks...
thingiverse
Both bearing planes have holes for the sensor but it should be mounted on the one facing the rear of the controller. If you put it on the front plane then left/right stick movement will be backwards. 1. Attach the other Littelfuse sensor to the...
thingiverse
Looking at the rear of the circuit board where the "Learn" button is, with the Learn button toward the bottom of the board, the battery contact to the right is negative and the one to the left is positive. Once you have the contacts inserted into the...
prusaprinters
insert the tab of the clip into the hole on the side towards the rear of the motor. make sure the clip is facing outward. use a small paperclip inserted into a hole with one end bent to secure it in place and then glue it. the paper clip shouldn't...
prusaprinters
Go ahead and feed the power cable through the rear feet of the table at this time. Now that the table is in place you can add the doors. ...I used super glue in the hinges to make sure the doors don't fall out.</p> <p><strong>These instructions are not...
thingiverse
I am happy to share this design with others who may find it useful, but it comes with no warranties of any kind and by using it you agree to do so at your own risk. #### Key Design Requirements - Based on the "standard" Creality X carriage trolley -...
prusaprinters
Changelog2022-08-23v1.01increased infill and perimeters for all caps2022-08-21v1.0initial public releaseUnused space in Zero Motorcycles XMX swingarm? Create sealed storage space for warning vests, emergency candy, charging cable, tools,...
thingiverse
As I see it (without some smoke tests to be sure), the major airflow is from front fan to rear fan across the drivers. A secondary air flow will move from the vents across the board to the exhaust (partially driven by the suction the primary airflow...
prusaprinters
Klipper can power down most of the printer (fans, lights & motherboard) once the print is complete.I don't envisage shutting the Pi down unless the rear power switch is pressed. To accomplish this I've bought an <a...
gambody
The 3D printing model's chosen scale is 1:8 for the FFF/FDM version;- When printed the Chevrolet Impala SS 1967 will stand 180 mm tall, 257 mm wide, 677 mm deep;Suspension:- The authentic active suspension of the model's front and rear axles...
gambody
Gatling cannon at the front of the carrier is poseable, as well as the roof turret, that it is mounted on a track to run down the rear of the APC for you to display the vehicle in a variety of scenarios. The windows on the driver compartment...
thingiverse
The rear vertical Z rail support extrusion (500mm) is centered on the back frame rails, equal distance between the two rear corners. ####**Z Drive** [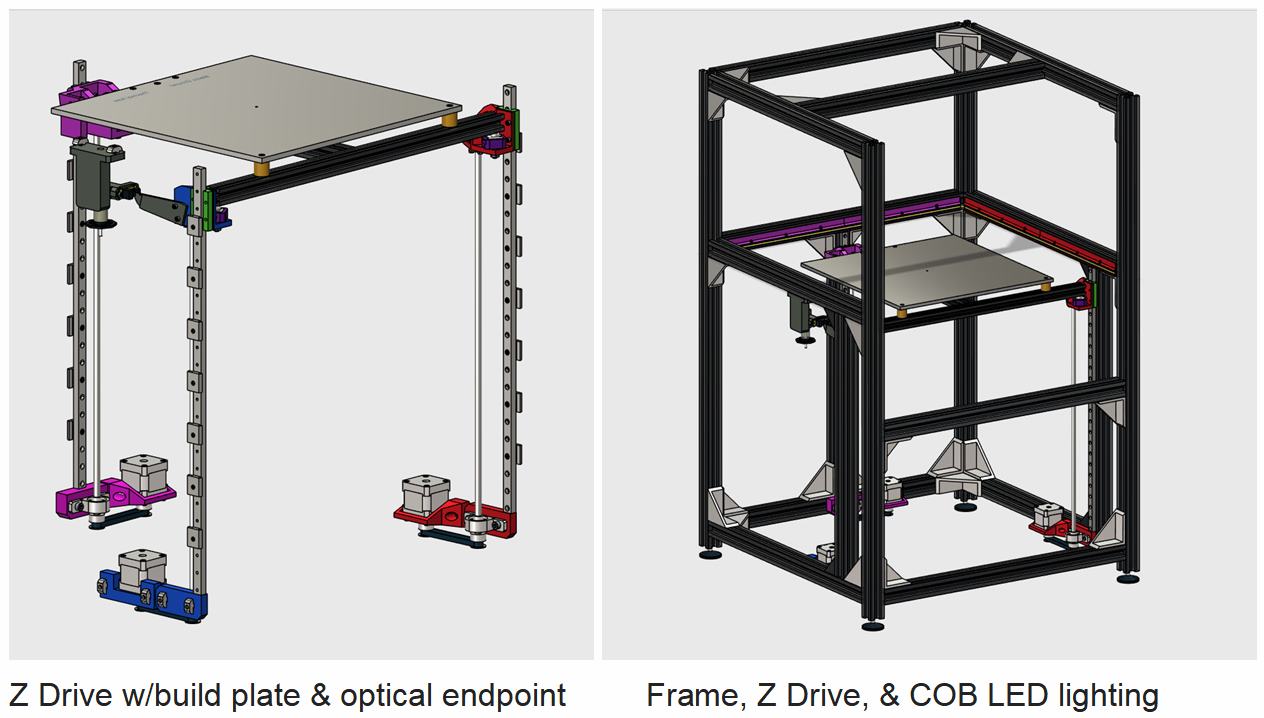](https://postimg.cc/QKs7nywc) ...
gambody
its thruster nozzles, entry hatch, interior compartments, landing feet, TARS support robot, rear venting panel, etc. are provided as separate STL files. The windows on the upper fuselage are also provided as 22 separate files for you to print them...
gambody
its rear hatchway, engine thrusters, crew seats, reaction control jets, glide wings, etc. are provided as separate STL files. The windows on the viewports are also provided as separate files for you to print them using transparent filament or access...
prusaprinters
Utiliza PETG en su lugar. Imprime con más perímetrosHaz que la pajarera sea lo más sólida posible para proteger a las aves de depredadores no deseados. Usa una boquilla grande para ahorrar tiempoLa boquilla de 0.8mm funciona...
prusaprinters
Modified settings: PrusaSlicer > Print Settings > 0.20 QUALITY MK3 > Layers and perimeters• "Ensure vertical shell thickness: disabled" - I had problems with thin 45° hanging angles when it was enabled.• "Perimeters: 6".• Seam position: Rear - I...
prusaprinters
I would suggest keeping the heater cables to the existing side of the block also.11.IF using the Creality dual gear extruder you will need to replace the tension bolt with a bolt with a traditional hexagonal head and use a spanner sidewise to tension...
prusaprinters
I connected the old battery, propped the rear up, and hit the gas to gauge the speed of the wheels. I then connected the new setup, turned the speed control knob all the way counter-clockwise, and briefly hit the gas. On my system, counter-clockwise...
prusaprinters
Two parts that clamp together around a tube such as a table leg. Rear Hub.stl Front Plate-200.stlUse with the 200mm rail Front Plate-240.stl… Front Plate-280.stl… Front Plate-320.stl…Customization and the ModelI have provided a Fusion 360 file with...
prusaprinters
It has also been designed to allow individual customisation with Lego blocks and/or card cut-outs that insert into custom 3D printed Lego-compatible blocks (the files for the LEGO-compatible blocks for card cut-outs are available here). All the...
prusaprinters
I'm even powering the RPi from 5v from a spare endstop pin off the Mini RAMBo - who has 3hrs to same-dayAmazon' yet another USB charger ? No metal fasteners needed (the MK2 comes with an extra 12mm M3 screw to replace the stock 10mm one as part of...
prusaprinters
In every step, two diagonal legs (for example the right front leg with the left rear leg) start raised and the other two down, the torso flexes to one side. Next, the flex torso to the other side and the legs that are down gets up and the other two...
grabcad
Ceiling and wall applications are mounted using the included adjustable swivel mount bracket found on the rear of the unit. Pendant applications are mounted from the ceiling and are suspended by rigid pipe via the 3/4" NPT hub on the back of the...
thingiverse
On the morning of 25 June 1941, the same KV tank was further engaged by German tanks from the woodland while an 88mm anti-tank gun targeted it from the rear. Of several shots fired, only two managed to penetrate the KV tank. The KV tank resisted and...
thingiverse
| | Merchantman-engines.stl | Rear engines. | | Merchantman-engines-thick.stl | “Thick” alternative part. ...