stundenglass diagram 3d models
5624 3d models found related to stundenglass diagram.
myminifactory
Wiring Use the included wiring diagram as a reference. If you are new to soldering, please see my tutorial which demonstrates how to solder an Arduino Nano. The tutorial shows how to solder pin headers to your Arduino Nano. You should not need to...
grabcad
For testing purposes only - sketching involved assistant In the interest of a trial, this pertains to a simple drawing - merely a sketch. assistant Exclusively for an initial attempt, the content provided is related to a rough draft - a trial...
thingiverse
There is a specific part for RFID and SD card reader fixed with screws. · Make holes (eyes, mouth and speakers) · Include components, according to images. · Connections according to electronic diagram. · The device...
prusaprinters
I will be doing diagrams and more detailed instructions for assembly eventually, but I want people to try this mod and provide feedback before I do that. So please bare with me through this and please ask any questions you may have in the...
prusaprinters
Look at the uploaded picture of the wiring diagram. This will give you an overview of how all the components need to be connected. Starting with the switch, use the close-up picture of the back of the switch to get it wired using spade connectors. It...
cults3d
Diagram of the bolts included. Stay tuned for more updates and more whacky weapons! I just added a video guide for assembly here DISCLAIMER: By downloading these files, you agree that I shall not be liable for any damage, injury or harm resulting...
thingiverse
The connection diagram is in the pictures above. If the toggle switch on the power box is off then the "auto power off" system is completely inactive and your printer would work normally (no risk for auto-off). If you turn the power box toggle...
prusaprinters
Purely optional though and works fine without.The two halves fit and clip together (I didn’t want any visible screw heads). First slide the top half micro usb protrusions and then ‘roll’ over the header pins. Then slide up the bottom and press into...
cults3d
Refer to the included diagram for wiring to the 26 pin header; you will be connecting the thermal camera this way, and the power LED via the 470 ohm resistor. The four connectors marked Flash are for an external flash unit; there is not yet a Thing...
cults3d
Connect the wires from the 5V, GND, and GPIO as shown in the diagram above, Also use this to connect the Relay in to the main 12v+ wire of the rest of the printer so it can be shut down from the Octoprint interface. Wire carefully, use good...
thingiverse
UPDATE 08Dec20: Upon multiple requests - I have just added a wiring diagram! Hope this helps.</b> <b>WIRING.</b> Upon request, here is short introduction to wiring the speaker (and remember, you can always use the enclosure as a passive speaker,...
prusaprinters
I used 25% infill.For a single height lampshade, the lampshade supporting ring should be put on the top lampstand section, immediately under the light fitting as shown in the diagram. For a double height lamp the lampshade supporting ring should be...
prusaprinters
Links to instructions are in the Post Processing section below. The link in the post processing section below also has a complete rundown on matching game pieces to insert pieces, as well as a packing diagram, so I won't rehash that here. Complete DI...
prusaprinters
They were designed using SolidWorks using side view diagrams of the spacecraft, and taking details directly from the 2017 movie (Salyut 7) and photos of the model displayed in the Exhibition of Soviet National Economic Achievement, in Moscow. Because...
prusaprinters
Refer to the included diagram for wiring to the 26 pin header; you will be connecting the thermal camera this way, and the power LED via the 470 ohm resistor. The four connectors marked Flash are for an external flash unit; there is not yet a Thing...
prusaprinters
This helps when connecting all the wires. Insert and glue the Tactile button from the side where a weird bevel is sticking out for the “Light Controller - Lid"Follow the wiring diagram below to plug in all the connections to the Arduino. Don't do...
prusaprinters
For the wiring please refer to the attached wiring diagram. Please use only GU10 LED bulbs as they will not generate too much heat to damage the printed electronics case on the top. Max temperature with 7,5W LED bulbs is 36°C on the case itself....
prusaprinters
It allows Central Station to select one of the eight contacts, request its state, switch to the next and so on.Overall, the multiplexing chip allows the reduction from 10 wires to 7 (see diagram), allowing us to utilize the 6 wire (plus shielding)...
thingiverse
Diagram of the bolts included. Stay tuned for more updates and more whacky weapons! I just added a video guide for assembly here DISCLAIMER: By downloading these files, you agree that I shall not be liable for any damage, injury or harm resulting...
prusaprinters
This probably isn't for the faint of heart and I doubt anyone is crazy enough to try printing this but I still thought I'd post it because someone might be able to use parts of it (the coin slide mechanism?) or maybe at least get ideas from it. The...
cults3d
The connection diagram is in the pictures above. If the toggle switch on the power box is off then the "auto power off" system is completely inactive and your printer would work normally (no risk for auto-off). If you turn the power box toggle...
prusaprinters
A little drop of oil is recommended to put in the bogies but it should roll fine without it too.AssemblyUsing this very scientific diagram™ glue the “detail” under the body. Batteryboxes marked in yellow, frames in orange and the airtank in blue. The...
prusaprinters
I used this wiring diagram to guide me through and it is a match for the parts that I used. Just be careful using the soldering iron around the body, it will melt obviously if you touch the body with it. ...(Ask me how I know…) </p><figure...
thingiverse
The TB6600 wiring diagram I added shows a different controller and I do not know if the pinout is the same on the Octopus, so I recommend using an ohm meter and checking for continuity from the pins on the stepper socket boards to the output jacks...
prusaprinters
(see Wiring diagram)I used headers and jumper wires for my prototype, but you might want to solder the whole thing together, if you're not planning on taking it apart later. Route the wires between the stepper motor and the walls of the...
thingiverse
Electronics: I’ve included a wiring diagram to wire up the Arduino Nano to the DRV8825 stepper motor driver and the driver to the stepper motor. It’s a pretty simple wiring job. Just take your time, making sure you correctly identify all the pins...
thingiverse
Images from this book including, including diagrams of the Federation class, appeared briefly in the background of Star Trek II and III, making it arguably screen-canonical! ...
prusaprinters
A wiring diagram is included in the attached images. Step by step assembly instructions will be uploaded shortly. </p><p>GRBL configuration is dependent on the motors and drivers you've purchased. The X axis is your linear axis and the steps...
prusaprinters
You only need a few parts to get started as illustrated in the assembly diagram to get started with your first level. </p><p>Shaft Safety note: While shaft wedges do have their ends blunted, please use care when using...
thingiverse
Please use this diagram as a reference: 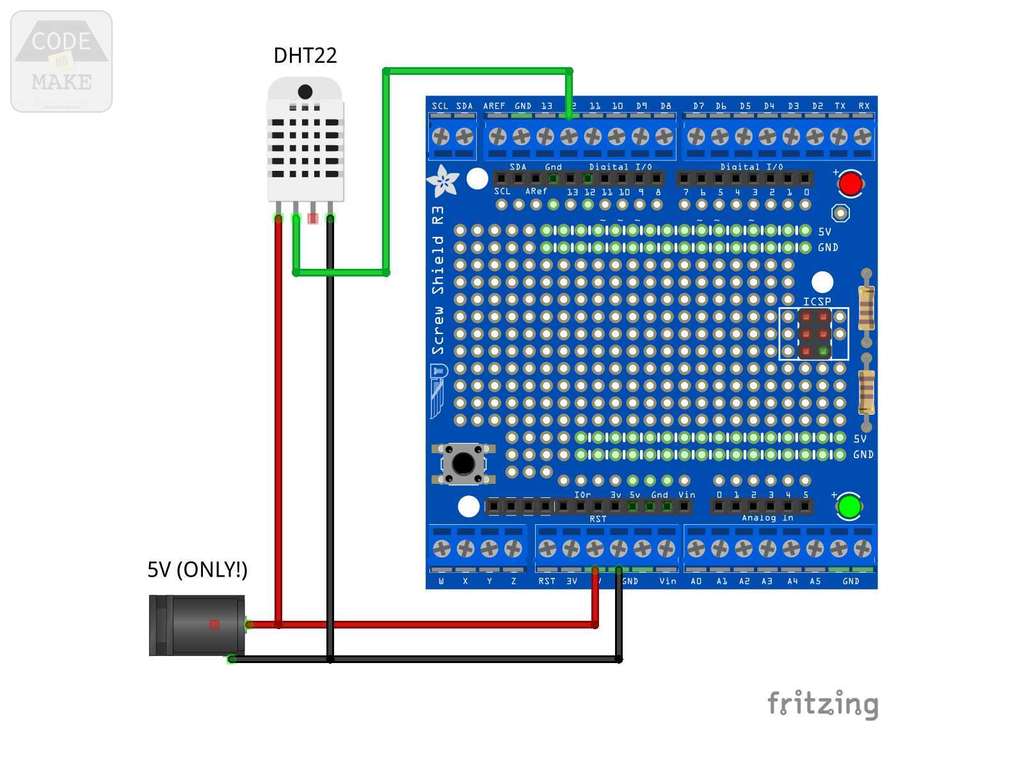 1) If you haven't already, upload the code to the Arduino...