scooter rear fender 3d models
58541 3d models found related to scooter rear fender.
prusaprinters
The rear shifter I have is capable of switching between friction/index, but that is beyond the scope of this project. If anyone wants to fix it, by all means. Two versions of the shifter were made by Suntour. The later version used a clamp band...
gambody
its rear hatchway, engine thrusters, crew seats, reaction control jets, glide wings, etc. are provided as separate STL files. The windows on the viewports are also provided as separate files for you to print them using transparent filament or access...
prusaprinters
Klipper can power down most of the printer (fans, lights & motherboard) once the print is complete.I don't envisage shutting the Pi down unless the rear power switch is pressed. To accomplish this I've bought an <a...
thingiverse
The rear vertical Z rail support extrusion (500mm) is centered on the back frame rails, equal distance between the two rear corners. ####**Z Drive** [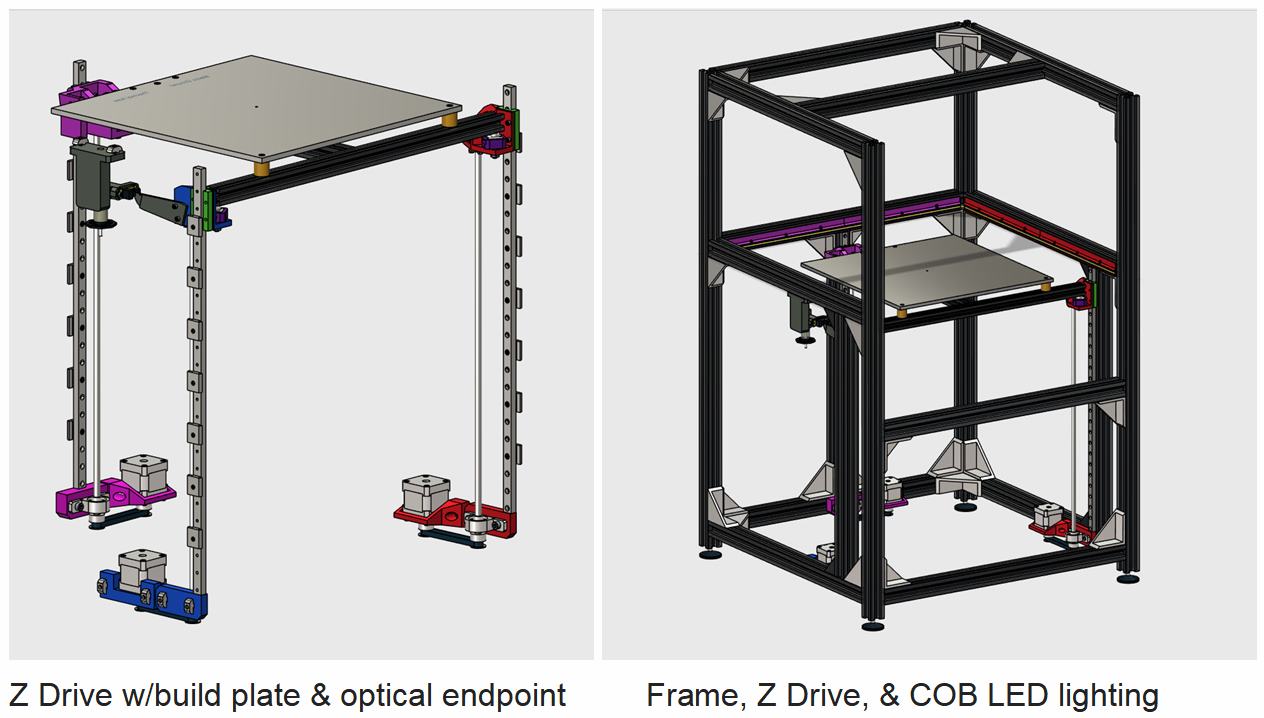](https://postimg.cc/QKs7nywc) ...
gambody
Gatling cannon at the front of the carrier is poseable, as well as the roof turret, that it is mounted on a track to run down the rear of the APC for you to display the vehicle in a variety of scenarios. The windows on the driver compartment...
gambody
The 3D printing model's chosen scale is 1:8 for the FFF/FDM version;- When printed the Chevrolet Impala SS 1967 will stand 180 mm tall, 257 mm wide, 677 mm deep;Suspension:- The authentic active suspension of the model's front and rear axles...
gambody
its thruster nozzles, entry hatch, interior compartments, landing feet, TARS support robot, rear venting panel, etc. are provided as separate STL files. The windows on the upper fuselage are also provided as 22 separate files for you to print them...
thingiverse
As I see it (without some smoke tests to be sure), the major airflow is from front fan to rear fan across the drivers. A secondary air flow will move from the vents across the board to the exhaust (partially driven by the suction the primary airflow...
prusaprinters
Modified settings: PrusaSlicer > Print Settings > 0.20 QUALITY MK3 > Layers and perimeters• "Ensure vertical shell thickness: disabled" - I had problems with thin 45° hanging angles when it was enabled.• "Perimeters: 6".• Seam position: Rear - I...
prusaprinters
Hi all,I'll start with listing all the parts, items and hardware you will need for this build:-5x 350x350x3mm acrylic panels (I got one acrylic mirror panel for the rear).-4x M3 ~20-40mm screws/bolts to attach the stand to the bottom plate.-optional:...
prusaprinters
Any combination can be true if the total Unit height matches across each stack of units. Print SettingsBase:Printed using the default “0.3mm Draft” settings on a Prusa MK3S, or “0.25mm Draft” setting on a Prusa Mini.Print either 4x the...
prusaprinters
Great quality cuts and fair pricing/delivery time.you need to send the provided DXF files with the following instructions : PW20 (2" props) :1 x PW20 frame : 2.5mm thick Carbon Fiber1 x PW20 lower guard : 2.5mm thick Carbon Fiber (try 2mm for...
thingiverse
Two per strut are required at the front and rear. Alternatively, use springs 30mm x9mm x0.9mm, here only one spring is required per shock absorber. Update 23_12_2020 I uploaded the model "Zahnrad_18_23_neu", which I had forgotten. Thanks...
thingiverse
Tai sabaki is usually used to avoid an attack, such that the receiver of the attack ends up in an advantageous position and it is often wrongly referred to as "evasion." Takemusu Takemusu (武産) was the concept developed by Morihei Ueshiba of how the...
thingiverse
This head can perform all the WIFI functions available on the previous Digital Bird heads but brings host of new high end features including: NEW FEATURES: * 4 Axis support for Pan, Tilt, Zoom & Focus * VISCA support for wired connection to...
cults3d
Printing 1.The majority of the parts print without support (the base ducts print upside down) except for the rear duct mounts which unfortunately require some support. I have included some sacrificial layers in some of the holes in the mounts which...
thingiverse
Attach the secondary instrumentation package to the rear of the thrust chamber under the hot gas transfer duct (Fig 24). We just called it this because the name of this package is not in any of the documentation we found, and couldn’t remember what...
prusaprinters
In every step, two diagonal legs (for example the right front leg with the left rear leg) start raised and the other two down, the torso flexes to one side. Next, the flex torso to the other side and the legs that are down gets up and the other two...
thingiverse
| | Merchantman-engines.stl | Rear engines. | | Merchantman-engines-thick.stl | “Thick” alternative part. ...
prusaprinters
Mount the PTFE tubes on the rear top side, e.g. with an aluminium bracket and pneumatic joints.</p><p>You did it! ...I hope you enjoyed the creative process as much as I did!</p><p>BTW - my wife thinks this design should be called the “Big Ben...
thingiverse
You will want to keep the rear features of the arm so you can save the PVC and handle hole locations. Also keep the clearance cut on the bottom to clear the small frame ends. Otherwise, redraw the arm parts however you like. DF95arms - Print...
prusaprinters
I used a router for that, but a jigsaw will do it tooput brush seal strip into the filament openingdepending who you want to feed all your cables inside the enclosure you can make a small cutout in the bottom rear corner. Feeding it through the base...
cults3d
Re-uploaded rear case files. 1/10/19 Added Gerber files to make PCBs for buttons for better fit and finish. 2/5/19 Got the PCBs from JLCPCB and added pics of how those get installed. 2/30/19 I got spare PCBs! ... You can PM me to buy a set at low...
prusaprinters
I'm even powering the RPi from 5v from a spare endstop pin off the Mini RAMBo - who has 3hrs to same-dayAmazon' yet another USB charger ? No metal fasteners needed (the MK2 comes with an extra 12mm M3 screw to replace the stock 10mm one as part of...
thingiverse
Please note that the code sets the print head to the rear corner of the print bed (Y changed to 220 for safety reasons). *Part 1: TESTING G-CODE MOVES* Filename: 'ejectmove.gcode' G28 ; home G90 ; Absolute positioning G0 X0 Y220 Z15 ; set...
cgtrader
The default tolerance on the main bearing in Hull rear was slightly decreased for a tighter fit. After a discussion with Justin Wombwell, a tolerance mod for tighter tolerances on both seals and both bearings was added into the MODS folder. Also,...
cults3d
Overhangs at the rear and right will still be cooled less effectively because the air cannot reach their undersides. One way to work around this is to print extra walls behind such overhangs to reflect the airflow back towards them. In most cases...
prusaprinters
Moved rear bearing to sandwich the MK8 drive gear better. Updated Pulley Cage .stl to extend to the bottom and rest against Top Frame to prevent bowing/bending of Top Frame when belt is under tension. Updated Top Frame .stl to include a bottom M3 nut...
thingiverse
Repeat for rear.Use the measuring cup included with the containers to measure out 50ml of beads and gently pour them into the dessicant tray from the side of the cup to avoid runaway beads.Slide the cover on, making sure to first insert the side...
prusaprinters
The adapters are then mounted to the main part with M3x10 screws (the inner screws can be a bit of a hassle; take your time). Step 2 The next step will be mounting the 140 mm fans. Make sure they're blowing in the right direction, i.e. they...