rpf1 center caps 3d models
208475 3d models found related to rpf1 center caps.
thingiverse
To achieve the wow effect, you need to place an LED strip on the back of the decor. My some other things: <a title="Cap.Am. ...Wall Decor" href="https://www.thingiverse.com/thing:5195100" target="_blank"><img...
thingiverse
Then fix it on the wall with nails or screws or use double-sided tape. To achieve the wow effect, you need to place an LED strip on the back of the decor. My some other things:...
thingiverse
To achieve the wow effect, you need to place an LED strip on the back of the decor. My some other things: <a title="Cap.Am. ...Wall Decor"...
thingiverse
To achieve the wow effect, you need to place an LED strip on the back of the decor. My some other things: <a title="Cap.Am. ...Wall Decor" href="https://www.thingiverse.com/thing:5195100" target="_blank"><img...
thingiverse
My some other things: <a title="Cap.Am. ...Wall Decor" href="https://www.thingiverse.com/thing:5195100" target="_blank"><img src="https://cdn.thingiverse.com/assets/d6/82/31/ab/50/card_preview_Wall-Decor.png" alt="" width="123"...
thingiverse
To achieve the wow effect, you need to place an LED strip on the back of the decor. My some other things: <a title="Cap.Am. ...Wall Decor"...
thingiverse
To achieve the wow effect, you need to place an LED strip on the back of the decor. My some other things: <a title="Cap.Am. ...Wall Decor"...
thingiverse
To achieve the wow effect, you need to place an LED strip on the back of the decor. My some other things: <a title="Cap.Am. ...Wall Decor"...
thingiverse
To achieve the wow effect, you need to place an LED strip on the back of the decor. My some other things: <a title="Cap.Am. ...Wall Decor"...
thingiverse
To achieve the wow effect, you need to place an LED strip on the back of the decor. My some other things: <a title="Cap.Am. ...Wall Decor"...
thingiverse
you can use the Prusaslicer's firmware update tool to flash Marlin firmware * shut down button: used to shut down the printer (it requires the feature is enabled on Marlin firmware) * Manual bed leveling menu: * added 5th leveling point: a center...
prusaprinters
With the rotor sitting so high above the mouthpiece, perhaps the air that is getting chopped is really between the rotor and the bar that goes across the center of the horn...The next step will be to raise the mouthpiece cone up by 1mm and retest the...
thingiverse
With the rotor sitting so high above the mouthpiece, perhaps the air that is getting chopped is really between the rotor and the bar that goes across the center of the horn... The next step will be to raise the mouthpiece cone up by 1mm and...
thingiverse
Did I mention if you bend those wires in any way without isolating the leads first you will break the reed switch.I use blue painters tape and put a piece for each side under the bottom piece, and carefully align the sides and tape each side next to...
prusaprinters
We use bowden tubes and PC4M10 connectors.The buffer : I reused the idea and the box interface from Canispulus without modification, but for the filament buffer modified the file from ensoniq2k from this project.The filament buffer is very...
prusaprinters
The body of the SPA has a numbered scale which equates to 0.1mm of height adjustment when used and aligned with the reference mark on the extruder body. Printing Considerations:The SuperPINDA Precision Adjuster is printed in PETG at a 0.1mm...
thingiverse
The rear vertical Z rail support extrusion (500mm) is centered on the back frame rails, equal distance between the two rear corners. ####**Z Drive** [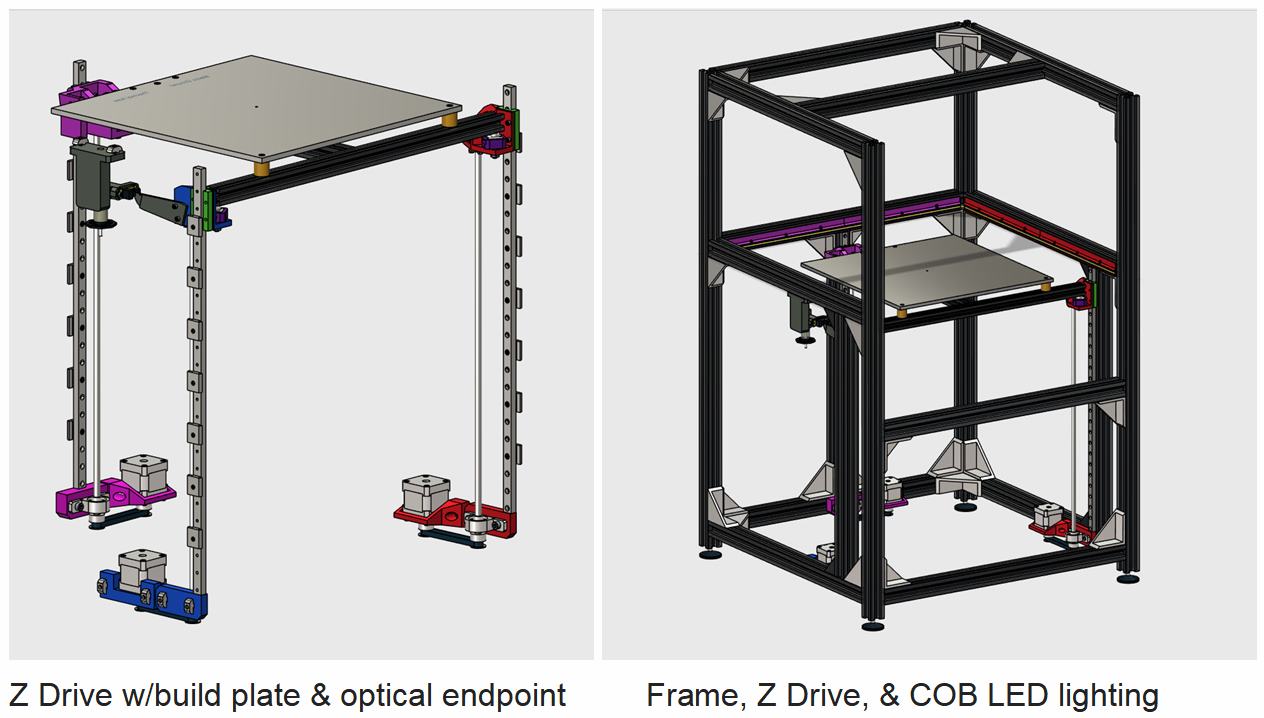](https://postimg.cc/QKs7nywc) ...
prusaprinters
I aligned the coupler with the layers parallel to the axis of the leg, there's a little bump on one face of each coupler to help you get it centered between the leg sections. Make sure they're fully pressed together and straight, I taped them to a...
thingiverse
This makes the 120 roll's 6x6 numbers visible in the windows of cameras that put the windows in the center of their film paths, like the Yashica 44 series; and 6x9 numbers should be visible in the windows of cameras that put their windows near the...
prusaprinters
The idea of having it in the middle is most prints will be centered and you'll get the best view for most objects you print now without having to make lots of adjustments later. When you're happy with the angle of all arms and the camera tighten all...
grabcad
Our business model is centered around building trust with our customers, and we strive to maintain the highest standards of professionalism in every transaction. We understand that trust is essential in any business relationship, and we work...
cults3d
2/5/19 Added a pin and socket in the center of the palmrest to help hold it down and support it when typing. 2/22/19 Added the screen bezel and option to use a Raspberry Pi Foundation 7" Touchscreen at 800x480 2/24/19 Added a version of the base...
prusaprinters
They now should be perfectly aligned in center horizontally and flush with the front-bezel.If you find the gap on the sides of the drives too large for comfort, remix the front-bezel and replace it.You can now archive the alignment tool, the...
prusaprinters
I spent the first few years of my life alternately playing with and being freaked out by spirits or something intangible there, so it didn't surprise me when my hedge-witch great grandmother (who was a professional douser that worked in the county to...
grabcad
The low operating cost and improved video transmission via fast transmission technology makes this new product configuration an absolute solution fit perfectly as per all the given design standards, requirements & operational parameters, even during...
prusaprinters
The 03 center ones are +- 3.5mm from face.)Printing and BuildingPrinting SettingsImportant notes:Fits on PRUSA miniUse PETG for “button_tails”Use PLA for “Joystick_base”All pieces print without support required, one exception is “Dock” that...
prusaprinters
Push the backside battery-cover onto the hot glue, so that the four centered over the four holes. Tear the isolation tape to the side out. If you want to overhaul the box and use some hot glue to secure it safer.</p><h3>Screw the Backplat...
thingiverse
Mars would become a center of space vehicle production, launching, and space tourism. Also, much like how old England had allowed its colonies to become tax free economic development zones, Mars could become a tax haven. Martian banks could make...
gambody
The 3D printing model's chosen scale is 1:60 for the FFF/FDM version and 1:120 for the DLP/SLA/SLS version.VERSIONS' SPECIFICATIONSFFF/FDM 1.0 version features:- Contains 9 parts;- The model's very first low-poly version released in 2014.FFF/FDM...
prusaprinters
Use thread lock to ensure these will not accidentally come loose.A 36mm diameter propeller should run freely inside the rudder at all rudder angles.Mount the rudder support to the hull using M3x6mm screws.Then put another M3x6 screw to secure the...