reusable filament spool 3d models
240915 3d models found related to reusable filament spool.
prusaprinters
You can use this quick print to make sure your printer and slicer settings are calibrated properly so the pieces will slide together properly. Print Settings Printer Brand: Creality Printer: Ender 3 Rafts: No Supports: No Resolution: 0.2 Infill: 20%...
cgtrader
Using transparent filament for this model part is suggested, though not necessary. 32. Round Base. One round stone base to mount your Nautiloid Horror on. It has a hole in the middle so that you can easily combine it with the flying stem. 33. Neck...
prusaprinters
Note; this only works if there is just a little solvent in the bottle. Print Settings Printer Brand: Prusa Printer: i3 MK3 Rafts: No Supports: Yes Resolution: 0.15 Infill: 20% Filament: Hatchbox PLA White Notes: Only used support for Main Frame.stl....
prusaprinters
These are in design rather than print orientation, and will load in context with the sundial set to its 90º rotation (sundial_mainbody_90.stl).Other detailsFilaments shown in photos: Polyalchemy Elixir Copper, Jessie Green Ice from Printed Solid,...
cults3d
7.I have included 2 sizes of clamp for the V6 versions has the tolerance can differ to different filaments and printers. They are very small parts so will not take long to create a test print of each. 8.All the base ducts print upside down do make...
thingiverse
Each half has 2 holes for 1.75 MM filament for alignment during gluing. 3D printing notes: Any files with an X2 or X3 require 2 or 3 of the parts. The file body.stl has to be printed with supports. The files right_ratchet and...
thingiverse
3D printing even with transparent filament is nowhere near clear enough to be usable. However in the maker community making vacuum formed parts are not unheard of. In this video http://y2u.be/RNAc0C8nApc you can see great tutorial how visor can...
prusaprinters
I've included a test model which you can print to check accuracy.If you find the lid doesn't slide easily (printed too wide) or it doesn't really click into position (printed too narrow), check if your filament diameter or your extrusion multiplier...
thingiverse
:) I included the modified STLs I used to make mine, basically smaller versions of DIY-Machines version and more of them and I added separate diffusers instead of his multi-filament versions, so that they can be printed on my smaller single-color 3D...
prusaprinters
Just make sure to get sufficiently large feet spacers too.Print SettingsPrinter Brand:AnycubicPrinter:Large Size ChironRafts:Doesn't MatterSupports:NoResolution:0.2Infill:10% GyroidFilament: Purefil PLAblackNotes:Actually used my Vyper to print -...
thingiverse
NOTE: By doing several experiments, I noticed that for some PLA filaments it is advisable to lower the Flow rate to 88% directly at the slicer level, in order to obtain a perfect first layer. In addition, I have also reduced the flow rate of the...
thingiverse
Lay a piece of filament in that gap and smooth it out with a soldering iron, or you can use a 3d pen, if you have one. After getting it as smooth as you can with the soldering Iron, sand with light grit sand paper for final smooth finish. if done...
prusaprinters
Your mileage may vary based on type/brand of filament.PETG and other similarly thermally resistant materials should have no issues at all. Cold drinks shouldn't be a problem.Print SettingsNo special print settings are required for the Base,...
thingiverse
[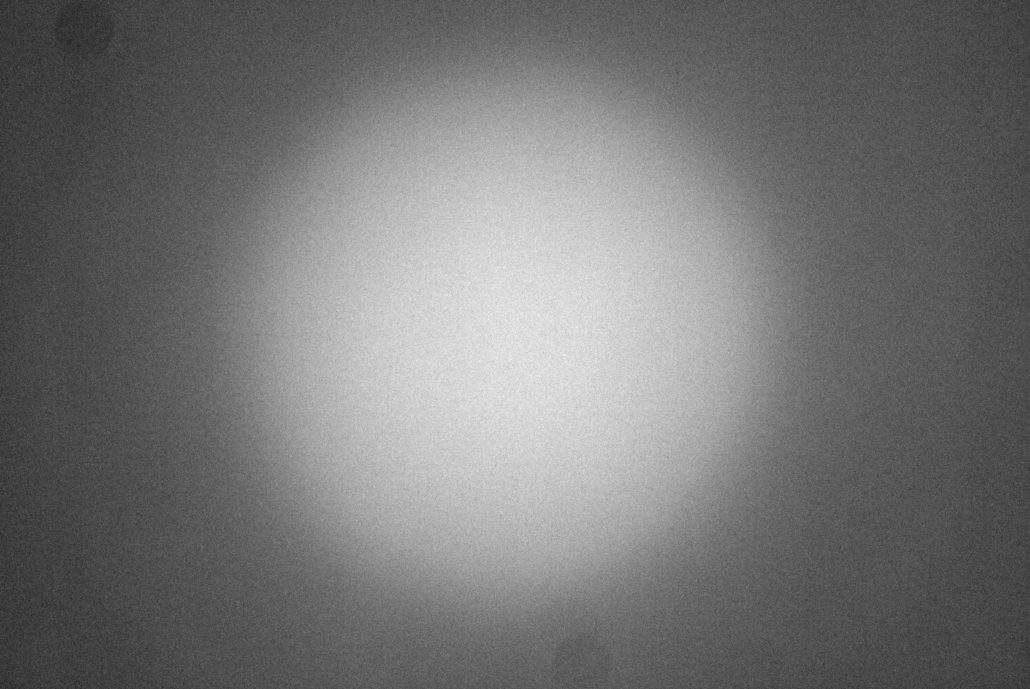](https://www.sternwarte-hoefingen.de/wp-content/uploads/2022/01/2021-10-09-flatfield-vignette.jpg)Beispiel Vignettierung unserer...
prusaprinters
Many PLA filaments are too translucent to make a good solid stripe color with only one layer thickness. This is the point of the second stripe.</p><figure class="image"><img...
prusaprinters
I printed the badge in Polyalchemy Elixer Lucid Pearl with Atomic Filament Jet Black Extreme PLA for the lettering. I printed the two buttons in COEX Bone Brown PLA. Of course many of the early cases that people made for the real...
prusaprinters
3.7" x 1.6" x 0.75"4-40 x 1/4" flat-head machine screws, qty 3 to mount the aluminum block4-40 x 1/2" round-head machine screws, qty 3 to mount the circuit board#4 x 1/4" nylon standoffs, qty 3micro USB cable to connect the Arduino to your computer...
thingiverse
if you bought SS22F32 switches, make sure that the part name contains "SS22F32"* #### If you want to have a tracker that uses an AUX/Extension module You would need the following: - *Case_503759_AUX.stl* - *Lid_503759_AUX.stl* *The tray is not...
prusaprinters
They have a thin wall (0.5mm) but are plenty sturdy for light-duty applications.A fast print time is achieved using Spiral Vase Mode which also minimizes filament usage. The lid screws on with a simple ¾ turn thread. The tolerances are loose to...
grabcad
Our standard unit ships with 5600K unless different color temperature is specified.Unlike the glass tube design of traditional fluorescent lamps, these LED T-Style lamps have no filaments or fragile housings to break during operation. Instead of...
thingiverse
I got mine from https://3dprintingcanada.com/collections/tpe/products/black-1-75mm-tpe-filament-0-5-kg (not affiliated). Video: - In action: https://youtu.be/3EBpf9YP5C4 - Showing the shock: https://youtu.be/YSYngEb9dG8 - Gearbox assembly:...
prusaprinters
Here you go >> [Deckman]Print SettingsPrinter:Bed Size 150x150 and upRafts:NoSupports:NoResolution:0.1mm layer heightInfill:100%Filament: Any Any Flexible AnyNotes:Unzip and sort by filename. Choose a SetX to print a complete mask.</p><p>All...
prusaprinters
The stuffer should also fit when printed in PLA, however flexible filament might be better. Enjoy!</li> </ul> <p><em>Update 19th of January 2022</em></p> <ul> <li>I've updated the exit, exit array and corresponding stuffer. They now can work as...
prusaprinters
I printed so many of these handles (to test how much pressure was needed to snap them in half) that I filled an empty filament box with them! So in addition to designing the print to be strong, I modified the gCode for the handle and nuts to have...
prusaprinters
Connect the remain cables (hot end fan, print fan, filament sensor, and PINDA probe) routing them through the top and right of the board. Adjust the length of cabling inside of the box and clamp down the strain relief cover over top of the...
thingiverse
The portal cable (black) does not need to be extended, even for the extension kit for 50mm, as long as you use a direct feeder, as the feeder wires and filament sensor wires are the shortest and they would be the only ones that can't reach their...
prusaprinters
The 12x12x1 version is great for portability.Fan: $17.503M Filtrete MPR1900 MERV13 Filter 2-Pack: $38, Qty2: $76PETG Filament: $12 @ $20/KgTOTAL COST: $105Similar sized air purifiers run anywhere from $150 to $300 so this seems like a...
prusaprinters
I managed to break a shell-piece as well as my LED-strip on my first attempt.Make sure all parts are clean and without any overhanging bits of filament.The shells slide over the core, so that Shell 001 covers the lower half of Core 001, Shell 002...
prusaprinters
... this shelf 40 connectors and four feet were needed - this corresponds to approx. 1,5 kilo of filament.The printing time was 156 hours. Happy furniture assembly :-)
prusaprinters
To learn about this setup, checkout the 2 YouTube videos linked in my V1 and V2 printer enclosure designs, linked below: V1: https://www.thingiverse.com/thing:5137500 V2: https://www.thingiverse.com/thing:5166976 Print Settings Printer: BIQU B1...