prusa mk2 assembly 3d models
288019 3d models found related to prusa mk2 assembly.
prusaprinters
The string connecting the carriage to the effector is tensioned by small springs and hooks are used to facilitate easy assembly/disassembly. The joints hold quite well for printing purposes, however it doesn't take a lot of force to dislodge them. A...

prusaprinters
...Print them 0.1 mm 100% Infill).Assembly:The rocket:This is straight forward. It is advisable to (hot) glue the top part to the bottle. Before you install the top part, take the parachute lines through it and glue them with hot glue(!) to the bottle.

prusaprinters
If you are a tough guy, I recommend 100% infill for the arm because I managed to break one that was made with 50% infill).Assembling the tool.Put the main scale under the vernier scale, align 2 studs with 2 holes and push on the main scale. The scale...

prusaprinters
(something, something, unimaginative name) Shown next to the CTRL for size comparison - its a little taller than i wanted, but had to add some height to account for the pro-micro along with the hand-wired switches, rotary encoder and LEDs. I will be...

prusaprinters
The sketches on SolidWorks between my partner and I were to be completely identical by creating steps we were to follow together to insure the same results. Assembly/Construction Instructions:Create a rectangular constraint box with...

thingiverse
# Assembly Instructions ## Hemera Mounting Instructions * Press nuts into appropriate slots in backplate * You can use a bolt to pull them in. a clamp, any hard surface, or an arbor press. * They should be tight enough that they don't fall...

cults3d
i am making these to sell on ebay if you want one and do not have the tools or patiance of making these they are a lot of milling so far i have 3 single cooling blocks about 8 heat blocks and 1 or 2 duo blocks also there are 2 differant duo blocks...

thingiverse
As for the instructions of putting everything together, I never actually filmed the assembly process, but I will include the original Fusion 360 file so that you can see how everything fits together and so you can change the design however you want...

thingiverse
Assembly ------ Please use this diagram as a reference: 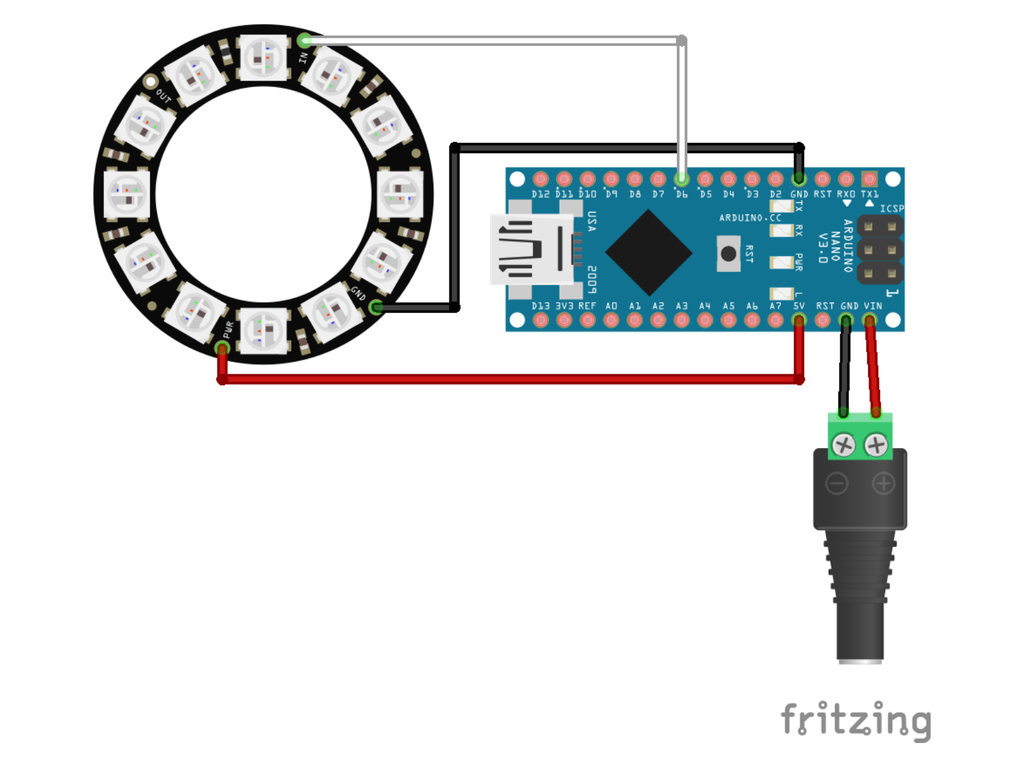 **Note**: It should not be necessary to use...

prusaprinters
Especially with kids. Easy to print. No assembly required. Just plug in the hair length adaptor and go.</li> <li>Ergonomically usage due to an angled mount of the vacuum hose.</li> <li>The scissors blades are fully covered for safety reasons.</li>...

thingiverse
thingiverse
- [merchantman-blender-files.zip](https://drive.google.com/file/d/1XYkN_XtefVgIEPelLYKaxvLams7DHjgP/view?usp=sharing) – Contains the source blender files used to generate the parts, as well as files with the parts assembled as used to generate the...

prusaprinters
Now, connect this assembly between the extruder and original ptfe tube. The short barrow end of the EasyCut connects to the original ptfe tube. Push together snuggly, check that all ptfe ends are well seated. On the EasyCut, ptfe tubing will cover...

prusaprinters
Dispensers for 12oz, and 16oz hold 3.5 cans per-layer plus 1.5 cans on the tongue. Printing and AssemblyLine I decided to slice mine with a 0.6mm line width even though I was printing with a 0.4 nozzle. so I could get a 1.2mm thick wall...

thingiverse
The intent of these additional files is to allow you to assembly and modify these parts to kitbash your own ship designs, without needing to build a model from scratch. ...

prusaprinters
You might want to print the part a little slower than usual because it's so tiny.Material: Use a material with great layer adhesion.Supports: NoLayer height: 0.2mm or 0.1mmExtrusion width: 0.4mmPerimeters: 3Infill: 0% (doesn't matter)Solid layers: 5...

thingiverse
How to assemble: Additional hardware needed: Plate: To fix the plate you need two M3 x 10 mm flathead screws. Filament sensor - I used this one: https://www.amazon.de/gp/product/B07FSXFPLD/ref=ppx_yo_dt_b_asin_title_o01_s00?ie=UTF8&psc=1 This...

prusaprinters
https://paypal.me/UnNamedGER Print Settings Printer Brand: Creality Printer: Ender 3 Pro Rafts: No Supports: Yes Resolution: 0.20 Infill: 20% Filament: Maertz Budget PLA PLA White Notes: Supports are only needed for the Roof without honeycombs ...

thingiverse
ASSEMBLY. Print one peace each of the main body, the front cover, the speaker ring, and the little BT/amp enclosure plus 4 pieces of the feet (the last 2 being optional). Mount the speaker to the inside of the front panel and speaker ring with M3...

prusaprinters
After assembly I took some conclusions and in short time this will change: Shorter distance beween diodes on the top. </li> <li>Hide the screws from above, all enclosure will be screwed from the bottom.</li> <li>Add the EEPROM (AT24C32) to remember...

prusaprinters
I used PETG which is quite a reliable choice for this purpose, but even standard PLA should have sufficient heat-proofness for printbed temps up to 150°C (which means about 45°C at the top plate).Please use at least 1.2 mm wall thickness and 40%...

thingiverse
\- M4 x 25mm screws (2), M4 hex nuts (2) (I got away with using M4 x 30mm screws) \- M3 x 15mm screws (4), M3 hex nuts (4) \- [activated charcoal sachets](https://www.amazon.com/dp/B0149GP7IU?psc=1&ref=ppx_yo2_dt_b_product_details) (2) (optional)...

prusaprinters
Moving it higher allows it to clear the board.I still need to assemble everything.This is a remix of the nicely designed "SKR PRO case remix" by vandenmar: https://www.thingiverse.com/thing:4870495Which was based on the "SKR PRo V1.2 + TFT35 E3...

cults3d
See the rendered 3D image in the photo gallery for an illustration of how the complete assembly fits together. (Again, even though this image shows the screws separately, you do not need to remove them. This was only rendered as such to help people...

grabcad
The housing is specially designed to dissipate heat which increases the efficiency and lifespan of the LEDs and electronics.The entire assembly is ETL listed Class 1, Divisions 1-2 and Class 2, Divisions 1-2 for use in hazardous locations and...

prusaprinters
I have been only able to carry out some limited testing:- Quick Release Belt feed first test print :- Note the catching in this video, has been fixed with the "Thinner Main Belt Drive":-...

thingiverse
You might be able to use fewer steps like two sizes but it's just harder I think or more steps but it's slower to get there.Of course all the plastic parts and screws to assemble it.You'll need like jumper wires and whatnot2@ 4x4 keypad modulesA...

prusaprinters
See video (above).Details of my upgrade of a LowRider v2 to v3 are available here on the V1 forum.Print and Assembly:Print the parts as oriented. No supports needed, assuming your printer is capable of a decent amount of bridging.</li><li>Use four...

prusaprinters
The steps will be similar for other operating systems. Remember to select 'Arduino Nano' under 'Tools > Board'. Assembly Please use this diagram as a reference: Note: It should not be necessary to use a resistor or capacitor, however, they may be...

thingiverse
### Post-Printing and Assembly The pump case has a 6.7 mm hole at the bottom. Most little DC motors have a little edge which fits there perfectly. The impeller itself supports a 2 mm motor shaft, however, you have to file one side of the shaft flat...
