pin clutch remover 3d models
242623 3d models found related to pin clutch remover.
grabcad
Once the brackets are mounted to a surface (ceiling, floor or wall), the light fixture can be removed from the brackets by loosening the cap screws that hold the bracket to the mounting peg.Suspension Mounting: Pendant mount fixtures hang from the...
thingiverse
For now, I'm opting for the Creative Commons Attribution-NonCommercial-ShareAlike 4.0 International license.Changelog03 Feb 2024: Rounded sharp corners of pot receptacles11 Feb 2024: Chimney lid fit clearance 0.0mm -> 0.1mm12 Jul 2024: Remove baffle...
prusaprinters
(If you need to remove the magnet you can use another magnet to pull it out of place or use a small Allen wrench or paper clip inserted into the hole below it.)• Insert the drawer by tilting in back when installing in order to pass by the drawer...
prusaprinters
Pro tip: reduce line width (to about 2/3rds normal) and support interface density (to about 50% for instance) to have easy to remove supports without needing to resort to increasing distance.Assembly InstructionsHemera Mounting InstructionsPress nuts...
prusaprinters
The legs are made in a way to account for some of this material to be removed. What You Need: 12v COB LED Bar eBay Search: 17cm cob led These are 1.5x17cm long COB LED bars. Usually around 5-8 watts.</p> <p>I'm not sure if they have resistors or...
prusaprinters
You can use contour/hole compensation in your slicer to account for this if there are problems.Parts PrintingFor the box you will need to print: 1x ‘Body’ 1x ‘Base’ 1x ‘Internal collar’1x ‘Twist collar’ 7x ‘Gear’ 7x ‘Bottom...
cults3d
Once those are printed, you can unscrew the two front outer screws on the ArrowGuides that hold in the StringPulley_Inner and remove them. Place the LimbExtensions on the appropriate sides of the ArrowGuide with the small circular cutouts of the...
myminifactory
She called for her daughters and demanded the man to be removed from the premises, as the daughters flew in to overwhelm the man, a black mist exhaled from his cloak. One daughter was touched by the mist and her skin started to crack and crumble like...
cults3d
The extra 50mm Z height is FREE, because you will reuse the two original 370mm linear rods that you removed from the X gantry, to replace the two 320mm Z axis linear rods. No changes to the Z axis stepper motors or threaded rods are necessary...
cults3d
... that it is solid! I also indicate where it is necessary to put supports and where it should not be put (screw holes for example because too difficult see impossible to remove) Note 3: files for V2 and V3 are included (V2 Files.rar, V3 Files.rar)
prusaprinters
See the Create your own section for more information about building a custom model.This project uses the the T-Nut mounting system created by @6d6178 to attach to the pegboard itself and uses BV3D's method to print indicators on the first layer in a...
thingiverse
Disconnect the printer from the mains, remove the regular holder of the Z limit switch, disconnect the cable from the limit switch and unscrew the limit switch screws 9. Install the top part (with screw in) onto the left X-axis face carriage. The...
prusaprinters
If not, you might have to remove some debris:Step 16: Now connect the sail axis and bloom axis with a screw by overlapping them:Step 17: Attach the main mount to the axis by using two screws. The mount should hold the axis very well, so that it...
prusaprinters
(board LEDs can be removed if needed)HullGeneral AssemblyThe following animation shows how most of the pieces fit together.Assembly DetailsThe images above detail the headlight assembly.Solder the bicolor LED and all cables on the top side of the...
prusaprinters
Beeswax has the advantage of allowing you to remove and replace the flea hole with a longer or shorter version if you wish to adjust the instrument's intonation or to replace it if it gets damaged.BlowpipeThe blowpipe is designed to have a one-way...
thingiverse
So when you flip the "DDX_Strain_Relief.STL" part over, you will be using the Dremel tool to remove the stand off on the left side of the "DDX_Strain_Relief.STL" part. The right hole will hold a screw with nut (M3x25). You must put the nut on the...
prusaprinters
because the M5 have bigger heads and allow a more powerful tightening), you will need at least 50, I advise you to take 100 lol, it goes quickly!In the end, I advise you to buy, a complete box of screws of different dimensions to have a lot of...
thingiverse
http://www.thingiverse.com/apps/customizer/run?thing_id=53235 Instructions Using the following options: gammaTooth = 2.3125 MusicCylinderName = new song axisSlack = 0.6 midBigTeeth = 21 pulleySlack = 0.45 gear_gap = 1 snapAxisSlack = 0.3...
prusaprinters
Remove the wire arms after inserting the binder clip. The bottom of the hex bodies will only be attached to the base surface, by screwing them either from within the body into the base surface or, through the base surface into the hex...
thingiverse
No user interaction is needed That feature is useful for example to temporary suppress any kind of error or echo ACK message * Fixes: 1) general cleanup (converted tabs to spaces + correct indentation) on different files 2) restored slovenian...
thingiverse
**Mirror Prints** - two mirrored parts at the same time, again doubling throughput **Standard single filament prints** - by X or U individually [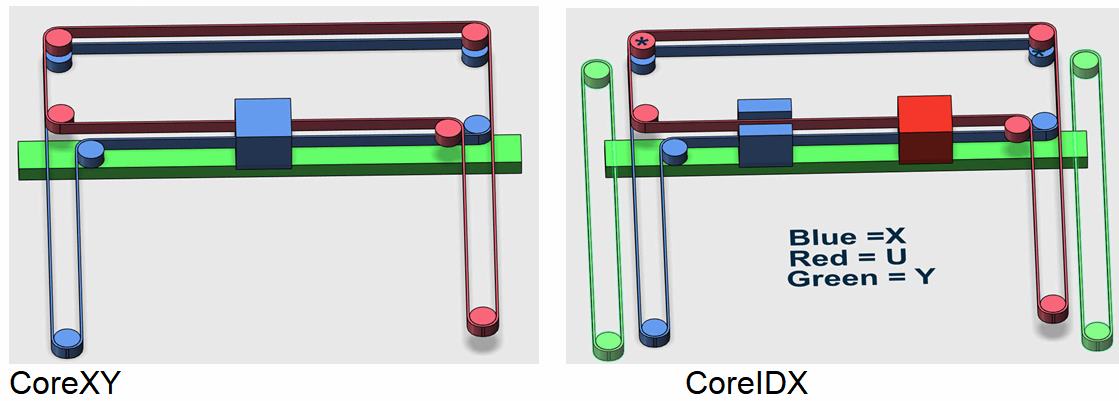](https://postimg.cc/hzfZQd8h) The...
prusaprinters
On the X tensioner, I made the narrow part considerably wider, stopping several tenths of a millimeter from the sides of the cavity it sits in in the X idler end, both to make it stronger and to reduce the play between it and the idler end....
thingiverse
To use these you want the jumpers on the SKR for Z and E you want #3 closed and the rest removed, This sets E and Z to 1/16th steps. Set driver current voltages to 0.95V on X and Y and 0.75v on E and Z. Now for the longer travel in the Y...
prusaprinters
This needs to be removed after printing! The space between the teeth should be completely free!I have printed ALL parts with a brim. Especially the Body is suspect to warping due to many overhangs.</li></ul><h3>Known Issues: can I fix my...
prusaprinters
Especially the removable wheel buffer allows to accurately control the filament loops in the buffer.The overall filament need (excluding box clips) is about:any color: 830gpreferrable white: 100gpreferrable transparent: 190gtotal: ~1120gBox...
cults3d
It has been written for ABL but if you don't use ABL then just remove the G29. Two versions of the start code are shown below. The first version uses Lin Advance on E0 but no Lin Adv for E1. The second version uses no Lin Adv at all. ; Ender 5...
prusaprinters
The fan shrouds have an integral support layer that is designed for removal, along with the main body. everything else should be fine to print without it.</p> <h3> Post-Printing</h3> <p><strong>Instructions</strong></p> <p>More complete instructions...
prusaprinters
So to generate this full size ‘natural’ waveguide, remove the /* and */ from around that section of the code, and make sure that unused speaker definition examples are commented out. Use the same approach to create your own speaker...
prusaprinters
Make sure that you don't turn off the heat-bed at the end of printing and don't remove letters from the heat-bed! Once this first print has finished, change the filament to a different color, and in slicer, deactivate the number object and activate...
prusaprinters
...This is to avoid something called infill anchoring, which creates useless zones in the layers that should be solid.The base and top should not be removed before they have cooled down, to avoid the surface bending.Base can be printed with 0.2 layers.