miata center console delete 3d models
147610 3d models found related to miata center console delete.
thingiverse
Mark the center point on that line. [ ] Step drill (small bits to larger) just under/to the hole saw drill bit size [ ] Using the 42mm hole saw bit, with the drill in REVERSE cut through the front case. Take care to do this in bursts so as not...
prusaprinters
Maybe calibrate ironing with the Grass Test model, before printing “production” full pieces. Other Useful Foosball Resources Rules of PlayThe International RulesThe International Table Soccer Federation posts the official rules online, here.I have...
prusaprinters
The two blocks on the left rail must be MGN12C in order to ensure the right amount of Y travel.BOMQtyDescriptionSourcing2MGN12 linear rail 280mm with MGN12C block **Aliexpress1Additional MGN12C blockAliexpress6M3x8mm Socket Heat Cap Screw...
prusaprinters
In the original (Stratego) version, there are two small lakes that provide a "do not enter" area near the center of the board - in my version, there is a Stargate that replaces these lakes (one on each team) that allows instant travel for your...
thingiverse
However, after printing it and using it in my crowded medicine cabinet, I found that the toothbrush handles tended to slide to the center because the cavity was egg shaped and they would then be angled such that the brushes were touching the cabinet...
prusaprinters
That grip arrangement also helps keep the plunger components centered within the housing to reduce friction and binding. Releasing the spheres – If a large amount of spheres are stacked up in the game board after a game is over, the spheres near...
gambody
In 1932, for instance, being inspired by the novel "Journey to the Center of the Earth", Doc decided to dig a tunnel but nothing came of it. His knowledge in nuclear physics he picks up while working on the Manhattan Project, and also in the...
thingiverse
И вот что из этого вышло.Parts links below: (65mm) Clock Quartz Movement Insert Roman Numeral White Face silver Trim DIY Clock Accessories 10x5 Neodymium Magnet 20pcs M3 Screws 360 adjustable smart mini ball head camera 38 14 Links to used tools:...
prusaprinters
It's much easier and faster to use blank wire (you anyway should solder fast if you used hot glue…).Do one path at a time and only solder it to one pad (I apply a bit of solder to one of the pads of each LED first and then just heating it up again to...
thingiverse
Finally, you can try CAREFULLY heating the carriage center section with a heat gun while it is installed on the x-axis rods—the material may relax to the stresses imposed by the rods, then harden in a more accommodating position. Use discretion—not...
thingiverse
*The fonts are shown in the center area of the first image, as a guide to help you choose a font that you like.* There are two sample STLs included: one with a very large and a very small ring demonstrating the size variance, and one with "♥ My Love...
thingiverse
:)For parts with little surface area contacting the print bed, eg planter modules, an inner brim can be used to promote bed adhesion.I recommend using PLA+ and strongly recommend you find food-grade filament to print with.[^4]Generally, I've been...
sketchfab
With his adamantium claws cutting through flames and igniting even more destruction, Wolverine finds himself at the center of an all-consuming inferno. His determination to protect innocent lives is tested as he navigates a landscape of burning...
thingiverse
For the big center hole do a medium size hole and then expand it carefully with scissors. I'd encourage anyone to find a better alternative. * [3/8"ID 1/2"OD Cear Vinyl Tubing,...
prusaprinters
With the rotor sitting so high above the mouthpiece, perhaps the air that is getting chopped is really between the rotor and the bar that goes across the center of the horn...The next step will be to raise the mouthpiece cone up by 1mm and retest the...
thingiverse
With the rotor sitting so high above the mouthpiece, perhaps the air that is getting chopped is really between the rotor and the bar that goes across the center of the horn... The next step will be to raise the mouthpiece cone up by 1mm and...
thingiverse
They are not difficult to find, however, I always indicate all the links where and what I buy.On the connector board, only the extreme power contacts are used, the data contacts, which are in the center - I removed with a mill so that during...
thingiverse
you can use the Prusaslicer's firmware update tool to flash Marlin firmware * shut down button: used to shut down the printer (it requires the feature is enabled on Marlin firmware) * Manual bed leveling menu: * added 5th leveling point: a center...
thingiverse
As I said in the video, you can watch everything: In conclusion, I would also like to note the program for using the engraver, this is perhaps the best program that I have seen - LightBurn. Multilingual interface, support for major systems, work...
prusaprinters
Install a small piece of heat shrink tubing over the end of the flex shaft if a spacer is needed to center the end inside the worm gear that will be fitted later. Main extruder and mount assembly 1x Press fit drill bushing...
prusaprinters
You may need to press upwards on the bottom of the 50mm lens locking bolt to return the locking plunger to the locked position (which prevents the lens from unscrewing).To mount the tube to the camera, align the small circle mark on the outer edge of...
pinshape
All About The Seriess Euphoria centers on CDC researcher Abby Arcane. When she returns to her childhood home of Houma, Louisiana, in order to investigate a deadly swamp-borne virus, she develops a surprising bond with scientist Alec Holland — only...
prusaprinters
Push the backside battery-cover onto the hot glue, so that the four centered over the four holes. Tear the isolation tape to the side out. If you want to overhaul the box and use some hot glue to secure it safer.</p><h3>Screw the Backplat...
thingiverse
Did I mention if you bend those wires in any way without isolating the leads first you will break the reed switch.I use blue painters tape and put a piece for each side under the bottom piece, and carefully align the sides and tape each side next to...
thingiverse
The rear vertical Z rail support extrusion (500mm) is centered on the back frame rails, equal distance between the two rear corners. ####**Z Drive** [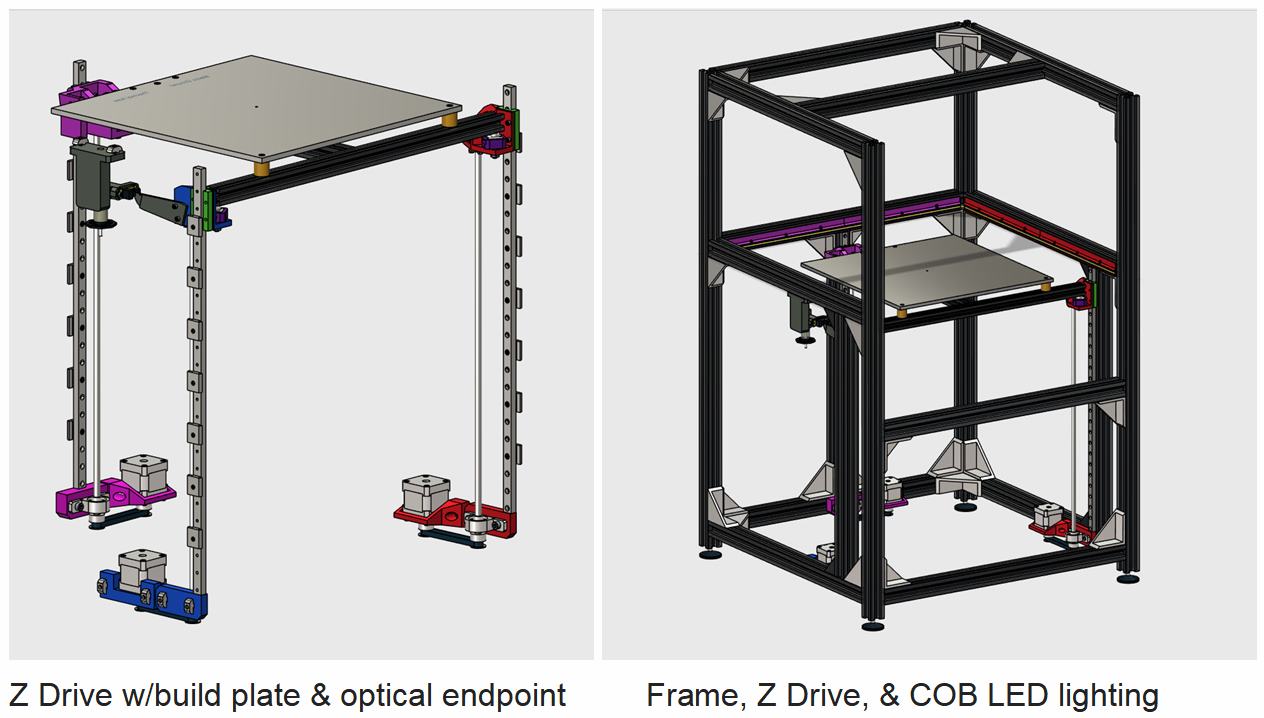](https://postimg.cc/QKs7nywc) ...
prusaprinters
The idea of having it in the middle is most prints will be centered and you'll get the best view for most objects you print now without having to make lots of adjustments later. When you're happy with the angle of all arms and the camera tighten all...
prusaprinters
They now should be perfectly aligned in center horizontally and flush with the front-bezel.If you find the gap on the sides of the drives too large for comfort, remix the front-bezel and replace it.You can now archive the alignment tool, the...
prusaprinters
This is why the handle has a small hole in the center – you can use it with a hook or a rope to mount the device under the ceiling.Never breathe ozone as it is a toxic gas and do not use this device when there are people and animals in the room. I...
thingiverse
- Update 5/5/2020 I ran into a spool that didn't fit on the spool holder so I designed a part that slides over the spool spike to hold a spool with as small as 40mm center and 100mm wide. - Update 10/7/2020 [Available...
prusaprinters
The 03 center ones are +- 3.5mm from face.)Printing and BuildingPrinting SettingsImportant notes:Fits on PRUSA miniUse PETG for “button_tails”Use PLA for “Joystick_base”All pieces print without support required, one exception is “Dock” that...