little sisters 3d models
133424 3d models found related to little sisters.
prusaprinters
it might be an advantage to pull a little and the turn the spool a bit and then pull again, to loosen it up all the way around. AssemblyStep 1:The bottom Piece Step 2:Place a PRUSAMENT spool side on top of the bottom piece.Step...
prusaprinters
If you cut a syringe, make sure to remove the little edge that prevents the plunger from being pulled out too much, or put that end near the top. (This step is only for FDM)</p><p>Cut the Barrel STL at the desired location in your slicer. Print the...
cults3d
I had to design and print a little bracket for it and needed a few more jumper leads to make the connections. Disconnecting the USB buck converter and connecting to the 10Amp one was also reasonably straightforward. As follows: If you buy the ones...
prusaprinters
...Due to the nature of 3D printing, they will typically come out a little smaller; the holes are intended for magnets of diameter 2 mm by 4 mm length (2 mm length for the lid).The height of the mini-tray is 5.5 mm; however the stacking height is 4 mm.
thingiverse
#### Part 4: Assembly #### The physical assembly process is not overly difficult or complex, but some components can be a little "fiddly" to get everything to line up or fit in place. **1** Start by inserting the shifter shaft into the main body...
prusaprinters
The main difference is one has a step in front, entry button, and is a little larger (15CM or 6 inches). ...The attached pictures show the Ad-Mech-Vessel (step less). </p><ul><li>Print with “Fill Pattern” as "Adaptive Cubic" to save time and...
prusaprinters
Then the heat issues are of little concern. It's meant to be more of a decorative light, so not having it at full power should be fine.</p> <p>There is a test print I recommend you print first to see if your strips and barrel connector fits. The LED...
prusaprinters
This one took a little more brain power, but eventually I gained inspiration from teaching my 3-year-old son how to flush a toilet. I realized that, in essence, my vial was just a holding tank, and when the time came, all the water needed to be...
cults3d
DO NOT FORCE IT ON, USE THE BLADE TO CLEAN A LITTLE MORE =OR= REPRINT WITH UPPER BALL SOCKET TOLERANCE. Almost certainly you will need to clean up the detent teeth. Use the #11 blade to trim the teeth sharp, note that they are OFFSET from the...
prusaprinters
In this project I combine all of them together to a little but spectacular do-it-yourself experiment. With just a few components and the 3d printed part you will be able to build your own Lorentz Force Experiment.</p> <p> <figure class="media">...
prusaprinters
The head of the bolt should sink into the counter-bore with a little bit of the top poking out. Repeat steps 3-9 with the round end axle holder and remaining axle holder. The bolts will sink further into the part than the surface of the part. Install...
gambody
In his long life, Sergeant Colon has served in many armies and happened to take part in battles, though little is known as to which side he chose and to which effect. Quite a marksman in his youth, he has lost the skill with time passing.ABOUT...
prusaprinters
I've spent a long time making, testing, and documenting this and my only reward is that little stupid ‘like’ counter, download counter, and photos/stories from users. DON'T DEPRIVE ME OF MY ONE SENSE OF SELF WORTHThe actual license is Creative...
prusaprinters
Just the slide enclosure needs a little bit of support structure - everything else can be printed without supports.In the following paragraphs, I will list the parts you need for your build and describe the special features of my...
gambody
Devil Hunter is an agile gunslinger that looks and acts a little bit like Dante from Devil May Cry, he can easily deal with hordes of demons, because that’s what he’s been taught to do. Devil Hunter has a fast-paced gameplay and uses 3 stances to cut...
prusaprinters
The pullcord occupies the full diagonal length of the print bed and there is little room for brim or skirt material. Can be printed together with the drive gear, but the drive gear needs its own brim. To prevent the pullcord from warping, add a...
thingiverse
--- ###### DIY Belt Sizing You will cut the steel shim based on the width between the two guard bumps on the rollers and the length a little longer than necessary to go around the rollers, over the bed and over the belt slides. Note that the steel...
prusaprinters
Align the gauge center slot with one of these lines, the outer guide with the border, and snap gently; maybe you'll need a little bit of wiggling, but don't use too much force (it's not required). The gauges can be also snapped over the plaques with...
thingiverse
Don't get crazy with tightening, as there is not a lot of wood in the IKEA stuff, although I think what little there is… is concentrated in tabletop corners and leg ends. Repeat the above at all four corners, and set the bottom aside. 2b. Now...
prusaprinters
Don't get crazy with tightening, as there is not a lot of wood in the IKEA stuff, although I think what little there is… is concentrated in tabletop corners and leg ends. Repeat the above at all four corners, and set the bottom aside.</p><p>2b. Now...
prusaprinters
I reduced "top layers" from 9 to 8 and "bottom layers" from 7 to 3.Rail handle oriented properly, with supports in the correct placesPush a 1/2" Loc-Line cup onto each set of fins (they should be a snug fit) then secure them together by passing the...
thingiverse
Laser Blowing System Updated the entry due to the fact that it became unavailable Laser Engraver Project Laser Engraver Update Laser Blowing System Rotary Axis for Laser Engraver Update Laser Engraver for Rotary Axis A little bit of theory ......
prusaprinters
Most parts have to be printed with some supports however they are designed to be printed with little and easy-to-remove supports. Bill of MaterialsThe BoM is the same for both editions of the drybox. A kit with the Electronic parts and Screws will be...
thingiverse
Because of this I am having to alter the end frames in order to provide some extra clearance for the spools and lower the bin placement a little. I believe I need to close up the openings under the bin along the outer sides in order to maintain a...
prusaprinters
Please try at first which one fits best for you 02.08.2016 Modified the tow-bar a little bit and added another part for connecting the trailer to the rover http://www.thingiverse.com/thing:1700138 Added a new link to the 6802zz bearings Added a...
thingiverse
You may find the Colorprint tool useful if your printer supports the M600 command, but your slicer doesn't support adding pauses: https://www.prusaprinters.org/color-print/ After switching filament colors, the nozzle may not be primed and the first...
prusaprinters
Make sure to raise your track pieces a little higher if the plexiglass isn't cut right - if you don't do this, you'll end up with a non-pocket-able door. Repeat the other top section as in step 6. Snap the door stop (#27) magnet against one of the...
prusaprinters
You may have to tweak the size of these or file a little off the fitting rings. This should be a snug fit by hand.</p> <p>Spacers - Print 16. Placing a couple of these back to back makes the middle spacer for the large and small frame connector bolt....
thingiverse
[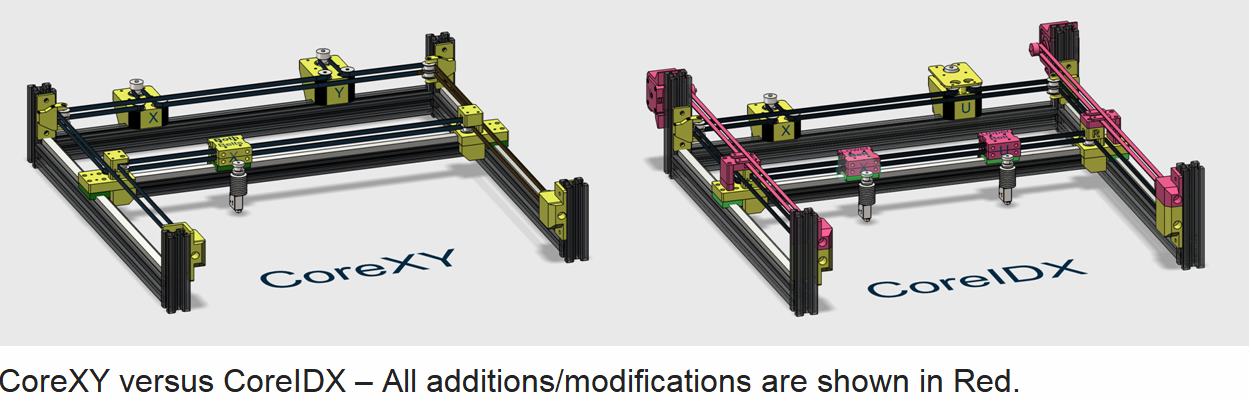](https://postimg.cc/QVWdKmBq) Very little was modified or added to make this conversion as shown in red on the CAD image comparison of CoreXY and Core IDX. This configuration has...
prusaprinters
For the Dupont holders, I just put a little glue around the inside faces of the printer part and inserted the Dupont connector. The face of the Dupont connector should be flush with the face of the printed part, let it dry before installing it. Glue...