intramedullary rod tibia 3d models
72197 3d models found related to intramedullary rod tibia.
thingiverse
As I was having a lot of trouble trying to get the whole XY gantry alligned and well working, I still noticed a lot of "flex" in my aluminum rods. So I decided to throw the whole thing overboard and design a new gantry using 2x MGN15H for the...
prusaprinters
SKR Pico) will run at 12 or 24v.Screws (socket head if not specified)X axis2x M3x25 (tensioner)2x M3 nut (tensioner)2x M3x14 pin (to hold tensioner pulley)3x M3x10 (to hold left motor)3x M3x12 (to hold right motor)4x M3x10 (Z rod clamps)4x M3x18 (POM...
cults3d
Add custom features such as a custom solder rod holder using two 4mm holes on the Left and Right sides, and put your name on it for credit. Options Choose between an 80mm fan size or 120mm fan size, with file titles indicating the specific size. The...
thingiverse
- Holes to close the Pitan now have modelled M3 threads - Redesigned for use with the hobbed nut that the stock Ender 3 extruder has, but I'm sure you can make it work with a hobbed nut like the original Pitan uses - Spring slot reshaped to work with...
thingiverse
Hardware: 2x Carbon fiber rods 10x360mm (sold 500mm lenth) for X axis 2x Steel shafts 8x303mm for Y axis 4x Steel shafts 8x300mm fox Z axis 4x Bronze bushings 10mm 8x LM8UU linear bearings 2x LM8LUU linear bearings 2x 250mm T8 lead screws (doesn't...
prusaprinters
EDIT (09.12.21): I have added some optimized parts, so Prusa MINI users could also print this Christmas tree :)MaterialsFor this project you will need:Metal (or other material) rod/tube/pipe with diameter of 10 mm and length of 75 cm - I recommend...
prusaprinters
It should be fully rules complaint but check dimensions before using this design.Note: At time of upload, the design has not been tested in competition and has no guarantee of performance.Note: The pictures included with this design show a Launcher...
thingiverse
My design faces the two motors towards each other straddling the chrome rods on the X-Axis & offsetting them so they can be attached using standard M3 screws. Additionally, I don't use any bearings on the idlers because cutting the PTFE tubing in a...
prusaprinters
This led to the creation of the CN Mini StealthBurner, combining the strengths of the Geetech MeCreator 2 and the Voron-inspired design for enhanced performance and print quality.I will let the pictures talk! BuildFor the new Gantry you will need to...
thingiverse
There is a launch lug tube running the entire length of the rocket that should accept a 1/8" launch rod. The ejection baffle should protect the parachute somewhat, although depending on the material used, it may need replacing after one or more...
thingiverse
But if you would like to build a similar one, here is some advice: BOM: Printable: Top plate x1; Bottom plate x1; Mecanum wheel x4; Motor mount x4 Non-printable: N20 Gear Box Motor x4; L9110S Dual Motor Driver x2; Logeek Max10 Dev Board x1; ESP8266...
prusaprinters
Parts: 2.5mm zip ties .8mm music wire as servo rod 1.1mm music wire for tail pivot shaft. ~34mm long Power wires and connectors of your choice I used 24 awg silicone wire. Hobby King S0361 3.6g servo (works well for the price. Be careful not to...
thingiverse
https://www.aliexpress.com/item/32963563253.html?spm=a2g0s.9042311.0.0.27424c4dwZaARw Rocket 3670 2280KV Motor https://www.aliexpress.com/item/1005001420604311.html?spm=a2g0s.9042311.0.0.27424c4dtJsHww 20KG Servo of your choice...
prusaprinters
this can be done on a H(BL) lower but you will find that is not easy since you don’t have room to place your finger above the selector.——you can use this set in a view waysthe safe and full auto optionyou can use it to make a H or BL model that can...
cults3d
This remix modifies most pieces and requires all the published components to work correctly I wanted to upgrade my hypercube to take advantage of the precision of MGN rails and stiffen the build to increase speed a little bit over the 8mm rods, while...
thingiverse
You can also use 1/8" plastic rod. You may need to hand drill to open the pinholes a bit, but no glue is needed - friction will keep them fairly firmly in place. Feed the stretchy string through the holes in the palm and secure in the upper corners...
prusaprinters
Then extend the caliper depth rod until it hits the surface. Take note of the depth reading, then measure the actual depth of the 45 degree hole, etc. that you wish to measure. Subtract the first measurement from the second to get the approximate...
youmagine
The bracket should expand enough to go around the threaded rods. With the mounting bracket in place, secure the M3 nut and screw and begin to tighten it down, but loose enough the plastic can still slide on the coupling. Adjust the mount distance...
cults3d
Note, they are all the same just different thickness so if you modify the Z height in your slicer to fit your need if required:** DIY3DTech_NEMA_17_StandOff_Y_Axis_6mm.stl DIY3DTech_NEMA_17_StandOff_Z_Axis_15mm.stl...
prusaprinters
;-)I would be very happy about a like or a rating if you like this project, also take a look at my other designs!Follow me on Twitter for regular updates and more!Since people often ask about it: What other modifications are on the printer in the...
prusaprinters
The length of said rod is around 274mm.The hinge piece takes a 3mm screw, and there is also space for an M3 nut in one end.There are two variation pieces.Main-Hilt-001-WITH-DETAILS: This piece is the main hilt 001 piece, with the switch assembly,...
thingiverse
I've re-framed the design using all stock extrusions, color-coded them to show where I made changes (see the 8th picture).\r\nSome of the advantages: lighter X rail with 20mm more travel (or supporting wider X carriage), more stable and Wider Y...
prusaprinters
Bolt they axis rod assemblies to the corners of your baseplate (a delrin cutting board or plywood work well here) making sure they are perfectly square and parallel to each other. Next install the bearings on the gantry sideplates, X motor, and X...
thingiverse
I used a small M3 threaded rod to tie the posts at the top, through the centre hole of the spool. This should also hold the spool from rolling off the holder. Of course the holder has to be held in place so that it does not slide. You could also just...
prusaprinters
The tube can extend all the way to the extruder for a "reverse bowden". The spool holder is wide enough to hold any spools up to several kg, without needing any adjustments Spools are simply set on top of the curved rollers-- no rods to feed through,...
cults3d
The halves are designed to be pinned with 1/8" brass rod - but you can use bamboo skewers as well. 4. Test your assembled keyboard for fitment and alignment - some trimming, filing, etc. will most likely be needed to get everything fitted nicely. I...
thingiverse
Level the bed by turning the thraded rods, before tightening the pulleys 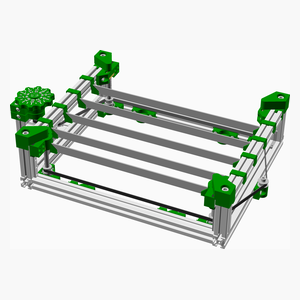 [Top](#TOP) --- Finished! ... <span></span> ...
prusaprinters
I did use a bit of aluminum tape to shim the horizontal bolt for a tighter fit on the 608RS bearing.The stake mount is sized for placement on a 3/8" all-thread rod used as a mounting stake.Print SettingsPrinter:Creativity ELF...
thingiverse
I used 3mm and 4mm threaded bar a lot, you could glue CF rods but I liked the idea of just unbolting to replace any damage. This adds weight but not a massive amount. Some of the photos may be slightly different to the STLs as they evolved a bit. All...
thingiverse
Link: https://www.banggood.com/fr/Lerdge-1_75mm-Filament-Material-Run-Out-Detection-Module-Sensor-For-3D-Printer-Parts-p-1323359.html?rmmds=myorder&cur_warehouse= CN Or :...