flex arm tapping machine 3d models
257826 3d models found related to flex arm tapping machine.
prusaprinters
Loctite is a good idea on the hinge screws but not the 8mm screw for the battery latch or "arm". The lengths of the screws are not absolute, it is possible to get away with shorter or longer screws in some cases, but these are what I used. How I...
gambody
The tank is included in the Imperial armed forces, although only in the second-line arsenal.With an ancient design, Marlcador Infernus’ peak of production was during the Great Crusade as a variant pattern of the Flame Assault Tank. Many tanks have...
prusaprinters
So I started from scratch to design a parametric file that produced an simple print that could be easily assembled. Required hardware: *optional M3 x 10mm screw: 4 for each segment and base printed M3 square nut: 4 for each segment and base printed...
prusaprinters
If you're beefing up the tires, keep in mind you probably still want some squish in the base tire, and probably still want just a bit of flex for the paddles. But eliminating the internal gap in the paddles seems probably...
prusaprinters
(See 3d rendering) added: better support for the top around the buttons In an attempt to reduce flex. changed: All screw holes of the lid are slightly chamfered, the outer 4 holes (that mount the top to the case) redone; they were meant for m2.5...
prusaprinters
And for many builders I consider this simpler than going the path of printing Flex material. Model DetailsPulley and Bearing Press ToolThere is not much to say. It shows the pulley with a bearing and heat-shrink tube on the outside. The...
prusaprinters
All of the flywheel cages (not just the MAX cages now) have been re-exported with ribs in the motor wells to hold the motors more securely and lessen flexing from higher crushes, which should increase long-term durability and possibly marginally...
grabcad
#UMBRA #PaperTowelHolderChallenge #Creativity #HomeDecor #Organization Submitted by user mike12345 /******/ Looking for a fun challenge to flex your creative muscles? UMBRA's Paper Towel Holder Challenge might be just what you need! This competition...
prusaprinters
When adapting typical M42 lenses, the helicoid is always taking an unbalanced load - these PLA parts flex a bit and with enough force, unfortunately lubrication doesn't quite overcome the friction between the plastic parts. It's of course very sturdy...
prusaprinters
After they’re tightened together there is a *tiny* bit of flex which will allow to straighten/tweak the pieces straight but you’ll want it to be as close as possible as you sinch the bolt down. 6. Next you will install the remaining T-Nuts in the...
thingiverse
####**X & U Carriages** [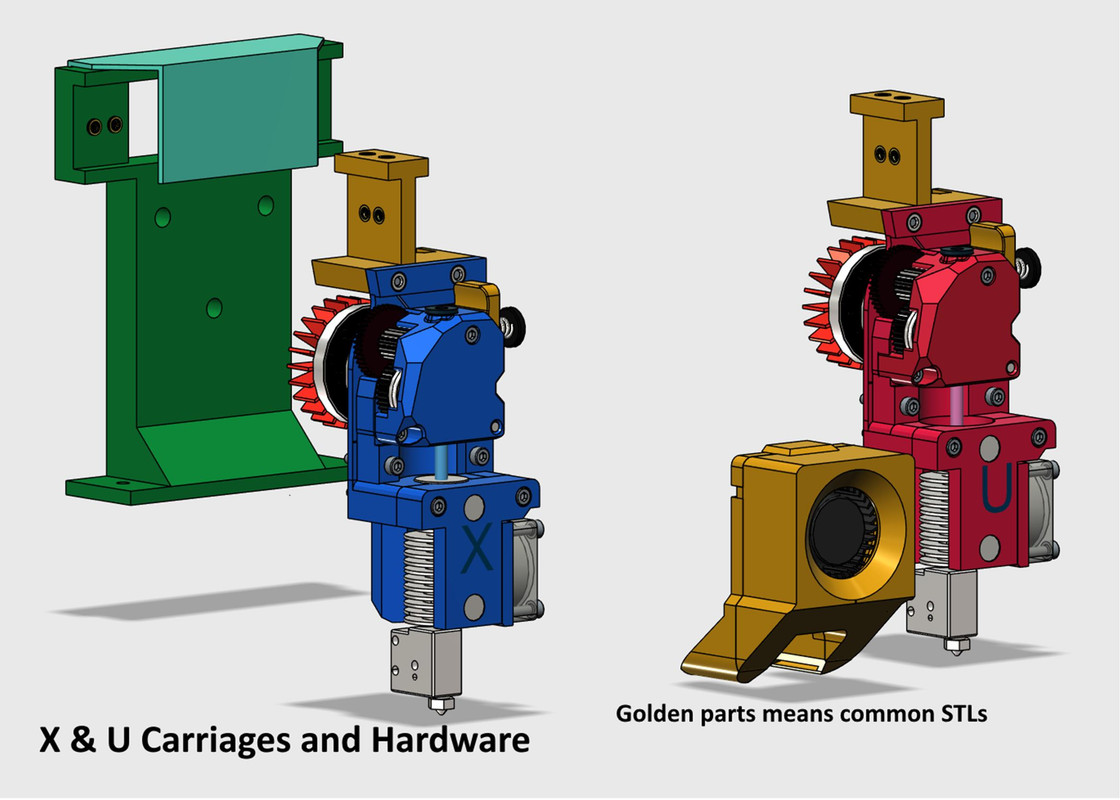](https://postimg.cc/xXcSzT8b) [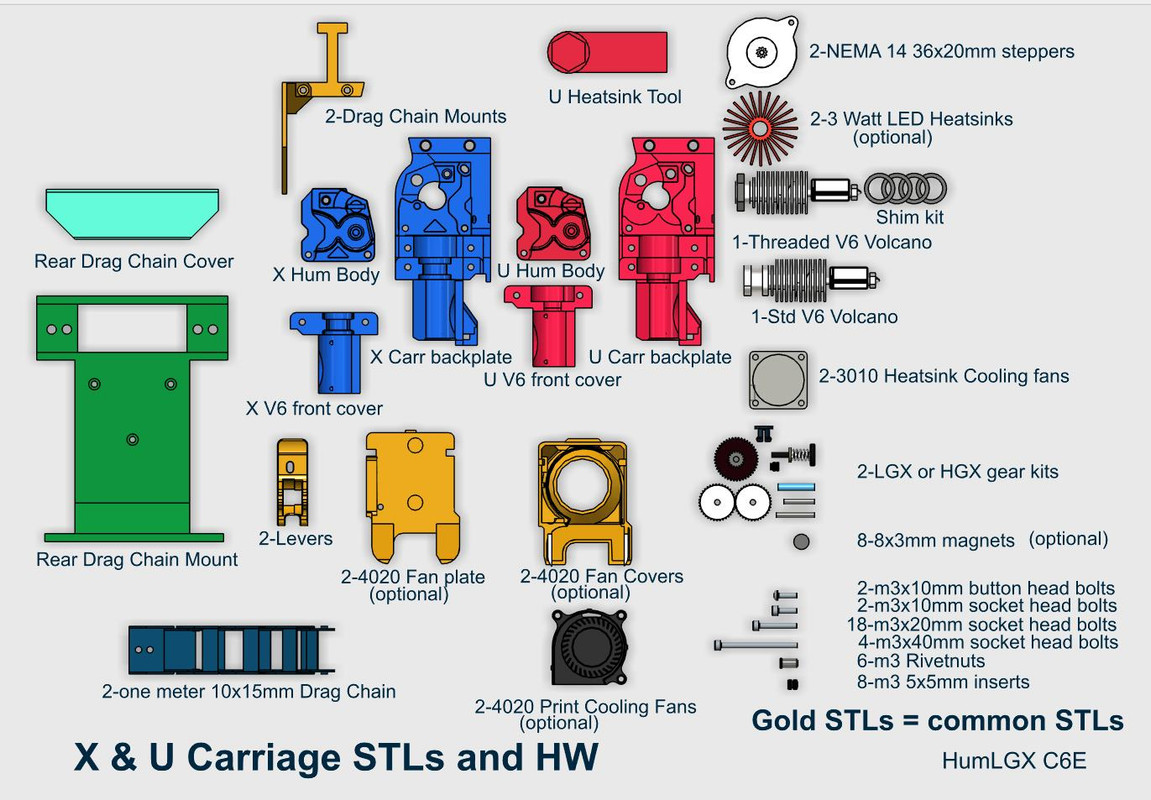](https://postimg.cc/CdST44d0) There have been multiple generations of carriages...
grabcad
Here is a new version of the text, focusing on the importance of stop buttons for machines in ensuring safety: A vital aspect of maintaining safety during machine operation is the presence of a stop button. This feature allows operators to swiftly...
thingiverse
according to DIN / ISO (high form for G-Cam clamp, low form for the camera clamps) - a piece of (copper) wire, tapped flat, for clamping the guiding tube so that the screw does not flatten the plastic - filament matt black as desired additionally for...
prusaprinters
If I were to rebuilt that I would probably use heat-set inserts here, should have been easier - I screwed up some tapping, and few screws are not holding in.And now since we have all the parts it’s time for:AssemblyI started by welding a frame (not...
prusaprinters
4) self-tapping countersunk screws for the sides and M3x12 screws for the back plate. The electronics cavity is 41.2mm x 45.6mm x 60mm (WxDxH), big enough to take a SqueezeAMP board and a 2-pack of 18500 Li-ion cells.</p><figure class="image...
prusaprinters
The design & assembly would be easier & stronger since we'd have a whole lever arm to work with. Stronger body I made a second version of the body which increases the amount of material (for strength) around the slotted head for the chainring...
gambody
The process of adaptation presupposes that practical aspects of printing the model using the FFF/FDM technology are taken into account, and the model's scale and cutting are chosen to ensure an optimum result of printing.3D PRINTING...
prusaprinters
The servo arm is clipped inside each leg then screwed, maintaining the leg in position. A drop of oil helps the legs rotate smoothly against the body.Legs connected to the bodyThen, the ankle servos are placed in the legs and secured with M2 screws...
myminifactory
We set the slicer to support ONLY the flat bottom of the left arm and the belly of the body.stl file.Note: Future models will contain built-in supports again. 2 - There are some pieces that may need brims or rafts, use your discretion. When setting...
myminifactory
The creator and donor of the collection was the Master of Pharmacy Mateusz Bronisław Grabowski (1904–1976), a pre-war pharmaceutical inspector of the Warsaw Voivodeship, soldier in the September campaign of 1939, member of the Polish Armed Forces in...
prusaprinters
I hope I'll be able to proceed last step soon, so then I can add arducopter parameters and some sample video here Print Settings Rafts: No Supports: No Resolution: 0.6 (for more solid parts) Infill: 100% Filament: Filamentum ABS or ASA Notes: I used...
prusaprinters
Crop and full-frame models are both compatible.Twin-head snake-arm macro flash (recommended)AssemblyMicroscopesPrepare the two microscopes by unscrewing the silver outer case (right) from the objectives, and discard them:Note that the internal and...
prusaprinters
The two supports arms are simple screwed into the base using some 10mm M3 screws. Nameplate can simply be screwed in.</p><p>If you have any issues, or requests for custom sizes pieces, please feel free to ask, and I'll do my best to be...
myminifactory
(See images if unsure) Place the 4 long bolts into the mount arm and slide that over the rail be it in front of the axle or behind it. Slide the Plate on the other side of the rail with the arrow facing up. Align the bolts and slowly tighten them a...
thingiverse
Also, if you get into using magnets in the models (so you can swap arms, weapons, etc.) then consistent polarity becomes very important, so this is good practice. I would have waited until it was a bit more refined, but I'm putting it up a little...
prusaprinters
But for now here are all the main parts if anyone wants to start playing with it. Build Thread https://forum.lulzbot.com/viewtopic.php?f=16&t=5733&p=33503#p33503 Preliminary Bill of materials: 1 Bondtech Drive gear kit for 3.00mm fillament...
cults3d
... into the base or screw it into the bottom. If you have any questions, let me know! Enjoy! EDIT - 04.30.19 - I've added the Fusion 360 file for the arms for those with S3D who are having issues with the bodies. ...Feel free to modify as needed.
thingiverse
A butane barbecue lighter works well, with the arm to get to the inside of the container. It helps to make a small pigtail in the cotton on the side to light. Be patient: it can take a couple of minutes to get it going. If the flame starts and goes...
thingiverse
UPDATE 20th of March 2019 -Tweaked the length of PVC used in the plunger to get full travel with the pump grip, previous plunger length was stopping the stroke short and causing pusher arms not to fully elevate. Also tweaked length of spring...
thingiverse
You can pull the spring arm out slightly, be careful. Solder extension wires onto the 3 pins of the magnetic sensor. (30 cm long) Hot-glue the magnetic sensor's pins onto the mechanism so it detects the passing magnet. Refer to the pictures as a...