e46 vent removal 3d models
184092 3d models found related to e46 vent removal.
prusaprinters
The fan shrouds have an integral support layer that is designed for removal, along with the main body. everything else should be fine to print without it.</p> <h3> Post-Printing</h3> <p><strong>Instructions</strong></p> <p>More complete instructions...
prusaprinters
So to generate this full size ‘natural’ waveguide, remove the /* and */ from around that section of the code, and make sure that unused speaker definition examples are commented out. Use the same approach to create your own speaker...
thingiverse
The spirit of the project is to remove barriers to innovation and focus on pushing the technology, working as a collective, inspiring each other and experimenting with new ideas. We are happy to foster a rich ecosystem of suppliers and services...
prusaprinters
...This is to avoid something called infill anchoring, which creates useless zones in the layers that should be solid.The base and top should not be removed before they have cooled down, to avoid the surface bending.Base can be printed with 0.2 layers.
prusaprinters
You can easily remove them by screwing in a bolt from the inside. About 40% infill should be ok. The grill for the fan requires a .2 layer-height to print. You can get away with .1, but I advice against it. This is because of the way the grill is...
prusaprinters
A third channel guides the wires from the hot end to a Sub-D9 connector, so the tool block can be removed by simply unplugging the Sub-D cable and the PTFE-Tube. This will make replacing and cleaning tools so much easier.</p> <p>Here the basic design...
prusaprinters
Or just remove the terminals and solder everything. That's the most secure. I will most likely do that on the next one.</p><ul><li>Apparently if you screw terminals too hard, the solder joint can shear and cause a bad connection. Happened to me. The...
cults3d
It has been written for ABL but if you don't use ABL then just remove the G29. Two versions of the start code are shown below. The first version uses Lin Advance on E0 but no Lin Adv for E1. The second version uses no Lin Adv at all. ; Ender 5...
thingiverse
* Remove the 4020 duct, BMG and hotend, if installed. * Sandwich the extruder plate between the extruder stepper and the BMG, and start the three long M3 screws. Do not tighten fully just yet. * (Dragon HF only) Rotate the hotend so that the heat...
thingiverse
The spirit of the project is to remove barriers to innovation and focus on pushing the technology, working as a collective, inspiring each other and experimenting with new ideas. We are happy to foster a rich ecosystem of suppliers and services...
prusaprinters
Then remove the screws and cut off those excess plastic dags:Installing the prismThe prism has 3 transparent sides and 3 opaque black-painted sides. The transparent sides will face the microscopes and the outside world, while the black-painted ones...
thingiverse
There are 5 files in the download: - An stl file of the top half - An stl file of the bottom half - A 3mf file with both halves - A 3mf file with both halves and a supports tear tab to make removal of the supports much easier. - A 3mf file with...
thingiverse
Removed the old file and uploaded the new one (REV7 steering link clearance fixed.stl). - New slightly modified rear chassis plate added. No need to switch from previous design. This newest version just adds a little bit more space to the rear...
prusaprinters
Make sure you understand how to place the display, in the correct orientation, into the shell BEFORE you cut the mounts!If your display is fitting into the top shell, you can remove it to glue theDisplay Frame to the upper shell. I used super...
prusaprinters
Put it back in its place and wait until the glue is dryed.Then strip the isolation tape off and go on to the next step.Touchpad Remove the backside of the touchpad. Take the hot glue gun and make a big drop of hot glue at the place for the...
prusaprinters
Make sure that you don't turn off the heat-bed at the end of printing and don't remove letters from the heat-bed! Once this first print has finished, change the filament to a different color, and in slicer, deactivate the number object and activate...
thingiverse
Here's how you can convert this format into numpy arrays of x, y, z: ```python import numpy as np hull_data = [[...your data...]] x, y, z = [np.array(item) for item in zip(*[data[i] for i in range(len(data))])] # Remove points that don't connect...
thingiverse
**Mirror Prints** - two mirrored parts at the same time, again doubling throughput **Standard single filament prints** - by X or U individually [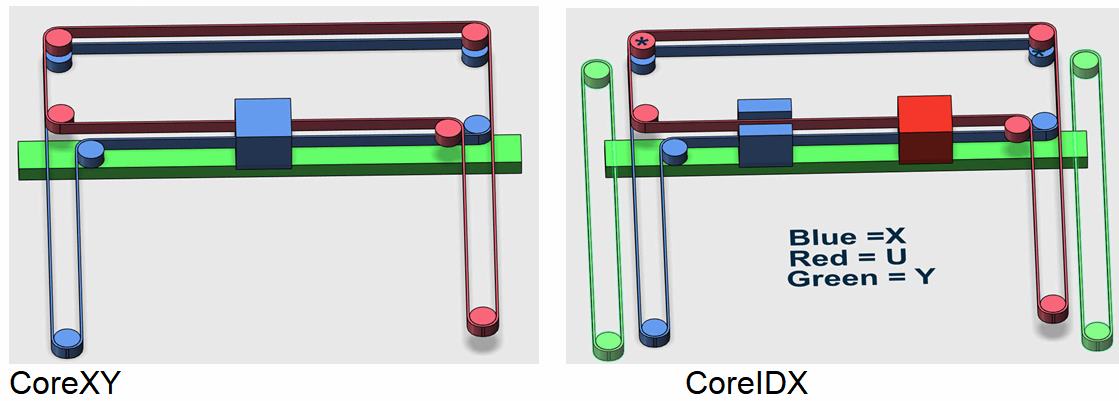](https://postimg.cc/hzfZQd8h) The...
prusaprinters
The slot should allow a bit of vertical adjustment.Install the probe mount to the extruder plate using two short M3 screws.Remove the 4020 duct, BMG and hotend, if installed.Sandwich the extruder plate between the extruder stepper and the BMG, and...
thingiverse
To use these you want the jumpers on the SKR for Z and E you want #3 closed and the rest removed, This sets E and Z to 1/16th steps. Set driver current voltages to 0.95V on X and Y and 0.75v on E and Z. Now for the longer travel in the Y...
thingiverse
This allows for easy loading and unloading of prints, as well as improved airflow, making it easier to remove warping from large prints. Additionally, the open frame makes maintenance a breeze, with easy access to all mechanical components. The...
prusaprinters
Especially the removable wheel buffer allows to accurately control the filament loops in the buffer.The overall filament need (excluding box clips) is about:any color: 830gpreferrable white: 100gpreferrable transparent: 190gtotal: ~1120gBox...
prusaprinters
Using supports for the slot cavity was problematic and difficult to remove. I am going to replace the slot with a hole for an M6 threaded insert. This will require a soldering iron to install but I expect those attempting this build will already own...
prusaprinters
On the X tensioner, I made the narrow part considerably wider, stopping several tenths of a millimeter from the sides of the cavity it sits in in the X idler end, both to make it stronger and to reduce the play between it and the idler end....
prusaprinters
It is possible (but fiddly) to remove it again with a small screwdriver.If, like me, you don't know anything about knots, this worked well https://www.animatedknots.com/gnat-hitch-knot Final BitsTie the ring onto the end of the left cord and the...
prusaprinters
I updated the .ino file to use the beeper.(Update):Replaced the file FrameSpacer.stl with new version that adds some clearance between the belt and this part by removing material from the 3 screw guides at the curved end.(Update):Uploaded schematic...
prusaprinters
(Observad la caja de mi fuente de alimentación que está impresa con las guías inferiores para poder "sujetarla" a la caja inferior). Nota: Los archivos stl y 3mf son solo un ejemplo de lo que se puede crear con este diseño, pero no creo que puedan...
prusaprinters
This needs to be removed after printing! The space between the teeth should be completely free!I have printed ALL parts with a brim. Especially the Body is suspect to warping due to many overhangs.</li></ul><h3>Known Issues: can I fix my...
prusaprinters
Remove the piMount from the bottle. Hold the piMount with the two arm brackets in place, directly above the bottle opening (see photo) so that the arm brackets are touching the bottle. Make sure that the arms are lined up with the two small marks...
prusaprinters
The smoother the interior is, the better. Use sandpaper, a utility knife, or a flash-cutter to put a very slight chamfer on the upper and lower edges of the crescent-shaped locking rib of the hot end lock. Assembly notes: The one tricky thing is...