cooling section 3d models
154226 3d models found related to cooling section.
prusaprinters
As this is for resetting the display, I made a short version that does not protrude, making it more difficult to accidentally depress.)Built in RS DesignSpark Mechanical, using the 'things' as mentioned in the remix section as inspiration and to...
prusaprinters
Insert the cylindrical section of the cableholder, that was previously used to hold it in the collet clamp, into Bone2's hole. Ensure that it is angled parallel with the whole arm, and not installed upside down. Apply resin or superglue to bond them...
thingiverse
The balancing act of tooth spacing angle and tooth tip to tip height is briefly covered in the naming convention section. #Installation Conversion of the shifter is not for the faint of heart. The shifter needs to be almost completely...
prusaprinters
Note that one 'M' (right side) and one 'O' (left side) are cut so as not to interfere with the rope indent.7 - Refer to the assembly diagrams in the pictures section as well as the uploaded pictures for putting the model together. ...The model is...
prusaprinters
Thats why I had to remap the arcade controls either way. You should be able to use the screws of the mounting plate to mount the stick to the shell. Add theDuster and screw theJoystick Ball to the top of the stick. Buttons If you want to use original...
thingiverse
The fender section keeps water and dirt from being splashed at the bearing. I just road the 5900 for the first time in 4-years with its new lower headset bearing, the prototype bearing fender, and the cleaned and repainted front brake-cable stop...
thingiverse
... you should end up with a little infill at the tips when slicing. * **QAV-S front_bumper.stl** * front lip bumper for the jb qav-s * **QAV-_S_Mid_rear_standoff_rx_bay.stl** * slides over mid rear standoff to create a section to stash an RX. ...
thingiverse
So that the printer now switches itself off after printing, the G-code in the slicer has to be adjusted a little: Here is my attitude towards Cura: In the device settings for Cura, insert the following in the section "End G code" above the last...
cults3d
One section of 3 LED's is 25X8mm's. I soldered wires to the end and peeled the backing paper off, and added a couple of drops of super glue and stuck them to the holders. I mount them using the screws that hold in the fans. Fan shrouds (Layer fan...
thingiverse
So that the printer now switches itself off after printing, the G-code in the slicer has to be adjusted a little: Here is my attitude towards Cura: In the device settings for Cura, insert the following in the section "End G code" above the last...
thingiverse
See the section above where I propose a different type of shock. ### Part to pay attention * There is a recess in the gear G34_P14_p1.STL. This recess is important so that the gear doesn't touch the outer ring of the bearing. I've had good result...
prusaprinters
etc. You can either print the individual 2 piece middle plate and bottom plate in clear, or print the one piece plate to about 4mm (at 0.2 layers that's at about layer 32) and switch to your filament from clear to a color like i did.Print as...
prusaprinters
Dune BuggyMain Color: Gold MH Build Series PLA Filament - 1.75mmContrast Color: Black MH Build Series ABS Filament - 1.75mmComplete Parts ListWheelso 4 – Black – Medium Wheel – MWo 2 – Black – Large Wheel – LWCubeso 2 – Gold –...
cgtrader
Update log Sprint 2021-12.03.2024 Supersprint since 12.03.2024 Update 27.03.2021: The Motor choice section in the manual was edited after testing more motors with the boat. Update 25.04.2021: A new folder Mods_for_M-Jet_Sprint was added to the...
prusaprinters
A layer height of 0.1 mm or less is recommended.Strong cooling may be required for the teeth.If possible, do not add a brim.Print the teeth last and don't mix them up! If possible keep them on the bed until...
thingiverse
Instructions To remove the Automated Robotic Rotary Digger and the Buggy from the print platform, cool the platform to room temperature, then reheat it. Wearing gloves to protect you from the heat, use a razor blade to remove the wheels from the...
thingiverse
Next, we do a PID tune because if we don't, the temperature will jump up and down more than we want because we've changed the heating and cooling properties with new heater and fan so it's no longer stable. After we've done the PID tune it will...
thingiverse
Next, we do a PID tune because if we don't, the temperature will jump up and down more than we want because we've changed the heating and cooling properties with new heater and fan so it's no longer stable. After we've done the PID tune it will...
prusaprinters
It was areally cool but challenging project for me. I learn a lot and I hope to be able to use this knowledge in future projects. I hope you enjoy this Instractable and have fun to build it. Let me know in the comments what you think or if you have...
thingiverse
Next, we do a PID tune because if we don't, the temperature will jump up and down more than we want because we've changed the heating and cooling properties with new heater and fan so it's no longer stable. After we've done the PID tune it will...
prusaprinters
A layer height of 0.15 mm or less is recommended.Strong cooling may be required for the teeth.If possible, do not add a brim.Print the teeth last and don't mix them up! If possible keep them on the bed until...
thingiverse
Next, we do a PID tune because if we don't, the temperature will jump up and down more than we want because we've changed the heating and cooling properties with new heater and fan so it's no longer stable. After we've done the PID tune it will...
prusaprinters
If the model is 33mm tall, then each part layer is 11mm tall and the pauses should be added at 11.2 and 22.2mm. In PrusaSlicer the pause action happens before the filament is extruded so adding a pause at 11mm would be off by one...
prusaprinters
As you approach that temperature, cooling efficiency is reduced, allowing more heat up past the heatbreak. This can cause low temperature filament to soften in the mechanism to cause feed problems. Therefore, for PETG filament, I set both enclosure...
thingiverse
Next, we do a PID tune because if we don't, the temperature will jump up and down more than we want because we've changed the heating and cooling properties with new heater and fan so it's no longer stable. After we've done the PID tune it will...
thingiverse
The next step was to design and 3D print a "Back" to protect the overall new "expanding" section to cover the exposed springs, and some handles and a screen wrapper to make it look more like a handheld and feel much more comfortable. It took a few...
thingiverse
For additional details, see the Using Fonts and Styles section on the following page: https://en.m.wikibooks.org/wiki/OpenSCAD_User_Manual/Text If OpenSCAD throws a CGAL error when rendering an ornament it can probably be solved by moving the name...
thingiverse
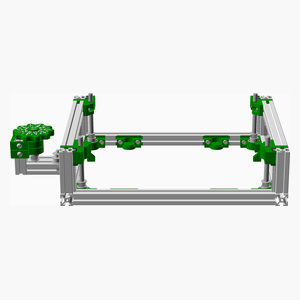 [Top](#TOP) --- ## DIYLB Beams To Bed Assembly ### Vitamins |Qty|Description| |---:|:----------|...
thingiverse
To set this property permanently for each boot add a file: sudo nano /usr/share/X11/xorg.conf.d/99-calibration.conf and add those lines: Section "InputClass" Identifier "calibration" MatchProduct "wch.cn USB2II_CTP_CONTROL" Option...
thingiverse
Common clefs Clef Name Note Note Location G-clef G4 on the line that passes through the curl of the clef C-clef C4 (Middle C) on the line that passes through the centre of the clef F-clef F3 on the line that passes between the two dots of the clef...