biqu b1 dual z 3d models
124659 3d models found related to biqu b1 dual z.
thingiverse
The wires should be long enough to keep the bluetooh remote controller on the desk when the print head goes (on Z -Axis) upto the height of the model printed (ie max 250mm for Ender 3). So approx. 40cm wire length will be sufficient). Optional: I...
cults3d
If your print volume is smaller, try to rotate them by the Z axis. They should fit a 200x200 mm buildplate when rotated so they are placed diagonally on the build plate. +++ Print settings +++ The relevant recommended print settings: 0.2mm layer...
thingiverse
In addition it contains two zip file containing the parts STL files used to build the combined ships and the Blender files used to create those parts: - ...
thingiverse
26.) Replace z-axis endstop screw. 26a.) Remove endstop screw, located on left gantry. 26b.) Put M4x50mm screw in place of original, using original spring. (You may need a washer, depending on what kind of screw you used. 26c.) Screw down...
prusaprinters
And focus on the size of the blocker as equal as in the pictures, the position XYZ set all to 0. Components list: Z steppers mounts, tension knobs, X-Y module's cable chain Assembly:Hex socket cylindrical head M3x6mm ...
prusaprinters
If you have the V6 Hemera you will need to firstly put all the rollers on and drill the holes with the x-carriage off the printer(step 4, 5, 7), then screw on the Hemera (step 6) and then slide this assembly onto the x-beam from the right by taking...
prusaprinters
You can probably scale the z axis to get the height you need. I printed with a 1mm brim to help them stick to the bed, then used a hobby knife to cut the brim off. I used PETG, but I suspect anything would work well enough.</p><p><strong>For the...
prusaprinters
if you have higher print, you will spend more time with printer ?? ...
prusaprinters
Has the same 240MHz dual-core.UK made or designed I think, so good doumentation.Button cover fell off..TinyS2 (esp32 S2):Very similar to TinyPico, but has a single 240MHz core. Slightly longer.<br>UK made or designed I think, so good...
prusaprinters
Has the same 240MHz dual-core.UK made or designed I think, so good doumentation.Button cover fell off..TinyS2 (esp32 S2):Very similar to TinyPico, but has a single 240MHz core. Slightly longer.<br>UK made or designed I think, so good...
thingiverse
Rosa multiflora is widely used as a dense hedge along the central reservation of dual-carriageway roads, such as parkways in the United States. In mild climates, more exotic flowering hedges are formed, using Ceanothus, Hibiscus, Camellia, orange...
prusaprinters
Looking at the failed print I had the idea to use single or dual layer prints as sails or blades for a DIY 3D-printed wind wheel. So after a few days of planning, designing and a little bit of trial and error, this is the design I came up...
prusaprinters
The wires should be long enough to keep the bluetooh remote controller on the desk when the print head goes (on Z -Axis) upto the height of the model printed (ie max 250mm for Ender 3). So approx. 40cm wire length will be sufficient).</p>...
sketchfab
In the Transform panel, click on the "Location" tab and set the X-coordinate to -50 mm, the Y-coordinate to 0 mm, and the Z-coordinate to 0 mm. Next, go to the Edit Mode and select all vertices by pressing Ctrl+A. Then, press F2 to open the Mesh tab...
thingiverse
2 #1 # # ## # ## # I' #1 # #03, 6) #0x # #01 # In [0 A #09 #0: ## # A_ - # #0. ## 0. The Astra,0x 03 ## 0. This ## 0. #07 (0x package_ package and 1 #06, 0x #08b 0x #02 using the end #2 package 0x The C++ #롤лове ersteھٹ Dopo DoposcriptstyleHECK...
thingiverse
(rotate 45 degrees in Z axis, enable supports)Cabinet_Light_Bar_Plug.stl is for plugging the two holes near the top left on the back of the cabinet. The original HF light is useless, and is generally replaced with LED lights or halogen bulbs. You'll...
prusaprinters
These are hosted externally.Ryobi to Makita Adapter:Wire Spool Holder:---------------------------------------------------------------------------------------------------------Edit: I guess I should have added some short instructions on how the gif's...
thingiverse
Thread the assembled carriage holders into the rails and rods of the Z-axis. 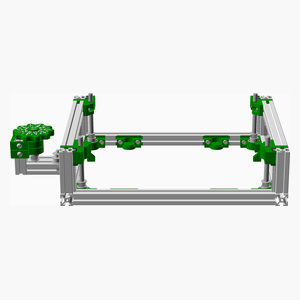 <span></span> ...
thingiverse
Dans le domaine de vol de l'avion, le turboréacteur est sollicité par des accélérations suivant l'axe longitudinal (X), qui ne fait pas l'objet d'une limitation particulière, et l'axe vertical (Z), pour lequel le motoriste impose une limitation en...
thingiverse
Este ejemplo asocia el código RF XXXXXX al registro 0 (movimiento de cabeza y sonido de R2D2) rf0 XXXXXX Estos son los registros disponibles: rf0 - Sonido R2D2 rf1 - Rueda Izquierda rf2 - Rueda derecha rf3 - Ambas ruedas rf4 - Melodía 1 rf5 -...
prusaprinters
If you have a more friction resilient plastic available this part especially will benefit from it.QualityRandomise the z-seam on the rollers, main drive axel and spindle, this helps prevent noise and vibration.Layer heightI printed the cam and tooth...
prusaprinters
You could also use a piece of Stripboard to just use oneground pin of the Raspberry Pi and connect all ground wires of the buttons just to this Stripboard.If you want to use the exact same configuration forRetrogame you can use the following...
prusaprinters
I found a lot of inspiration and I have remixed a lot of designs that I found online, but at the same time I designed a large portion of models, so I will try to provide as much references as possible in this description. My main goal with this...
prusaprinters
I recommend raising the Z-axis toward the top before starting this procedure so you have ample room to work.Remove the print fan (tuck it between the X-axis belt and bottom bar).Remove the SuperPINDA (lay it over the top X-axis bar or over the X-axis...
prusaprinters
There are three dual spool holders and one central support. All use the same 3 inch brackets with wood screws. Notice the brackets are offset so the screws from the opposite side do not touch each other. Cut your oak base board that is .75 inches...
prusaprinters
To tune the extrusion of the first layer to make it nicely continuous, you will need to tweak both the Flow and Live-Z settings.You can use the Customizable Bed Level Test to tune your settings before attempting to print the diffuser. Configure it to...
thingiverse
https://www.science.org/doi/10.1126/science.abd9149 [2] Z. Peng and J. Jimenez, “Exhaled CO₂ as a COVID-19 Infection Risk Proxy for Different Indoor Environments and Activities, ACS, 2021. https://pubs.acs.org/doi/10.1021/acs.estlett.1c00183 [3]...
thingiverse
Created McBIGface for those of you with Z axis build volume above 280 mm so you can print mid and front sections as one piece #jealouscat (note that this will result in a weaker motor mount as you will still need to balance weight considerations...
thingiverse
(ENT: "Rogue Planet") Lors de son 8ème anniversaire, son père lui offrit son premier livre d'astronomie "Le Cosmos de A à Z". Archer passa des heures à admirer la couverture qui présentait la Nébuleuse Arachnid. Quelques temps après, son père,...
thingiverse
Heute mal ein Video zum SpeedyBee Master 5 v2 Frame ich hoffe es gefällt euch😊Die verbauten Komponenten findet Ihr hier in der Beschreibung.Teileliste:Frame Kit SpeedyBee Master 5 v2:https://www.speedybee.com/speedybee-master-5-v2-frame/Empfohlener...