bearing drawer slides 3d models
191122 3d models found related to bearing drawer slides.
prusaprinters
It helps to center the column in the tool.The adapter plate should have supports to get the best surface for the locking clips to slide on. You can see my supports in one of the pictures.</p><p>The spring holders are glued in place. They can be moved...
prusaprinters
It helps to center the column in the tool.The adapter plate should have supports to get the best surface for the locking clips to slide on. You can see my supports in one of the pictures.The spring holders are glued in place. They can be moved to...
prusaprinters
To find out which gap width works best for your printer, follow this process:Print all test models: 5 male gap variants (0.00 | 0.05 | 0.10 | 0.15 | 0.20) + at least 1 female part.Try fitting each gap variant into its counterpart:Do they slide into...
cults3d
Included is pod bay model which features a sliding platform and translucent lighting fixtures for easy LED installation. The pod bay is designed to be assembled separately and then fitted inside the sphere. EVA Pod Model I used BouncyMonkey's EVA...
prusaprinters
I have included the parametric OpenSCAD files so that you can adjust the wheel diameter, width, tyre thickness and so on to suit your application. FeaturesSimple tread pattern provides good traction on most indoor surfacesHub designed for easy,...
prusaprinters
I found it easiest to set 3 of the same polarity (blue) then set the other 3 with the opposite polarity (red). Once all magnets are inserted, insert the Pusher into Top Jig to ensure free sliding movement. Tips:These can be relatively...
thingiverse
So the changing digits fade in and out, slide up or down and so on. I probably add more in the future. This is fun. The spacing dots between hours and minutes and minutes and seconds have their own animations, too. I also partly implemented an...
thingiverse
Fit the anchor to the shim first, then slide the combined pieces in place before you screw the shim in place. Filament guide with cable chain anchor If you're using the stock extruder setup and just want a place to anchor the cable chain, this is...
prusaprinters
This may be easier if you first detach one side of your beam from a side assembly, so you can temporarily remove your LR Core by sliding it off of the main beam.Attach the same X end stop switch (which is to become the new Y end stop switch) onto the...
thingiverse
* Booklet Divider: this (booklet-divider.stl) is a Quality-of-Life thing; just print it and slide it into the row of booklets to mark where you currently are in the progression so that it'll be easier to find the next booklet when you need it. *...
cults3d
One small advantage of leaving the sheet installed, is that it provides some friction, making it less easy for the glass to slide around than on the bare metal surface. ...However, it should be the brackets that keep your glass in place, not the...
prusaprinters
(not necessarily needed) Afterwarts slide the lithophanes into the corners and put on top of the base Zum Zusammenbauen wird die Lampenfassung in die Basis gesteckt und mit ihrer Kontermutter befestigt. Dann wird das Kabel durch den Sockel geführt,...
prusaprinters
So one of the compartments is rounded to make it easier to slide out those tiny little nuts. As with most of my designs, this is a huge print taking more than a day to print. What's the point of having an awesome 3D printer if all you do is print...
cults3d
Plug the USB DIY connector into the battery and slide it in, it will require a small amount of force to snap it into place. Then attach the base (may have to momentarily loosen the front and/or back) and screw everything together with the self...
prusaprinters
To add our finishing touches to the camshaft, we created camshaft caps, rings for the camshaft with a radius of 0.5 cm to prevent the camshaft from sliding out of place in the box. Finally, we made our final changes to the cams. After assembling...
prusaprinters
Before attaching the shoulder and hip pegs to the body, check that you can snap on the arms and legs.If the arms/legs are too tight to snap on: Either (1) file/sand down the inside of the sockets until they fit on, or (2) slide the ams/legs on from...
thingiverse
Be aware that if you use a smaller battery you may have to fill up the space a little bit to prevent the battery from sliding around, while a 503450 would fit just fine. Hyperion also supports various switch types. The case was originally...
prusaprinters
Be aware that if you use a smaller battery you may have to fill up the space a little bit to prevent the battery from sliding around, while a 503450 would fit just fine. <br> <br>Hyperion also supports various switch types. if you...
prusaprinters
Slide it in the slot between the two pieces and make sure both pieces still touch so you can have proper glue coverage. Give full coverage of the epoxy on all flat mating surfaces, enough to cause some squeeze-out (You'll sand that down later). Make...
prusaprinters
There is an internal voltage regulator but it will get quite hot with 12V and may shorten the lifespan of the arduino.I recommend using USB power (allows for easy reprogramming as a bonus) or a proper 5V supply.History and IssuesI am still working on...
prusaprinters
I recommend flexing it upwards slightly when sliding down a stack of tokens into it to get them in more easily. After that, they should be held pretty snugly but it shouldn't be difficult to get one or two tokens out at a time. Put the black hit...
myminifactory
Once it's sliding it a bit pull it out a bit and insert the female end of the connector to keep it rigid. Insert some hot glue into the XT90 hole then press the connector in. If it resists tug on the 14 gauge wire and use a hammer to tap it down till...
thingiverse
Sand it down as so it is as smooth as possible and can slide and rotate freely into the shaft within the Receiver. Once it is sufficiently smooth, glue the BoltExtractorArm into the small slot on the front of the Bolt. Next, take the LeverArm and...
thingiverse
A stake or length of rebar to pound in the ground and slide the PVC over. CA glue optional: RTV silicone sealant and hot glue Disassembly of stock flame light: Use a spudger or similar to pry the white globe off. It's held on by a spot of...
thingiverse
It can be attached to a drawer or cabinet door of your kitchen for easy access. Or mounting with self-tapping screws, for example, on a workbench in your garage. ... <hr> <p> </p> <h3>My some other things:</h3> <p><a title="Keychain"...
thingiverse
I have not found this size in the store.Since the seller did not specify the thickness of the large gear, it may be necessary to print a washer to fit between the gear and the thrust bearing. I also used a radial bearing from the HDD head, here, a...
prusaprinters
This is a redesign of markus_p's Mini FPV-Rover, modified to be controlled by a Raspberry Pi Zero W with camera, using the control software created by Wingman94 for it's ZeroBot Pro.Some changes from the original rover:Direct WiFi connection with the...
thingiverse
My some other things: <img src="http://things.ruvim.info/img/Disc-Sander-Duo.-D50mm,-D75mm.jpg" alt="Disc Sander Duo. D50mm, D75mm" title="Disc Sander Duo. D50mm, D75mm"></a> <a...
thingiverse
3DZ for Fusion 360 The main components you will need: Infrared ceramic heaters with dimensions 223x200mm and power up to 1000W 2pcs Infrared upper ceramic heater with dimensions 60x60mm for 250W Here you need to make a digression, I left the old...
thingiverse
Since these have no real load-bearing function, you can use the "worst" ones here. 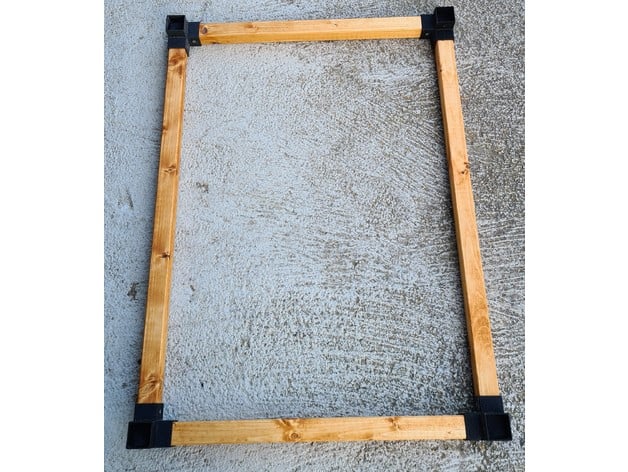 **Be careful when pushing the wood into...