appli tec 3d models
122094 3d models found related to appli tec.
myminifactory
At least two or three layers of Plastic PRIMER should be applied on the outside of the mask to reduce the possibility of entry of the virus, which can penetrate the plastic (PLA or PETG), lets dry 24 Hours. This is my first contribution against the...
thingiverse
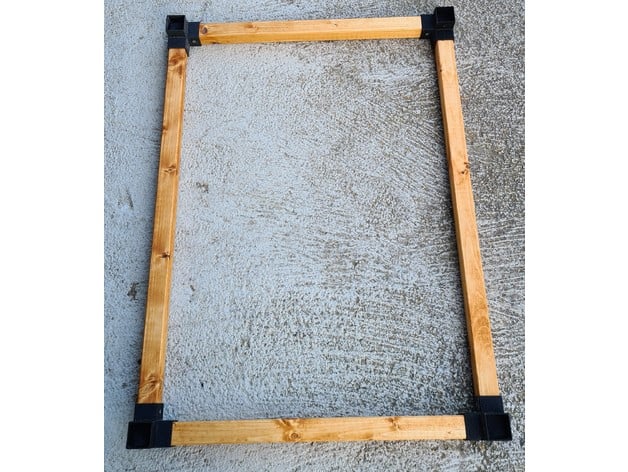 **Be careful when pushing the wood into the printed parts, if they become wedged, the printed part can break because you are...
thingiverse
Tighten the bolts quickly to apply clamping force before the glue cools. 1. Once the glue cools, trim any excess that may have squeezed out into the inlet hole. If there are any gaps, seal with more hotglue and trim flush. ## Separator...
thingiverse
Here are 2 ideal options: https://www.thingiverse.com/thing:4766416 or https://www.thingiverse.com/thing:4792529 2/ Remove old Bed by removing the leveling wheels 3/ Install Adhesive Thermal tape onto Heated Bed: a/ Clean the Aluminium plate with...
thingiverse
Apply power via the 2.1mm jack socket to ensure it works. If not, check your soldering. 1. Slot the Arduino Nano into the recess in the base. If desired you can secure it in place with a sticky pad or some hot glue. 1. Push the insert into place. ...
prusaprinters
The housing will click into place when it is fully inserted, and it should be flush against the door or mounting surface, and even with the back of the base that is touching that surface.Apply heavy duty adhesive backing to the backside (exposed...
prusaprinters
I also applied a dab of grease before final assembly. With the handles inserted into the frame stands, screw each wheel onto a handle; note the openings on the wheel must be oriented away from the frame. Tighten the handles firmly but be careful not...
prusaprinters
It is advisable to apply some lubricant for plastics between the gears.Step 7: Attach the Top Support to the Central Support Plus Final Details.To do this insert the center pencil through both bearings. Then, insert the bottom spacer and glue it...
prusaprinters
UHU Allzweckkleber)Tools: 1x cardboard cutter 1x straight cutting guide 1x hexagon spanner 1x 8mm wood drill + portable electric drillSteps of Assembly: 1) Print parts: 4x...
thingiverse
The document was made using an Anycubic i3 Mega S but, with modification, can be applied to any 3D printer that runs off 12 volts DC. If you choose to do this you take your fate into your own hands, don't complain that I broke your printer. ...
prusaprinters
Change the necessary values, save the file (CTRL + S), re-render the model (F6), and export it (F7).VariableNameExampleNotescolsColumns3Number of squares along the X axisrowsRows3Number of squares along the Y axissqTextText for Squares…Content for...
cults3d
At least two or three layers of Plastic PRIMER should be applied on the outside of the mask to reduce the possibility of entry of the virus, which can penetrate the plastic (PLA or PETG), lets dry 24 Hours. This is my first contribution against the...
cgtrader
During this period, wood clapboard siding was applied to the original adobe chapel walls as both a cosmetic and a protective measure; the veneer was later removed when the Mission was restored. During the 1906 San Francisco earthquake, the adjacent...
prusaprinters
The game is easy to print and printable in almost any printer bed size, from an Original Prusa Mini to a CR10 (or even bigger). The board, pawns, and the cover use neodymium magnets for a safe and precise fixation that allows playing even on a...
gambody
This applies to SLS/SLA 3D printers.The entire model was modeled in Autodesk Maya and ZBrush modeling programs. It is converted to STL file format. The files are checked and corrected in Netfabb and can be easily handled in any slicing program. For...
thingiverse
I used JB Weld Black Plastic Bonder and applied a small amount to hold the wires in place. When mounting the main Housing, be sure to slide it over both tabs on the fixed Locking Tab Plate. This will provide a secure three point mount with the...
cults3d
#Setting motor drive current #This needs to be done with power applied to the RAMPS board. #While this is typically only 12 volts you can cause damage by shorting things out. #Be careful what you stick where! The little thing in the...
thingiverse
Apply CA only on the deeper half of the Button insides, otherwise you are risking to glue it ALL together. 7. Unscrew assembled button caps. 8. Remove metal levers from KW10 micro switches (if they are present), then using M2 screws screw them...
thingiverse
You should be able to press down the lever and have it spring back. Alternatively, if youve printed the NonMagnetic parts, screw the M3x12 through the LockLever_NonMagnetic's top hole, then apply a bit of glue to the end of the screw once it comes...
thingiverse
Rather than sandwich the glass between the frame and the box as in v1, I changed the design to recess the glass and o-ring further into the frame and use a threaded insert to hold it together and apply pressure to seal the glass against the o-ring. ...
thingiverse
Apply some hot glue to the capacitor groove and seat the capacitor -- this will keep the radio module in place. 7. Run the radio ground wire, LED VCC, ground, and data wires through the wire hold-downs. Run the sensor and power lines through the...
prusaprinters
All the firmware instructions from above mentioned link still apply, while the BOM has changed slightly. First thing i wanted to tackle is the printability. While i do not have anything against printing with supports, i tend to avoid them...
prusaprinters
Apply glue of your choice (I use cyanoacrylate super glue) to the bottoms of the legs, and press into place inside the jig. Try not to let glue ooze out the outside of the legs to avoid gluing the jig to the stand. Leave the glue to set adequately...
grabcad
If the brakes opposite of the load brake the load will be applied to those arches, if they both brake the load is divided over the arches, if the side of the load brakes the arches on that side will carry an extra load. Some thought in making the...
prusaprinters
One thing I did to remedy this was to reduce the number of facets for the preview (currently there's no way to detect preview within OpenSCAD and apply different settings for preview and rendering, but something's on its way). So <strong>don't forget...
gambody
Using technique of creating “Polygonal Modeling” was applied a lot of work for make sure that you will enjoy quality of this model. The Raven flew through testing, modernization and time and come to Gambody Marketplace. Now it’s available for...
grabcad
Instead of using a combination of gases to produce light, light emitting diodes (LEDs) use semi-conductive materials that illuminate when electric current is applied and emit light. The LED assembly is mounted to the "tube" constructed from extruded...
prusaprinters
As such, you may wish to solder the wires to the Arduino Nano, such that the Arduino Nano's LEDs will be facing downwards. Solder the 2.1mm jack socket wires to the Arduino Nano's GND and VIN terminals accordingly. Apply power via the 2.1mm jack...
thingiverse
The same applies to the horizontal and vertical positions of the letters (`h_x`, `w_y`, etc). The strange adding and subtracting of magical numbers in the measurements is due to the way the walls were created with [openSCAD'S Minkowski...
prusaprinters
But almost as good is to just lie the cup on its side at the edge of a table and then put the stream&splash inside of it after glue applied, with the splash part hanging under the table. Let gravity do the work.</p> <p>It might be a good idea to...